
RTC and Bluetooth
1.RTC
1.1. RTC Overview
The full name of RTC is “Real-Time Clock”, which refers to a real-time clock chip. A real-time clock chip provides an external time read/write interface through pins and is usually powered by an independent battery. This ensures that even when the external system is powered off, the chip circuit continues to operate normally and keeps accurate time. Although different clock chips have different internal mechanisms, Linux system drivers encapsulate the operation details of different clock chips and provide applications with a unified time operation interface.
1.1.1 RTC Resources on the Development Board
EASY EAI Nano-TB does not include an RTC circuit by default. If you want the baseboard to support the RTC function, you can expand it by using our RTC module.
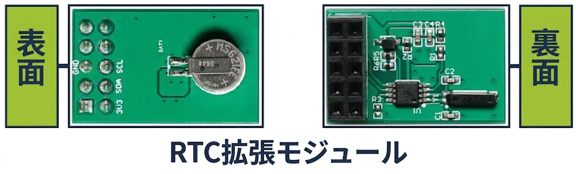
RTC resources on the development board
Specific steps for RTC expansion:
First, power off the baseboard, and insert the module into the 40PIN interface of the baseboard with the front side facing up. See the figure below for details.
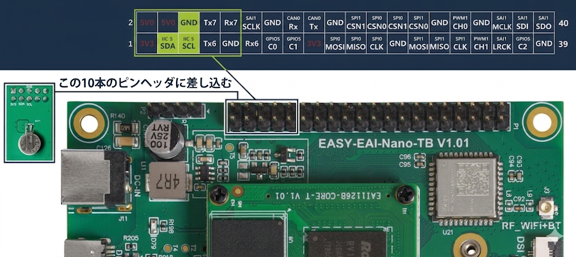
RTC resources on the development board
After inserting it firmly, power it on. Use the ls command to check whether the RTC chip is recognized by the system.
ls /dev/rtc\*
RTC resources on the development board
After confirming that the driver has loaded correctly, you can access the driver with the following command and read all information from the RTC chip.
cat /proc/driver/rtc
RTC resources on the development board
1.1.2 Reading and Writing RTC Time
Two clocks are involved here: the RTC chip clock and the system clock. The essence of manually managing the RTC clock is clock synchronization, either synchronizing the system clock to the RTC chip clock or synchronizing the RTC chip clock to the system clock.
System Clock:
The system clock is essentially a 64-bit integer. This integer represents the time difference from the current EpochTime in seconds and is called a timestamp. This clock is maintained by the timer of the CPU main chip, and the time information is lost when the CPU is powered off. The operating system clock command is date.
date # Query the system timedate -s "2023-09-20 11:18:00" # Change the system time💡 Note: Epoch Time refers to a specific time: 00:00:00 on January 1, 1970. If N seconds have elapsed since 00:00:00 on January 1, 1970, the time value in the Linux system is N.
RTC Chip Clock: This is the time maintained inside the RTC chip. After the system is powered off, it is powered by the battery. Therefore, even when the system is powered off, the RTC time continues to advance normally. The role of the RTC chip clock is to retain time information even when Linux is not running.
Synchronizing the Chip Clock to the System Clock:
sudo hwclock --hctosysSynchronize the system clock to the chip clock (or sudo hwclock -w)
sudo hwclock --systohcIf you do not want to synchronize it to the system clock and only want to query the RTC chip clock, use the following command.
sudo hwclock -r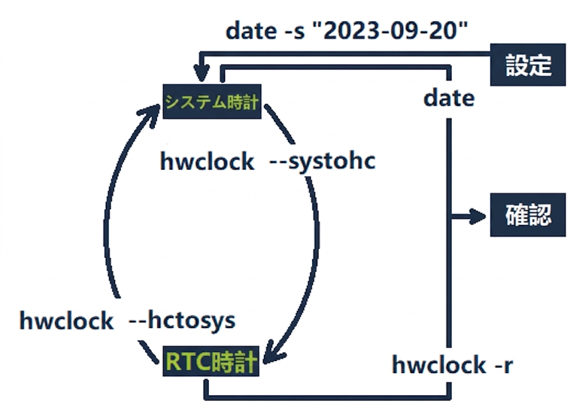
Synchronizing the chip clock to the system clock:
1.1.3 Reading and Writing the System Clock
This document focuses on the RTC clock.
1.1.4 Time Zone and Time Synchronization Service
-
Time Zone: Both the RTC clock and the system clock use UTC time. For time used in different regions, the effect of the time zone must be considered.
-
Time Synchronization Service: The RTC clock can not only be operated manually, but is also affected by time synchronization services.
1.2. Quick Start
1.2.1 Preparing the Development Environment
On the Ubuntu system on the PC side, run the run script to enter the EASY-EAI compilation environment. The details are as follows.
cd ~/develop_environment1.2.2 Downloading Source Code and Compiling the Sample
First, run the following commands in the background terminal of the virtual machine to create a management directory for the peripheral sample source code:
cd /optmkdir -p EASY-EAI-Nano-TB/demoDownload the sample program:
For example, download the sample program to “PC\D:”. This path is not mandatory; any location chosen by the user is acceptable.
Then copy the downloaded sample to the file system of the virtual machine. Refer to the figure below for the procedure.
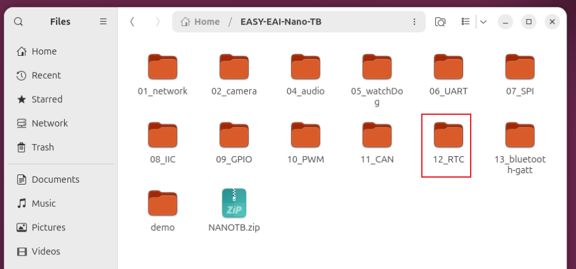
Downloading source code and compiling the sample
Finally, go to the directory of the corresponding sample and perform the compilation operation. The specific commands are as follows:
cd EASY-EAI-Nano-TB/demo/12_RTC./build.sh💡 Note: Since the dependent libraries are placed on the board, the /mnt mount must be kept during cross-compilation.
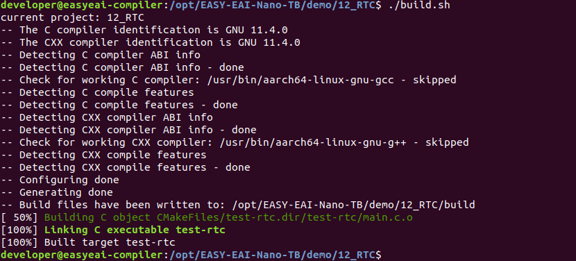
Downloading source code and compiling the sample
After the compilation succeeds, an executable program named test-rtc is generated in the Release directory and automatically placed in the /userdata/ directory on the development board.
1.2.3 Running the Sample
Access the board background through serial port debugging or SSH, and go to the directory where the sample is placed:
cd /userdata
Running the sample
Run the following command to start the sample.
sudo ./test-rtcThe execution result is as follows.
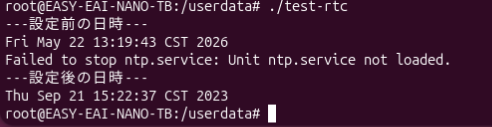
Running the sample
1.3. C Language Usage Example
This is a C language usage example for RTC. The code path is 12_RTC/test-rtc/main.c. Use it as a reference for coding. The following code shows the flow for reading and writing the RTC clock:
int main(int argc, char const *argv[]){    const char *strDateTime = "2023-09-21 15:22:37";
    // Convert the string to time information of the tm structure type    struct tm tm = {0};    strptime(strDateTime, "%Y-%m-%d %H:%M:%S", &tm);
    // Open the RTC device    int rtc_fd = open("/dev/rtc0", O_RDWR);    if (rtc_fd < 0) {        perror("open RTC device /dev/rtc0 faild.");        close(rtc_fd);        return -1;    }
    printf("---Date and time before parameter setting---\n");    system("date");
    /***  1. Stop the network time synchronization service ***/    system("systemctl stop ntp.service");
    /***  2. Write the preset time to the RTC clock ***/    struct rtc_time rtc_tm;    rtc_tm.tm_sec  = tm.tm_sec;    rtc_tm.tm_min  = tm.tm_min;    rtc_tm.tm_hour = tm.tm_hour;    rtc_tm.tm_mday = tm.tm_mday;    rtc_tm.tm_mon  = tm.tm_mon;    rtc_tm.tm_year = tm.tm_year;    if (ioctl(rtc_fd, RTC_SET_TIME, &rtc_tm) < 0) {        perror("set data time to rtc0");        perror("Failed to set RTC time");        close(rtc_fd);        return -1;    }
    /***  3. Synchronize the RTC clock to the system clock ***/    // Read the RTC clock parameters written earlier    if (ioctl(rtc_fd, RTC_RD_TIME, &rtc_tm) < 0) {        perror("Failed to read RTC time");        close(rtc_fd);        return -1;    }    close(rtc_fd);
    tm.tm_sec  = rtc_tm.tm_sec;    tm.tm_min  = rtc_tm.tm_min;    tm.tm_hour = rtc_tm.tm_hour;    tm.tm_mday = rtc_tm.tm_mday;    tm.tm_mon  = rtc_tm.tm_mon;    tm.tm_year = rtc_tm.tm_year;    struct timeval tv;    tv.tv_sec = mktime(&tm);    tv.tv_usec = 0;
    // Synchronize the time to the system clock    if(0 != settimeofday(&tv, (struct timezone *)0)){        perror("Failed to set system time");    }
    printf("---Date and time after parameter setting---\n");    system("date");
    return 0;
2.Bluetooth
2.1. Bluetooth Overview
In the Bluetooth protocol stack, two protocols are mainly used for Bluetooth data transmission: SPP (Classic Bluetooth Serial Port Protocol) and BLE (Bluetooth Low Energy Protocol).
-
Single-mode Bluetooth module: Supports only one of SPP or BLE.
-
Dual-mode Bluetooth module: Supports both SPP and BLE at the same time.
The Bluetooth module used by EASY-EAI-Nano-TB is DB37, which is a single-mode Bluetooth module that only supports the BLE protocol.
2.1.1 BlueZ
BlueZ is currently the most mature open-source Bluetooth protocol stack. It is an open-source project released under the GNU General Public License (GPL). It is the official Bluetooth protocol stack for Linux (it has been part of the Linux kernel since Linux 2.4.6) and is widely used in major Linux distributions. In other words, it is reasonable to understand “How do you use Bluetooth on Linux?” as “How do you use BlueZ?”.
Specifically, BlueZ is a toolset for processing the open-source Bluetooth protocol stack officially supported by Linux. It includes the following tools: bccmd, bluemoon, bluetoothctl, bluetoothd, btattach, btmon, ciptool, hciattach, hciconfig, hcidump, hcitool, hex2hcd, l2ping, l2test, mpris-proxy, rctest, rfcomm, sdptool.
2.1.2 Preparations
First, install BlueZ.
apt-get install bluezCheck whether BlueZ has been installed correctly:
bluetoothctl -vIf the version number is output as shown below, BlueZ has been installed correctly.

Preparations
You can use the hciconfig tool to check whether the Bluetooth device is operating correctly.
hciconfig -a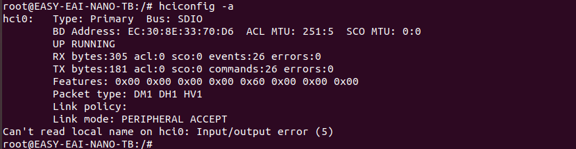
Preparations
2.2. Bluetooth Tools
hci*-series tools are generally used to directly operate the HCI layer of the Bluetooth protocol stack, but they are gradually no longer maintained in newer versions of the BlueZ toolset. Currently, the mainstream tools for operating Bluetooth devices are bluetoothd and bluetoothctl.
2.2.1 bluetoothd
This is an application-layer service used to manage Bluetooth drivers. Basically, it is enough to keep it running. Use the ps command to check whether it is running in the background:
sudo ps -ef \| grep -i bluetoothd
bluetoothd
In Ubuntu systems, you do not need to manually start or stop this process. bluetoothd is managed through the systemctl service. The commands for starting/stopping the bluetoothd service and checking its status are as follows:
sudo systemctl status bluetooth.service ## Check the status of the bluetoothd servicesudo systemctl start bluetooth.service ## Start the bluetoothd service (the state is not saved after restart)sudo systemctl stop bluetooth.service ## Stop the bluetoothd service (the state is not saved after restart)sudo systemctl enable bluetooth.service ## Enable the service (bluetoothd starts automatically after the device restarts)sudo systemctl disable bluetooth.service ## Disable the service (bluetoothd does not start automatically after the device restarts)2.2.2 bluetoothctl
This is a tool that communicates with bluetoothd through D-Bus and is equivalent to a client of the bluetoothd service. bluetoothctl indirectly operates Bluetooth hardware through bluetoothd. bluetoothctl has a built-in shell interaction function. If you run the bluetoothctl tool directly on the command line, you can enter the internal shell of this tool.

bluetoothctl
Enter help to view the commands supported by this tool.
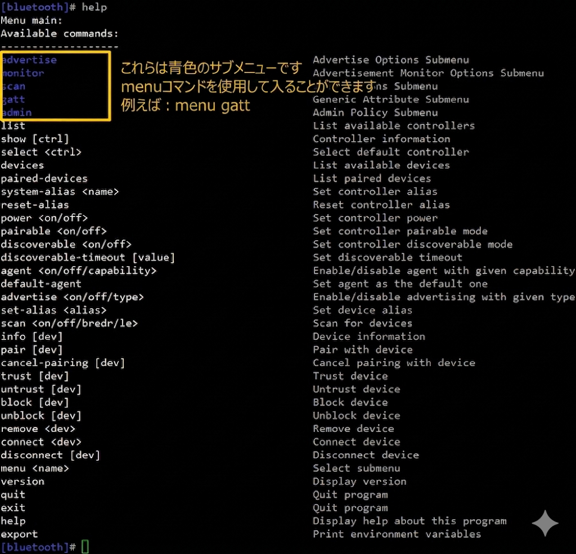
bluetoothctl
Command to Power On the Bluetooth Chip:
power on
Command to power on the Bluetooth chip:
Enter the advertise Submenu: Change the chip name so that it can be scanned and discovered by other Bluetooth masters (hosts).
menu advertisename EASY-EAI-Nano-TB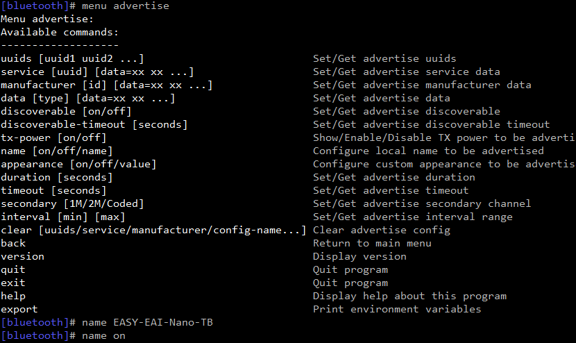
Enter the advertise submenu:
After that, return to the upper-level menu with the back command:
back2.3. BLE Protocol Communication
BLE (Bluetooth Low Energy) is based on GATT.
2.3.1 When the Development Board Is Used as the Master (Host)
First, set the Bluetooth debugging assistant app on the smartphone as the slave: enable slave mode and start advertising (broadcasting).
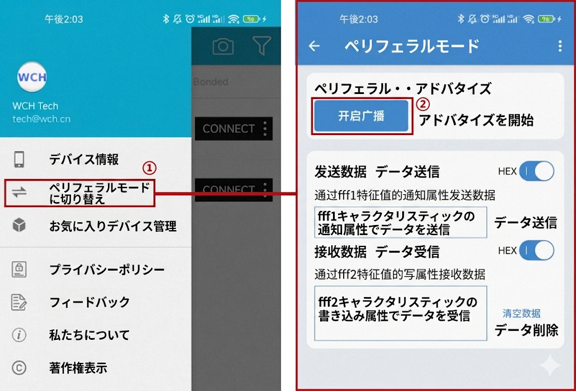
When the development board is used as the master (host)
Next, on the development board side (inside bluetoothctl), start scanning, stop scanning, and connect the device.
Start Scanning:
scan onStop scanning after the target device is found:
scan offList the scanned devices (find the MAC address):
devicesPair, trust, and connect to the target device:
pair xx:xx:xx:xx:xx:xxtrust xx:xx:xx:xx:xx:xxconnect xx:xx:xx:xx:xx:xxAfter the Bluetooth connection succeeds, enter the gatt submenu on the Bluetooth master (development board):
menu gattCheck characteristic attributes:
list-attributes(From the BLE debugging assistant app, you can see that fff1 is used for slave transmission, and fff2 is used for slave reception.)
The characteristic attribute for slave transmission is as follows:
Characteristic (Handle 0x0000) /org/bluez/hci0/dev_78_C3_C4_C4_94_8D/service002f/char0030 0000fff1-0000-1000-8000-00805f9b34fb UnknownThe characteristic attribute for slave reception is as follows:
Characteristic (Handle 0x0000) /org/bluez/hci0/dev_78_C3_C4_C4_94_8D/service002f/char0034 0000fff2-0000-1000-8000-00805f9b34fb Unknown2.3.1.1 Master Receiving, Slave Sending
First, select fff1.
select-attribute /org/bluez/hci0/dev_78_C3_C4_C4_94_8D/service002f/char0030Next, turn on notifications (notify).
notify on
Master receiving, slave sending
Then operate the app to send 1 Byte of Hex data to the development board.
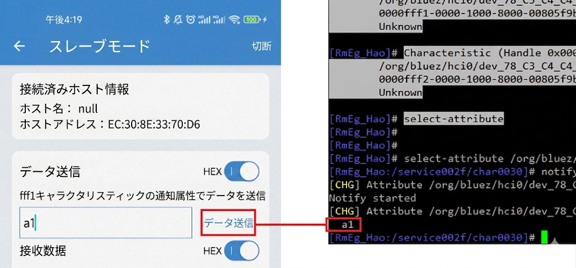 )
)
Master receiving, slave sending
2.3.1.2 Master Sending, Slave Receiving
Change the selected attribute to fff2.
select-attribute /org/bluez/hci0/dev_78_C3_C4_C4_94_8D/service002f/char0034Then perform the write operation.
write 0x67Finally, the data sent from the development board can be received in the app.
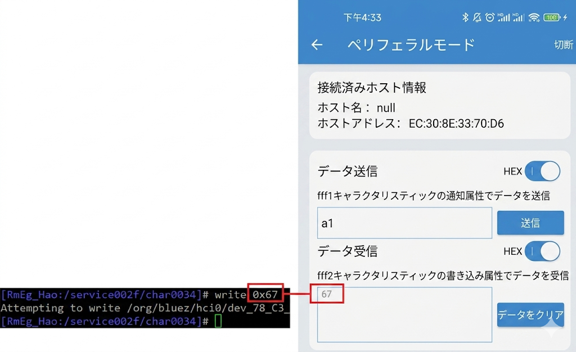
Master sending, slave receiving
2.3.2 When the Development Board Is Used as the Slave
Download the sample program:
For example, download the sample program to “PC\D:”. This path is not mandatory; any location chosen by the user is acceptable.
Then transfer the bluetooth-gatt folder to the development board, open a new terminal on the development board, and compile and run the gatt-server service, which is the application used to communicate with the master.
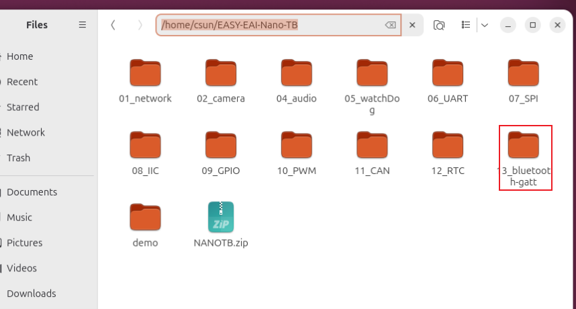
When the development board is used as the slave

When the development board is used as the slave
Return to bluetoothctl again and run the following command to start Bluetooth advertising:
advertise on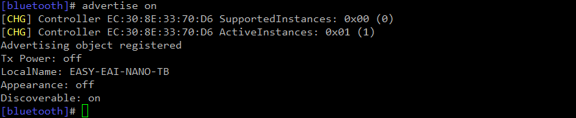
When the development board is used as the slave
Use the BLE debugging assistant app to scan for and connect to the Bluetooth of the development board.
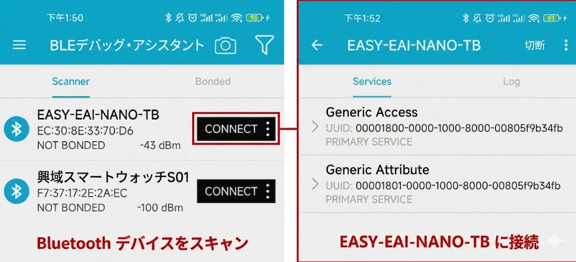
When the development board is used as the slave
2.3.2.1 Master Receiving, Slave Sending
Read the data from the development board using the BLE debugging assistant app.
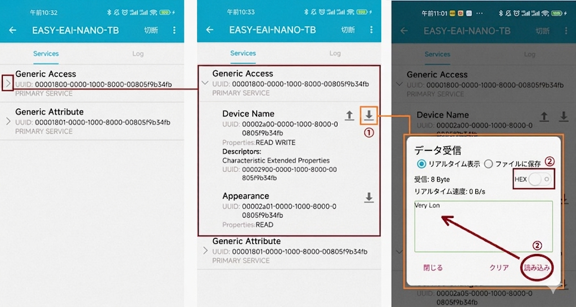
Master receiving, slave sending
After performing the above operation, the following information is output in gatt-server on the development board:

Master receiving, slave sending
2.3.2.2 Master Sending, Slave Receiving
Send data to the development board from the BLE debugging assistant app.
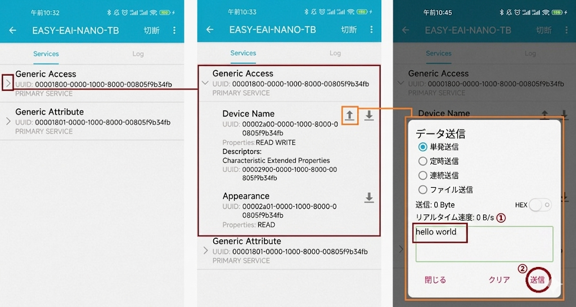
Master sending, slave receiving
The gatt-server on the development board receives the following information:

Master sending, slave receiving