
Embedded Low-Level Development Manual
1. Development Overview
1.1. Overview of Embedded Low-Level Development
Embedded low-level development generally refers to the development of U-Boot, Kernel, and Rootfs.
-
U-Boot: (Universal Boot Loader) is a bootloader program mainly used in embedded systems (Kernel). It supports various computer architectures such as ARM, AVR32, x86, and Nios. It is an open-source project licensed under the GPL.
-
Kernel: The Linux kernel is a POSIX-compliant Unix-like operating system written in C. It implements multi-process management and scheduling through time-division multiplexing of CPU resources, and manages and schedules resources such as memory and disks through various submodules. It also implements interaction between peripherals and the Linux system by writing device drivers for various peripherals and modifying the device tree. In practice, most embedded kernel development work involves adding, removing, or modifying peripheral resources, usually through “device driver development” and “device tree modification.”
-
Rootfs: (Root file system) is the first file system mounted when the kernel starts. A file system is a mechanism for organizing and managing data and metadata on a storage device. This mechanism facilitates interaction between the user and the operating system.
1.2. Overview of EAI UbuntuSDK
EAI UbuntuSDK is a system specially optimized and adapted by the EASY-EAI team for embedded systems based on Ubuntu. Compared with traditional embedded SDKs, it has the following features:
-
Supports fast boot: Common applications can run in only 6 to 7 seconds after power-on, and second-level fast boot is also supported.
-
Inherits an excellent ecosystem: It inherits the advantages of traditional Ubuntu systems, such as easy installation of dependency libraries and a powerful software ecosystem, allowing ROS2 and Python libraries to be deployed quickly.
-
High file-system reliability: RamDisk is supported. It can automatically repair bad blocks in the file system and prevent file-system boot failures caused by disk abnormalities or power loss.
-
High system-initialization reliability: An external watchdog (1.6 seconds) is supported by default to prevent U-Boot or Kernel initialization failures caused by any abnormal condition. (User applications should call the watchdog built into the chip to protect the application.)
-
Easy low-level development: There is no need to study the massive Buildroot SDK code. You only need to modify the kernel and device tree.
-
Highly efficient low-level development: A complete build of a common SDK takes only about 15 minutes, while a traditional Buildroot SDK takes about 90 minutes. (Comparison on a PC with equivalent performance: CPU @ 4.2 GHz, 12 cores and 24 threads.)
-
Supports one-click Rootfs export: Libraries installed by the user on the development board and user-developed applications can be exported with one click over Ethernet, making it easy to output a mass-production image.
-
Supports online software-library upgrades: By simply running sudo apt-get upgrade, low-level-related dependency libraries (such as rkaiq, rga, and gstreamer) can be synchronized and updated from the dedicated server (os.easy-eai.com), enabling timely fixes for chip-vendor bugs.
-
Highly efficient application development: Local compilation on the development board and online cross-compilation are supported. During online cross-compilation, application dependency libraries directly depend on the board’s file system. This avoids library compatibility issues while taking advantage of the PC’s compilation performance and source-code editor.
-
Supports OTA solutions: This helps avoid mass-production incidents caused by software and enables iterative updates of applications and the system.
-
Supports the A/B partition scheme: It provides very high system reliability, but consumes more storage space.
-
Flexible UI interaction options: Desktop systems and browser installation are supported, allowing users to develop their own UI interfaces using various technical approaches. (They are not preinstalled or running by default, so they do not consume system resources.)
-
Improved software-deployment flexibility: Docker deployment is supported.
1.3. EAI UbuntuSDK Development Flow
Overview of the firmware development flow:
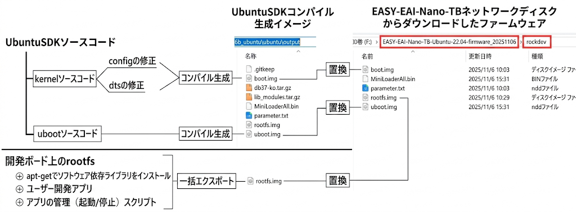
EAI UbuntuSDK Development Flow Figure 1
-
【uboot.img】 Usually compiled and generated from the UbuntuSDK source code. In 99% of cases, it does not need to be modified or replaced.
-
【boot.img】 This is the kernel image. It is also usually generated from the UbuntuSDK source code, but users can modify it freely.
-
【rootfs.img】 This is the file-system image. It is usually obtained by “fully exporting it from the development board” and is then used to replace rootfs.img in the firmware.
2. Obtaining the Source Code
2.1. Obtaining the Source Code
The RV1126B Ubuntu system SDK is optimized and ported based on Ubuntu 22.04, so compilation and development in an Ubuntu 22.04 environment (such as the EASY-EAI compilation environment) are also recommended.
2.1.1 Preparing the Development Environment
If you need to use the EASY-EAI compilation environment, read “Getting Started/Preparing the Development Environment/Preparing and Updating the Easy-Eai Compilation Environment” and follow the related steps to set up the compilation environment.
On the PC-side Ubuntu system, run the run script to enter the EASY-EAI compilation environment. Details are as follows.
cd ~/develop_environment./run.sh 2204Install compilation auxiliary tools:
sudo apt-get update && sudo apt-get install file2.1.2 Obtaining the Source Code (Pull)
Go to the /opt directory and create the rv1126b_sdk directory:
mkdir /opt/rv1126b_sdkcd /opt/rv1126b_sdk
2 Obtaining the Source Code (Pull) Figure 3
https://dl.dragonwake.com/download/rv1126b/embedded/RV1126SDK/ubuntu.tar.gz Download the ubuntu.tar.gz archive from the link above, upload it to the /opt/EASY-EAI-Toolkit directory in the virtual machine, and extract it.
2.2. Source-Code Compilation Guide
After entering the source-code directory, you can see the following contents (refer to the figure in the original document).
2.2.1 Checking the Configuration Files
The first step in compilation is preloading the board configuration.

1 Checking the Configuration Files Figure 5
When you check the configs directory, you can find configuration files that correspond to various boards.
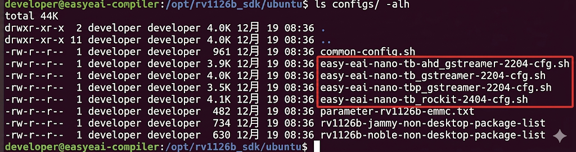
1 Checking the Configuration Files Figure 6
Here, select 【easy-eai-nano-tb-gstreamer-2204-cfg.sh】.
./build.sh configs/easy-eai-nano-tb-gstreamer-2204-cfg.sh2.2.2 Compilation Description
After the configuration file is loaded, run build.sh again to display each module that can be compiled.

2 Compilation Description Figure 7
-
all: Compiles the entire firmware.
-
uboot: Compiles and generates only the U-Boot image (uboot.img).
-
kernel: Compiles and generates only the kernel image (boot.img).
-
rootfs: Compiles and generates only the Ubuntu file-system image (rootfs.img).
Usually, select ./build.sh all for the first compilation.
./build.sh all
2 Compilation Description Figure 8
When the interactive prompt appears, press the 【Enter key】 to confirm execution. The script will then automatically obtain the source code of 【each image module】 from the server and start 【image compilation and building】.
*Note: When compiling the 【kernel】, there is a step that checks the timestamps of disk files. If /mnt is disconnected at this time, the process will stop because of the NFS infinite timeout. The solution is to first press Ctrl+C to stop compilation, then use sudo umount -f /mnt to unmount this directory, and then compile again.
2.3. Brief Description of Directories
2.3.1 Firmware Output Directory
After compilation is complete, the firmware is output to the 【output】 directory.
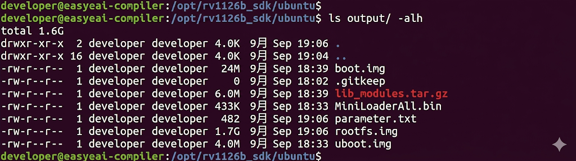
1 Firmware Output Directory Figure 9
Simply replace the corresponding files in the firmware with the generated boot.img, MiniLoaderAll.bin, parameter.txt, rootfs.img, and uboot.img.
2.3.2 uboot
The directory where the U-Boot source code is stored is u-boot.

2 uboot Figure 10
After modifying U-Boot, if you need to recompile U-Boot, do not return to the parent directory and run ./build.sh uboot. Instead, run the following command inside the u-boot directory:
./make.sh2.3.3 kernel
The directory where the kernel release source code is stored is kernel.

3 kernel Figure 11
It is not recommended to modify the source code directly inside the kernel directory. When recompiling the entire firmware, the kernel directory will be completely deleted and fetched again from the configured remote server to ensure consistency of the 【entire firmware】.
2.3.4 rootfs
Creating rootfs.img for the Ubuntu system is slightly more complex and involves three directories: configs, hooks, and overlay.

4 rootfs Figure 12
3. kernel
3.1. Preparing the Environment and Obtaining the Source Code
3.1.1 Downloading and Placing the Flashing Tool
Link:
Place the downloaded flashing tool anywhere in the virtual machine (for example: ~/rv1126b_sdk).
Next, go to the directory where the tool is stored (for example: ~/rv1126b_sdk) and grant execution permission.
cd ~/rv1126b_sdk/chmod 777 upgrade_toolThen move the tool to the /usr/bin directory of the virtual machine.
sudo mv upgrade_tool /usr/bin
1 Downloading and Placing the Flashing Tool Figure 13
Finally, restart the terminal for the tool to take effect. (Note: this tool only needs to be placed once in the virtual-machine environment and does not need to be repeated in subsequent operations.)
3.1.2 Preparing the Development Environment
On the PC-side Ubuntu system, run the run script to enter the EASY-EAI compilation environment. Details are as follows.
cd ~/develop_environment./run.sh3.1.3 Obtaining the Source Code
3.1.4 Creating a Directory for Kernel Development
After the first SDK compilation is complete, run the following command to copy the kernel repository.
cp kernel -r kernel_dev
4 Creating a Directory for Kernel Development Figure 14
Enter the kernel_dev directory and create a branch for managing the user’s custom code.
cd kernel_dev/3.2. Kernel Usage Guide
3.2.1 Compilation Configuration Description
Return to the SDK root directory and edit the board compilation configuration file.
cd /opt/rv1126b_sdk/ubuntuvim configs/easy-eai-nano-tb-cfg.sh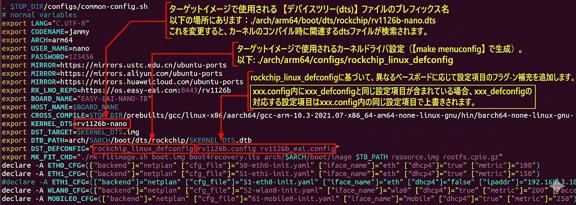
1 Compilation Configuration Description Figure 15
-
Kernel driver configuration files are located in the following directory: /opt/rv1126b_sdk/ubuntu/kernel_dev/arch/arm64/configs/
-
Device tree files (dts) are located in the following directory: /opt/rv1126b_sdk/ubuntu/kernel_dev/arch/arm64/boot/dts/rockchip/
3.2.2 Compiling the Kernel
In the SDK root directory (/opt/rv1126b_sdk/ubuntu/), run the following command to switch the kernel compilation target directory from “kernel” to “kernel_dev”.
export KERNEL_DEVELOP=kernel_dev-
This environment variable is valid only in the 【current terminal window】 of the 【current environment】. If you open a new terminal window, the default “kernel” directory will be restored as the compilation target.
-
You can also add this command to the .config file to keep it always enabled, but remember to comment it out when it is no longer needed.
Run the build kernel command again.
./build.sh kernel
2 Compiling the Kernel Figure 16
Press the 【Enter key】 to confirm that the compilation target is the kernel source. When you try to compile a kernel source “other than the kernel directory,” a prompt similar to “Is the kernel directory to be compiled /opt/xxx/xxx/kernel_dev?” will appear. Press the 【Enter key】 again to reconfirm, and compilation will be executed.
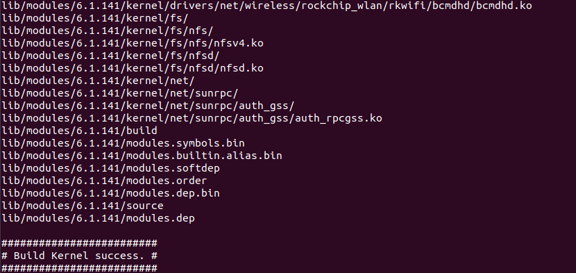
2 Compiling the Kernel Figure 17
💡 Note: During kernel compilation, there is a step that checks the timestamps of disk files. If /mnt is disconnected at this point, the process will stop because of the NFS infinite timeout. Solution: first press Ctrl+C to force-stop compilation, run sudo umount -f /mnt to unmount the directory, and then compile again.
3.2.3 Compiling the Wi-Fi Driver
If you make significant changes to the kernel’s 【driver configuration】 or 【device tree configuration】, the symbol table of the kernel drivers may change. If the symbol table of the Wi-Fi driver loaded on rootfs is not updated, symbol conflicts may cause the Wi-Fi driver to fail to load. Solution: after compiling the kernel source, compile the Wi-Fi driver again.
In the ubuntu directory, run the following command to compile the Wi-Fi driver.
./hooks/hook-none-install-wifibt-db37.sh💡 Note: This command depends on rootfs, so you must run ./build.sh all or ./build.sh rootfs before executing it.

3 Compiling the Wi-Fi Driver Figure 18

3 Compiling the Wi-Fi Driver Figure 19
3.2.4 Compilation Result Description
After compilation is complete, the following three files in the output directory will be updated.
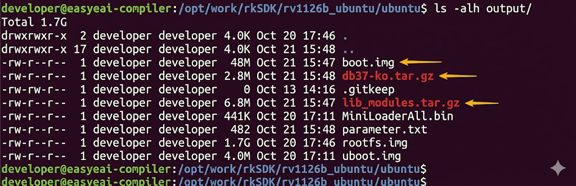
4 Compilation Result Description Figure 20
-
boot.img: Kernel image file (Rockchip’s U-Boot image is called uboot.img).
-
db37-ko.tar.gz: Wi-Fi/Bluetooth driver and related configuration (Wi-Fi driver compilation is special and must be generated separately).
-
lib_modules.tar.gz: Drivers that need to be loaded during the rootfs stage (for example, drivers whose CONFIG setting is =m).
※If there are many changes to dts or driver settings and the driver symbol table has changed, lib_modules.tar.gz and db37-ko.tar.gz must be extracted and placed into rootfs.
3.3. Updating the Kernel
After kernel compilation is complete, press the shortcut key 【Ctrl+Shift+T】 to open a new terminal window.

Updating the Kernel Figure 21
Go to the output directory where the kernel was compiled earlier.
cd ~/rv1126b_sdk/ubuntu/output
Updating the Kernel Figure 22
Next, open a third terminal window.

Updating the Kernel Figure 23
3.3.1 Updating db37-ko.tar.gz
Return to the 【second window】 and use the adb command to push db37-ko.tar.gz to the board.
adb push db37-ko.tar.gz /userdata
1 Updating db37-ko.tar.gz Figure 24
Move to the 【third window】 and extract db37-ko.tar.gz.
tar -xvf /userdata/db37-ko.tar.gz -C / && sync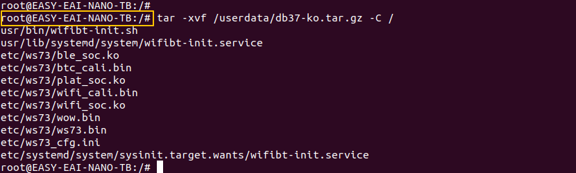
1 Updating db37-ko.tar.gz Figure 25
3.3.2 Updating lib_modules.tar.gz
Return to the 【second window】 and use the adb command to push lib_modules.tar.gz to the board.
adb push lib_modules.tar.gz /userdata
2 Updating lib_modules.tar.gz Figure 26
Move to the 【third window】 and extract lib_modules.tar.gz to /usr.
cd /userdatatar -xvf lib_modules.tar.gz -C /usr && sync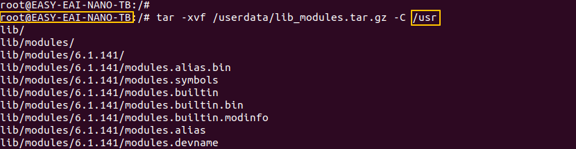
2 Updating lib_modules.tar.gz Figure 27
3.3.3 Updating boot.img
On the 【development board (third window)】, run the command to 【reboot into loader mode】.
reboot loader- If you cannot enter loader mode using this method, you can also use the hardware button to enter it. (Refer to “Firmware Flashing and Updating” ==2.1-Manually Entering Loader Mode==.)
Return to the 【second window】 and run the following command to update kernel.img to the development board.
sudo upgrade_tool di -boot boot.img
3 Updating boot.img Figure 28
If “Download image ok.” is displayed, kernel flashing has succeeded. Run the following command or press the 【RST button】 to restart the device.
sudo upgrade_tool rd※If an error is displayed, the board may be in MASKROM mode. In that case, you need to use the firmware from Baidu Netdisk to flash MiniLoaderall.bin again.

3 Updating boot.img Figure 29
In addition to the method above, boot.img can also be updated using the 【firmware flashing tool】. The specific procedure is to copy the boot.img generated by compilation, overwrite the boot.img in your local 【firmware folder】, and then use the flashing tool to flash it to the development board.
3.4. Changing Kernel Configuration
When ./build.sh all or ./build.sh kernel is executed in the ubuntu directory, a .config file is generated in the corresponding kernel directory (kernel or kernel_dev).

Changing Kernel Configuration Figure 30
Use the following command to specify the platform environment variable as arm64.
export ARCH=arm64- Pay special attention that this environment variable is lost when you open a new terminal or re-enter the compilation environment.
Next, run make menuconfig to open the kernel configuration menu.
make menuconfig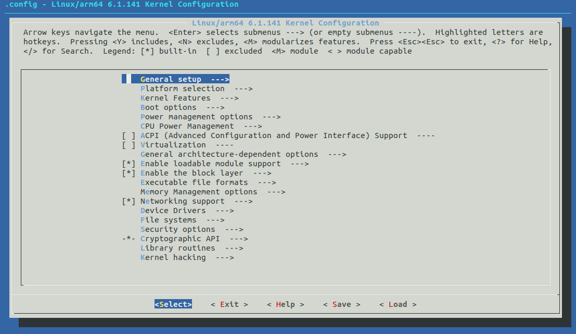
Changing Kernel Configuration Figure 31
- The menuconfig here is used only for “searching” kernel configuration items. If you are not familiar with kernel compilation operations, directly changing settings in menuconfig is not recommended.
Press the 【/】 key on the keyboard to display the search menu, and enter the driver configuration you want to find (for example: CH343).
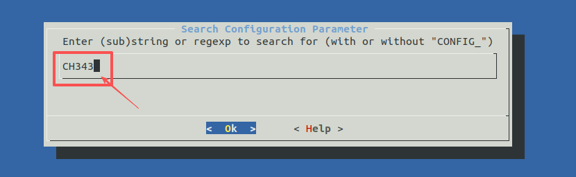
Changing Kernel Configuration Figure 32
Press the 【Enter key】 to select it, and the corresponding menu will be displayed.
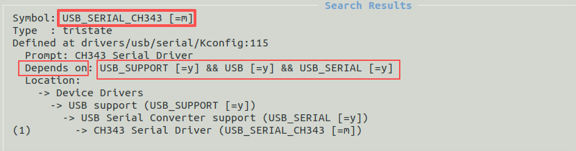
Changing Kernel Configuration Figure 33
-
【Symbol】 is the driver currently required (for example: USB_SERIAL_CH343).
-
【Depends on】 indicates the prerequisite drivers that this driver depends on (for example: USB_SUPPORT, USB, USB_SERIAL).
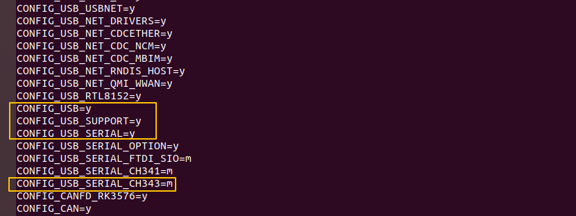
Changing Kernel Configuration Figure 34
Add the “CONFIG_” prefix to these items and append them directly to rv1126b_eai.config to complete the configuration.
(At this point, the complete kernel development flow has been explained. If there are no other requirements, you do not need to read the following content.)
3.5.==== Supplementary Notes ====
3.5.1 About menuconfig
If you directly use menuconfig to configure the kernel, you cannot compile the kernel using ./build.sh kernel in the ubuntu directory. You need to go directly to the kernel source-code directory and compile manually. The steps are as follows:
cd kernel_dev # Go to the kernel source directoryexport ARCH=arm64 # Set the platform to arm64 (note: this will be reset when a new terminal is opened)make rockchip_linux_defconfig rv1126b.config rv1126b_eai.config # Use these configuration files to generate .configmake savedefconfig # Save .config as defconfig (backup)cp defconfig mydefconfig # Copy defconfig to prevent lossIn this state, you can run make menuconfig to modify .config.
make menuconfigAfter configuration is complete, use the following commands to compile the kernel manually:
make rv1126b-nano.img -j8 # Compile the kernel driver using rv1126b-nano.dts as the root device tree# Compile the drivers that need to be loaded on rootfs and package them into lib_modules.tar.gzmake modules -j8make modules_install INSTALL_MOD_PATH=/tmpcd /tmp/tar czvf /tmp/lib_modules.tar.gz libcd -# Bring lib_modules.tar.gz to the current directory (it is okay even if you do not copy it)mv /tmp/lib_modules.tar.gz ./# Finally, package the ramdisk with the emmc partition repair function into boot.img./mk-fitimage.sh boot.img boot4recovery.its arch/$ARCH/boot/Image$DTB_PATH resource.img rootfs.cpio.gzAfter completing the manual operations above, refer to 2.3 Compiling the Wi-Fi Driver in this article to update db37-ko.tar.gz.
After debugging all functions and when you need to 【archive and release】, run make savedefconfig to export the current .config as defconfig. Compare it with the previous mydefconfig, manually append the differences to rv1126b_eai.config, and save the file.
4. Exporting the Development Board rootfs
4.1. Preparations Before Export
4.1.1 Entering the EASY-EAI Compilation Environment
On the PC-side Ubuntu system, run the run script to enter the EASY-EAI compilation environment. Details are as follows.
cd ~/develop_environment./run.shNote: If you do not know how to enter or use the EASY-EAI compilation environment, first read “Getting Started/Preparing the Development Environment/Preparing and Updating the Easy-Eai Compilation Environment” and follow the steps to set up the compilation environment.
4.1.2 Mounting the Development Board
Next, confirm through serial debugging that the board’s IP address is 192.168.3.121 (the mount parameters must be changed according to your actual environment), and mount the development board to the /mnt directory, as shown below.
sudo mount -t nfs -o nolock 192.168.3.121:/ /mnt
2 Mounting the Development Board Figure 35
4.2. Export Operation
Directly run the following export command at 【any location】 in the EASY-EAI compilation environment (using /opt/rv1126b_sdk as an example), and the file system of the development board will be exported as rootfs.img.
export_rootfs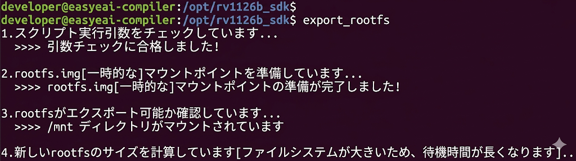
Export Operation Figure 36
- ※The waiting time required for this operation is about 1 minute for 2 GB.
A prompt indicating successful export will be displayed.
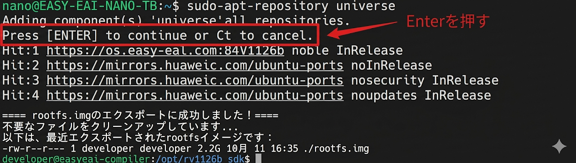
Export Operation Figure 37
Check the generated rootfs.img. By default, it is exported to the 【directory where the command was executed】.

Export Operation Figure 38
Finally, replace rootfs.img in the 【standard firmware】 with this rootfs.img so it can be used for mass-production firmware flashing.
4.3. Export Description
The /export_rootfs export script can also specify the output directory of rootfs.img by passing an argument, as shown below.
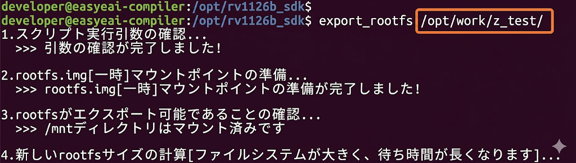
Export Description Figure 39
In this case, rootfs.img is exported to the /opt/work/z_test/ directory.
4.3.1 Notes
-
The directory passed as an argument must 【already exist】.
-
The export destination directory must have 【write permission】.
-
The free disk space of the export destination must be larger than the size required by the new rootfs.img.
-
The /mnt mount must not be disconnected while export is running.