
Human Keypoint Recognition
Revision History
| NO | Version | Description | Date |
|---|---|---|---|
| 1 | Ver1.0 | Initial creation | 2026/06/29 |
The information in this document may be changed without prior notice for the purpose of improving the document. Please refer to our website for the latest version.
Reproduction in any form without the written permission of Nissho Technology Co., Ltd. is strictly prohibited.
1. Human Keypoint RecognitionOverview
Human keypoint recognition is a model that performs person position detection and pose estimation based on deep learning. It is widely used in fields such as sports analysis, animal behavior monitoring, and robotics, and is used to help machines understand physical actions in real time. This algorithm provides high execution efficiency and excellent real-time performance.
The performance of this algorithm on the dataset is as follows:
| Human Keypoint Recognition Algorithm | mAP pose@0.5 |
| Person Pose-S | 86.3 |
| Person Pose-M | 89.3 |
The execution efficiency on the CSUN RV1126B board is as follows:
| Algorithm Type | Execution Efficiency |
| Person Pose-S | 59ms |
| Person Pose-M | 108ms |
Definition of the 17 human keypoint indexes:
| Index | Definition |
| 0 | Nose |
| 1 | Left Eye |
| 2 | Right Eye |
| 3 | Left Ear |
| 4 | Right Ear |
| 5 | Left Shoulder |
| 6 | Right Shoulder |
| 7 | Left Elbow |
| 8 | Right Elbow |
| 9 | Left Wrist |
| 10 | Right Wrist |
| 11 | Left Hip |
| 12 | Right Hip |
| 13 | Left Knee |
| 14 | Right Knee |
| 15 | Left Ankle |
| 16 | Right Ankle |
2. Quick Start
2.1 Preparing the Development Environment
If you are reading this document for the first time, refer to Getting Started / Preparing and Updating the Development Compilation Environment, and deploy the compilation environment according to the related steps.
On the Ubuntu system on the PC side, run the run script to enter the Docker development environment. The steps are as follows:
cd ~/linuxshare/work/rv1126b/jp/embedded/images/develop_environment./run.sh 2204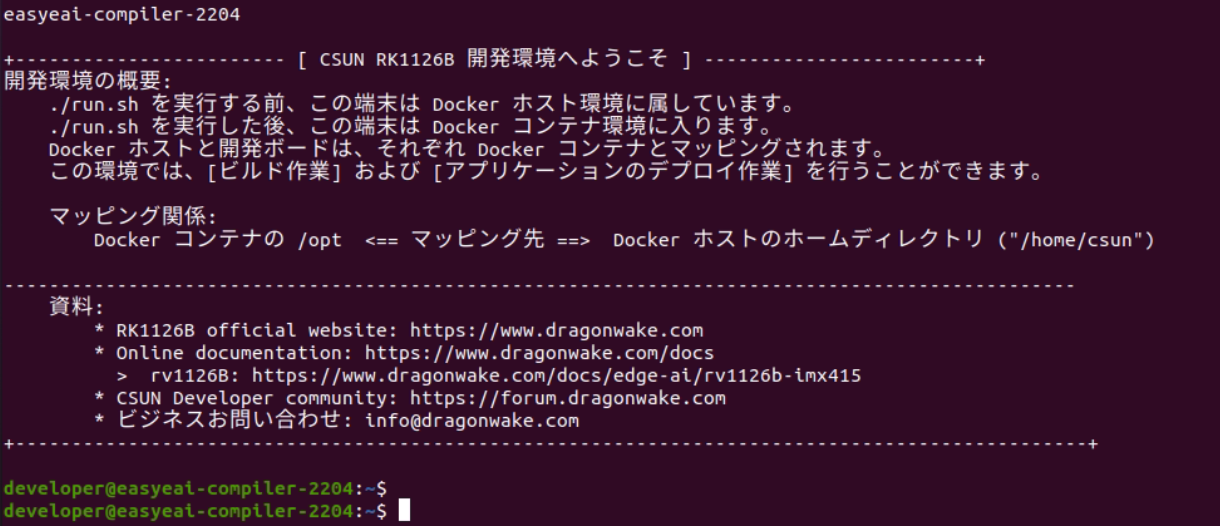
Figure 2-1 Starting the Docker Development Environment
2.2 Downloading the Source Code
In the Docker development environment, create a management directory for storing the source code repository.
cd /opt/linuxshare/work/rv1126b/jp/AI/demo/ai-algorithmUse the git tool to clone the remote repository into the management directory.
git clone https://github.com/csunltd/rv1126b-ai-toolkit.git※ Even when downloading from the GitHub web page, download the entire repository. Do not download only the directory corresponding to this sample.
※ If the repository has already been downloaded, skip this step.
2.3 Model Deployment
To run the algorithm Demo, first download the human keypoint recognition algorithm model.
Download link:
https://dl.dragonwake.com/download/rv1126b/AI/demo/10_person_pose.zip
Then copy the downloaded human keypoint recognition algorithm model to the Release/ directory.
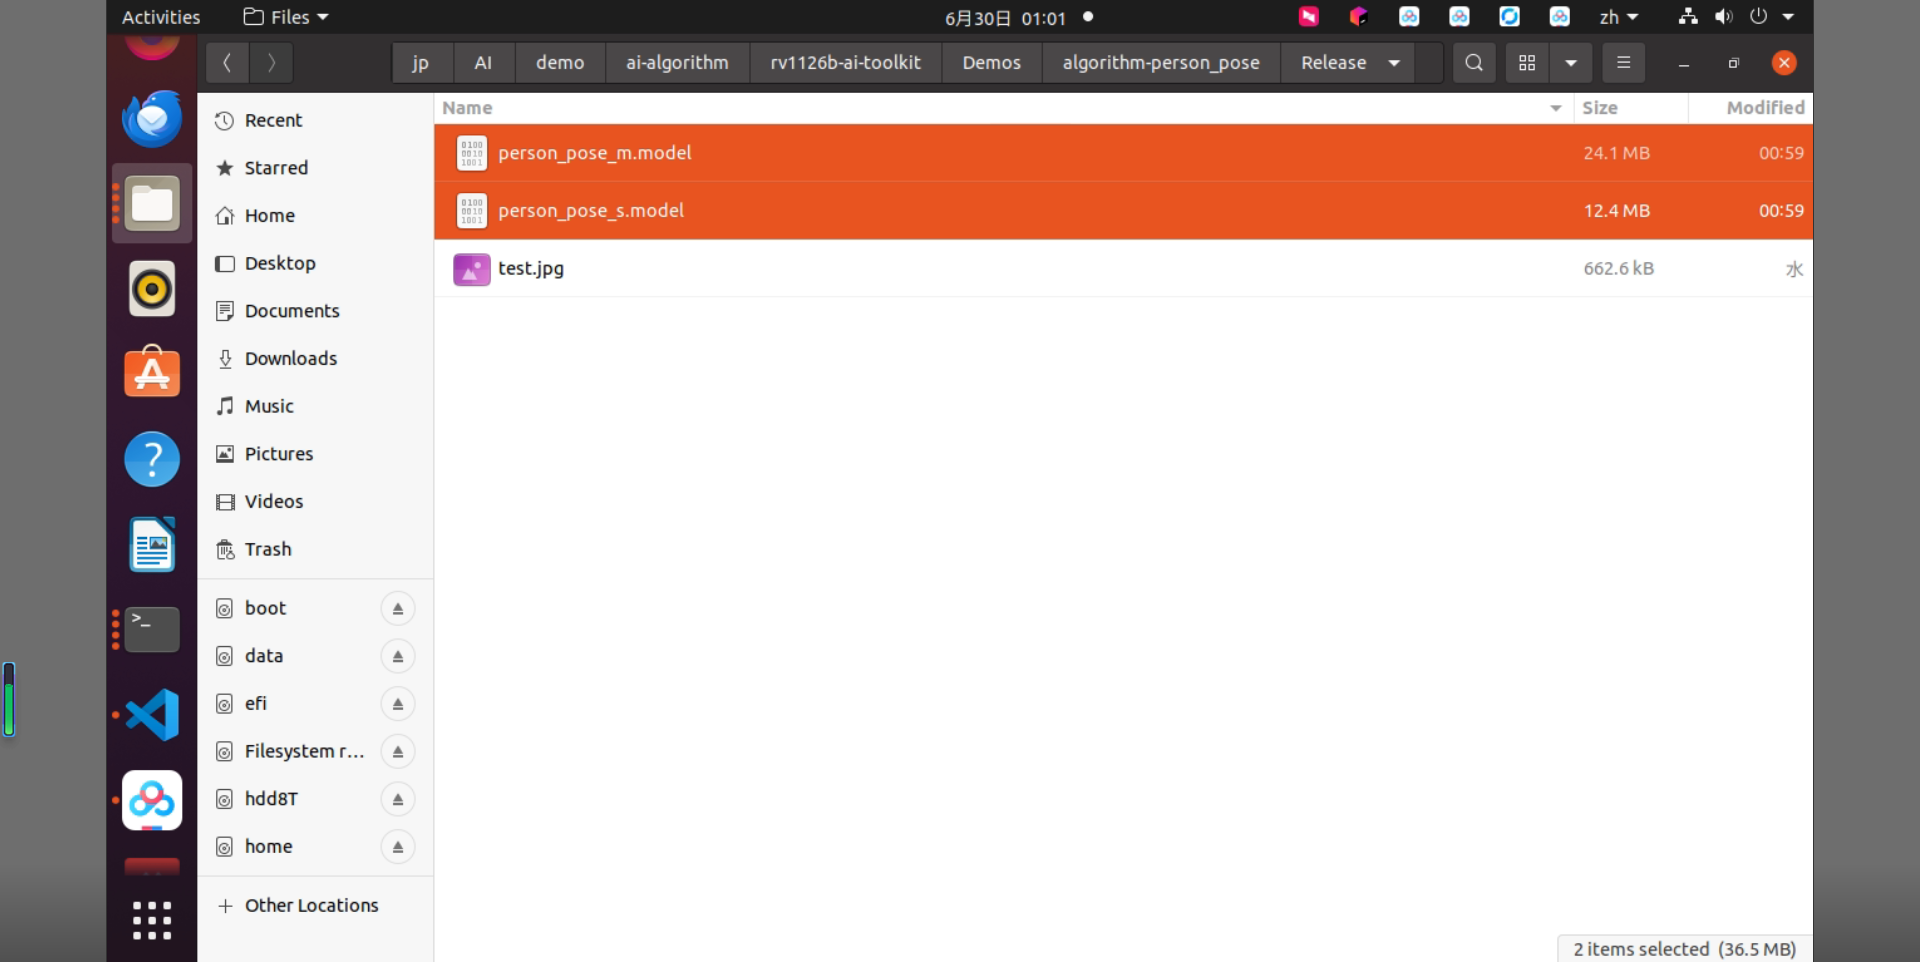
Figure 2-2 Files in the Release Directory
2.4 Building the Sample
Move to the directory containing the sample and execute the build. The specific commands are as follows:
cd rv1126b-ai-toolkit/Demos/algorithm-person_pose/./build.sh cpres* Because the dependent libraries are located on the development board, keep /mnt mounted during cross-compilation.
sudo mount -t nfs -o vers=3,proto=tcp,mountproto=tcp,nolock,retrans=5,timeo=5 192.168.10.85:/ /mnt* When the cpres parameter is specified for the build.sh script, all resources in the Release/ directory are copied to the development board.
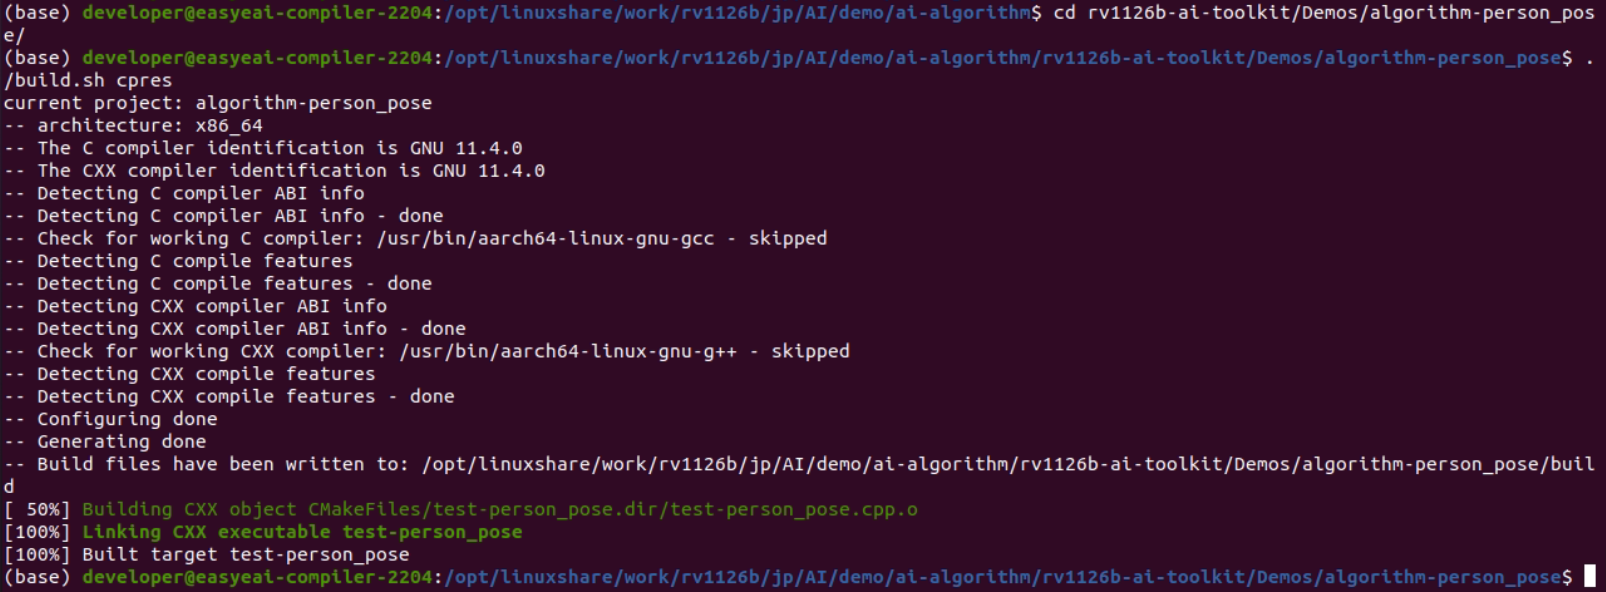
Figure 2-3 Sample Build Result
2.5 Sample Execution and Results
Copy the compiled files to the board.
cp Release/\* /mnt/userdata/Demo/algorithm-person_pose/※ If you build with ./build.sh cpres, the files are copied automatically.
Enter the backend of the development board through serial debugging or SSH debugging, and move to the sample deployment directory as follows:
cd /userdata/Demo/algorithm-person_pose/The command for running the sample is as follows:
./test-person_pose person_pose_m.model test.jpg
Figure 2-4 Sample Execution Result
In the Docker development environment, copy the test Result Image from the board.
cp /mnt/userdata/Demo/algorithm-person_pose/result.jpg .
Figure 2-5 Command for Copying the Result Image
The recognition result is shown in the following figure.
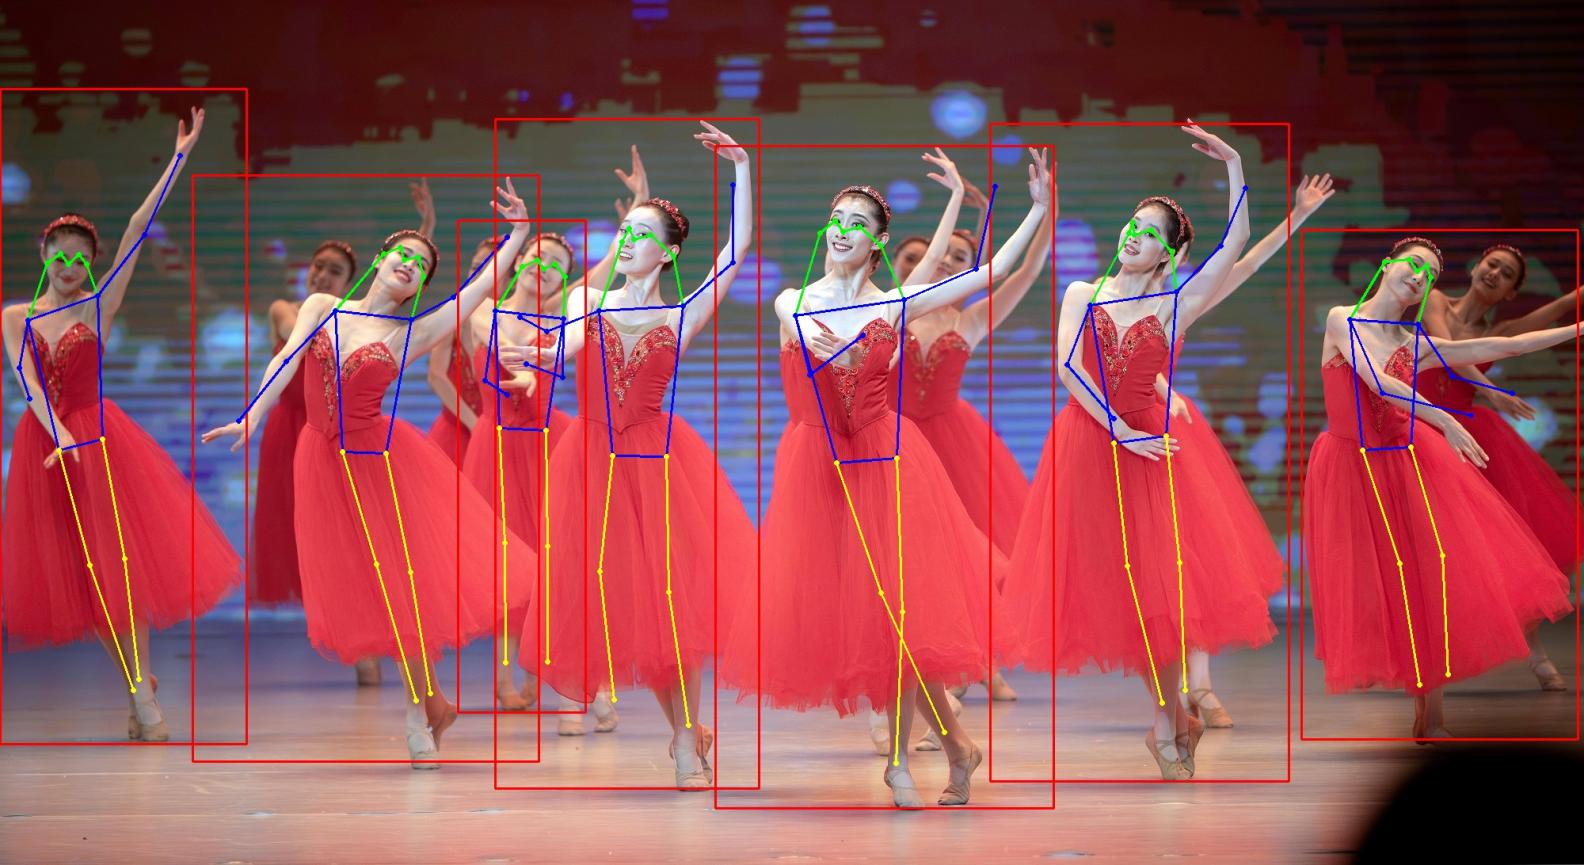
Figure 2-6 Human Keypoint Recognition Result Image
For detailed API descriptions and API calls (the source code of this sample), refer to the following.
3. Human Keypoint RecognitionAPI Description
3.1 Reference Method
To allow users to call the EASY EAI API library directly from a local project, the libraries and header files that need to be linked in this project are listed below. Users can add them directly.
| Item | Description |
| Header File Directory | easyeai-api/algorithm/person_pose |
| Library File Directory | easyeai-api/algorithm/person_pose |
| Library Link Parameter | -lperson_pose |
3.2 Human Keypoint RecognitionInitialization Function
The prototype of the human keypoint recognition initialization function is as follows.
int person_pose_init(const char \*c, person_pose_context_t \*p_person_pose, int cls_num)The details are as follows.
| Function Name: person_pose_init() | |
| Header File | person_pose.h |
| Input Parameter | p_model_path:algorithm model path |
| Input Parameter | p_person_pose:algorithm handle |
| Input Parameter | cls_num:number of classes |
| Return Value | Return value on success: 0 |
| Return value on failure: -1 | |
| Notes | None |
3.3 Human Keypoint RecognitionExecution Function
The prototype of the human keypoint recognition execution function person_pose_run is as follows.
std::vector\<person_pose_result_t\> person_pose_run(cv::Mat image, person_pose_context_t \*p_person_pose, float nms_threshold, float conf_threshold);The details are as follows.
| Function Name:person_pose_run() | |
| Header File | person_pose.h |
| Input Parameter | image:image data input(cv::Mat is an OpenCV type) |
| Input Parameter | p_person_pose:algorithm handle |
| Input Parameter | nms_threshold:NMSthreshold |
| Input Parameter | conf_threshold: confidence threshold |
| Return Value | std::vector<person_pose_result_t>:person posedetection result |
| Notes | None |
3.4 Human Keypoint RecognitionRelease Function
The prototype of the human keypoint recognition release function is as follows.
int person_pose_release(person_pose_context_t\* p_person_pose)The details are as follows.
| Function Name:person_pose_release() | |
| Header File | person_pose.h |
| Input Parameter | p_person_pose:algorithm handle |
| Return Value | Return value on success: 0 |
| Return value on failure: -1 | |
| Notes | None |
4. Human Keypoint Recognition Sample
The sample directory is Demos/algorithm-person_pose/test-person_pose.cpp, and the operation flow is as follows.
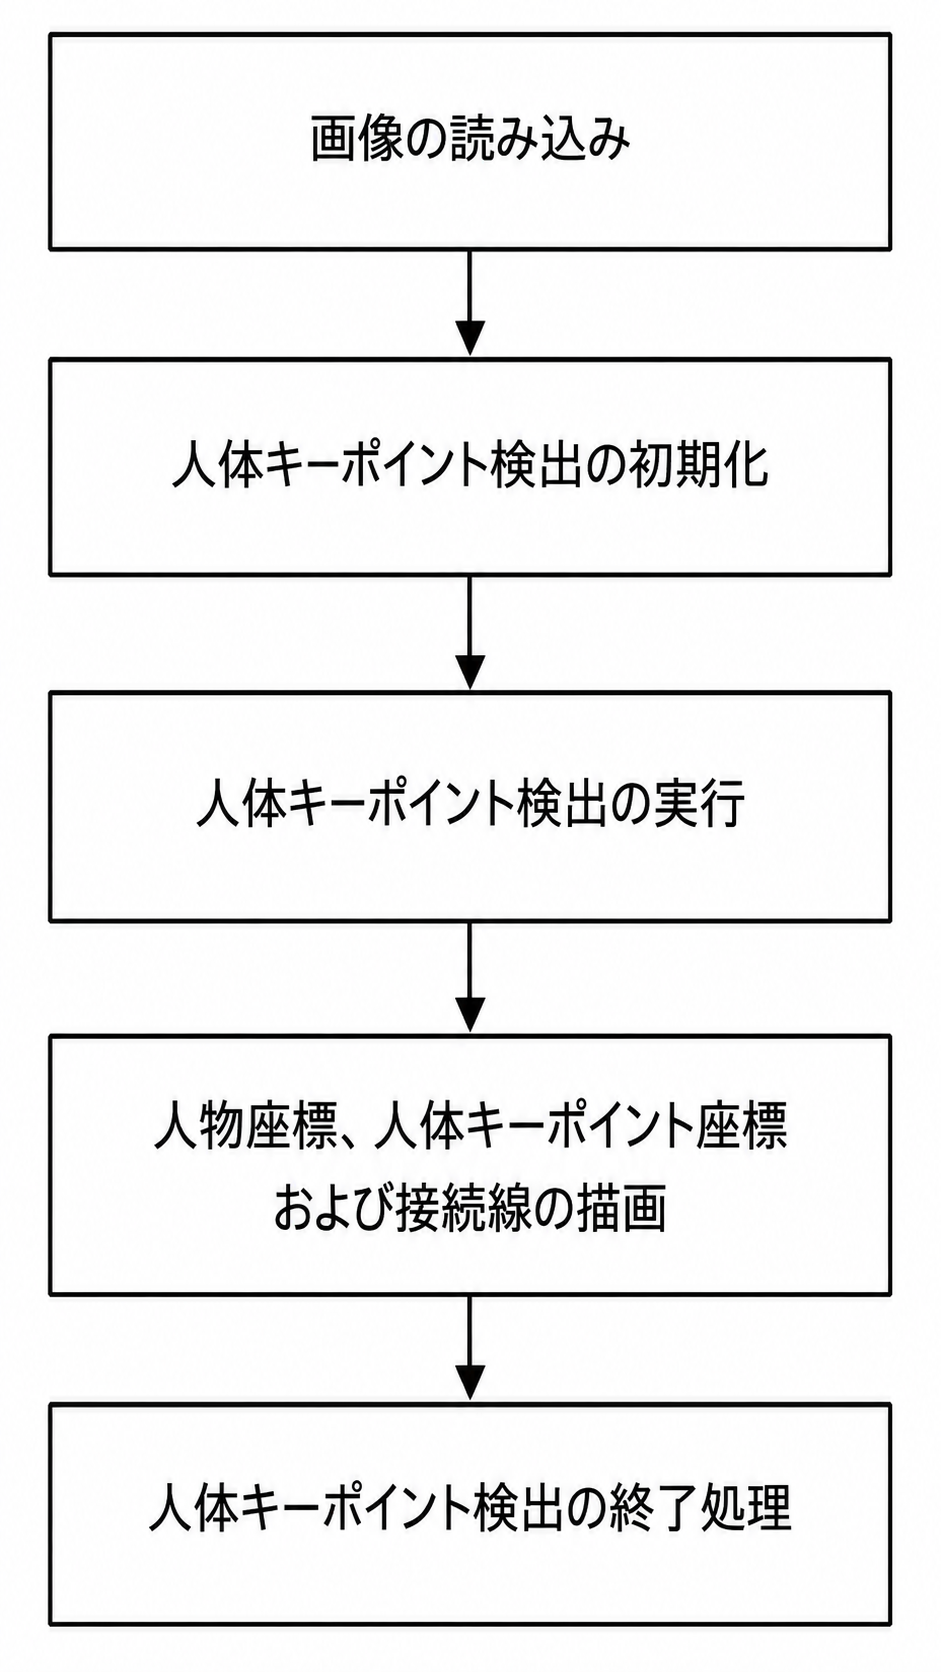
Figure 4-1 Human Keypoint Recognition Algorithm Processing flow
The reference sample is as follows.
#include <stdint.h>#include <stdio.h>#include <stdlib.h>#include <string.h>
#include "person_pose.h"#include <opencv2/opencv.hpp>

// 線を描画しますcv::Mat draw_line(cv::Mat image, float *key1, float *key2, cv::Scalar color){  if (key1[2] > 0.1 && key2[2] > 0.1) {    cv::Point pt1(key1[0], key1[1]);    cv::Point pt2(key2[0], key2[1]);    cv::circle(image, pt1, 2, color, 2);    cv::circle(image, pt2, 2, color, 2);    cv::line(image, pt1, pt2, color, 2);  }
  return image;}

// 結果を描画します:// 0 鼻、1 左目、2 右目、3 左耳、4 右耳、5 左肩、6 右肩、7 左肘、8 右肘、9 左手首、10 右手首、11 左股関節、12 右股関節、13 左膝、14 右膝、15 左足首、16 右足首cv::Mat draw_image(cv::Mat image, std::vector<person_pose_result_t> results){  long unsigned int i =0;  for (i = 0; i < results.size(); i++) {    // 顔部分を描画します    image = draw_line(image, results[i].keypoints[0], results[i].keypoints[1], CV_RGB(0, 255, 0));    image = draw_line(image, results[i].keypoints[0], results[i].keypoints[2], CV_RGB(0, 255, 0));    image = draw_line(image, results[i].keypoints[1], results[i].keypoints[3], CV_RGB(0, 255, 0));    image = draw_line(image, results[i].keypoints[2], results[i].keypoints[4], CV_RGB(0, 255, 0));    image = draw_line(image, results[i].keypoints[3], results[i].keypoints[5], CV_RGB(0, 255, 0));    image = draw_line(image, results[i].keypoints[4], results[i].keypoints[6], CV_RGB(0, 255, 0));
    // 上半身を描画します    image = draw_line(image, results[i].keypoints[5], results[i].keypoints[6], CV_RGB(0, 0, 255));    image = draw_line(image, results[i].keypoints[5], results[i].keypoints[7], CV_RGB(0, 0, 255));    image = draw_line(image, results[i].keypoints[7], results[i].keypoints[9], CV_RGB(0, 0, 255));    image = draw_line(image, results[i].keypoints[6], results[i].keypoints[8], CV_RGB(0, 0, 255));    image = draw_line(image, results[i].keypoints[8], results[i].keypoints[10], CV_RGB(0, 0, 255));    image = draw_line(image, results[i].keypoints[5], results[i].keypoints[11], CV_RGB(0, 0, 255));    image = draw_line(image, results[i].keypoints[6], results[i].keypoints[12], CV_RGB(0, 0, 255));    image = draw_line(image, results[i].keypoints[11], results[i].keypoints[12], CV_RGB(0, 0, 255));
    // 下半身を描画します    image = draw_line(image, results[i].keypoints[11], results[i].keypoints[13], CV_RGB(255, 255, 0));    image = draw_line(image, results[i].keypoints[13], results[i].keypoints[15], CV_RGB(255, 255, 0));    image = draw_line(image, results[i].keypoints[12], results[i].keypoints[14], CV_RGB(255, 255, 0));    image = draw_line(image, results[i].keypoints[14], results[i].keypoints[16], CV_RGB(255, 255, 0));
    cv::Rect rect(results[i].left, results[i].top, (results[i].right - results[i].left), (results[i].bottom - results[i].top));    cv::rectangle(image, rect, CV_RGB(255, 0, 0), 2);  }
  return image;}
/// メイン関数int main(int argc, char **argv){    if (argc != 3) {        printf("%s <model_path> <image_path>\n", argv[0]);        return -1;    }

    const char *p_model_path = argv[1];    const char *p_img_path = argv[2];  printf("Model path = %s, image path = %s\n\n", p_model_path, p_img_path);  cv::Mat image = cv::imread(p_img_path);
  printf("Image size = (%d, %d)\n", image.rows, image.cols);    int ret;  person_pose_context_t yolo11_pose;    memset(&yolo11_pose, 0, sizeof(yolo11_pose));
  person_pose_init(p_model_path, &yolo11_pose, 1);

  double start_time = static_cast<double>(cv::getTickCount());  std::vector<person_pose_result_t> results = person_pose_run(image, &yolo11_pose, 0.35, 0.35);
  double end_time = static_cast<double>(cv::getTickCount());  double time_elapsed = (end_time - start_time) / cv::getTickFrequency() * 1000;  std::cout << "person pose run time: " << time_elapsed << " ms" << std::endl;
  // 結果を描画します  image = draw_image(image, results);
  cv::imwrite("result.jpg", image);  printf("Detect size = %ld\n", results.size());
    ret = person_pose_release(&yolo11_pose);
    return ret;}