
OSD (Text Overlay)
1.1. OSD Overview
In some application scenarios (for example, IP cameras), there is a requirement to add watermarks to images, especially to draw watermarks using multibyte characters such as Japanese. However, OpenCV itself does not support drawing these Asian-language characters by default. To address this situation, the EASY EAI API provides an encapsulated font engine dedicated to drawing text on images.

1.1. OSD Overview Figure 10
1.2. Quick Start
1.2.1 Preparing the Development Environment
Run the run script on the Ubuntu system on the PC to enter the EASY-EAI compilation environment. The details are as follows.
cd ~/develop_environment./run.sh 22041.2.2 Downloading the Source Code and Compiling the Sample
In the EASY-EAI compilation environment, create a directory for managing the source code repository.
cd /optmkdir EASY-EAI-Toolkitcd EASY-EAI-Toolkithttps://dl.dragonwake.com/download/rv1126b/embedded/EASY-EAI-Toolkit-1126B/Demos.zip
Download the Demos.zip archive from the link above, upload it to the /opt/EASY-EAI-Toolkit directory in the virtual machine, and extract it. Go to the corresponding sample directory and perform the compilation operation. The specific commands are as follows.
cd EASY-EAI-Toolkit-1126B/Demos/common-font_engine/./build.sh cpres💡 Note: Because the dependency libraries are placed on the board, be sure to keep /mnt mounted during cross-compilation.
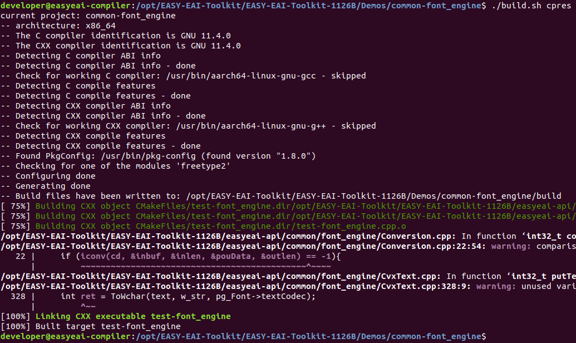
1.2.2 Downloading the Source Code and Compiling the Sample Figure 12
1.2.3 Running the Sample
Enter the board backend through serial debugging or SSH debugging, and go to the location where the sample is placed, as shown below.
cd /userdata/Demo/common-font_engine
1.2.3 Running the Sample Figure 13
The command for running the sample is as follows.
./test-font_engine1.2.4 Execution Result
The execution result is as follows.
After running the test program, an image named “result.jpg” will be generated.
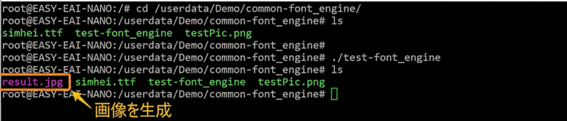
1.2.4 Execution Result Figure 14
Return to the [compilation window] and use the eog command to open the image directly.
eog /mnt/userdata/Demo/common-font_engine/result.jpg &eog /mnt/userdata/Demo/common-font_engine/testPic.png &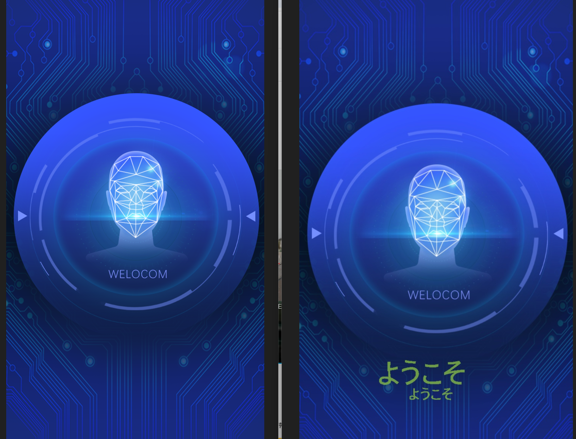
1.2.4 Execution Result Figure 15
This allows you to confirm that the text has been overlaid on the original image. If the EASY-EAI compilation environment prompts that the eog command cannot be found, install it using the following operations.
sudo apt-get updatesudo apt-get install eogAlternatively, you can copy the image from the board to the PC.
cp /mnt/userdata/Demo/common-font_engine/result.jpg ./ReleaseFor detailed API descriptions and API calls (the source code of this sample), refer to the following explanation.
1.3. String Operation API Description
1.3.1 Include/Reference Method
The EASY EAI API library is located in the easyeai-api directory of this repository. To allow users to directly call the EASY EAI API library in a local project, the libraries, header files, and related items that need to be linked in the project are listed below.
| Description | CMake Description | Makefile Description |
|---|---|---|
| api.cmake | ${common_root}/font_engine/api.cmake | None |
| Header File Directory | ${FONT_ENGINE_INCLUDE_DIRS} | -I ../../easyeai-api/common/font_engine |
| Source File Directory | ${FONT_ENGINE_SOURCE_DIRS} | ../../easyeai-api/common/font_engine |
| Library File Directory | None | None |
| Library Link Parameters | ${FONT_ENGINE_LIBS} | None |
The API source code path is EASY-EAI-Toolkit-1126B/easyeai-api/common/font_engine/. Users can check the interface implementation through the source code and can also modify the source code directly.
1.3.2 Creating the Global Font Object
The function prototype is as follows.
int32_t global_font_create(const char \*fontLib, const char \*codec);The detailed description is as follows.
| Function name: global_font_create() | Details |
|---|---|
| Header File | easyeai-api/common/font_engine/font_engine.h |
| Input Parameters | fontLib: font library file to load (for example: ”./simhei.ttf”) codec: character encoding format of the text to be written to the image (for example: utf-8 or gbk, etc.) |
| Return Value | Creation successful: 0 Creation failed: -1 |
| Notes | If a global font object has already been created in the current process, calling it again will always return -1. |
1.3.3 Setting the Character Encoding of the Global Font Object
The function prototype is as follows.
int32_t global_font_set_textCodec(const char \*codec);The detailed description is as follows.
| Function name: global_font_set_textCodec() | Details |
|---|---|
| Header File | easyeai-api/common/font_engine/font_engine.h |
| Input Parameters | codec: character encoding format of the text to be written to the image (for example: utf-8 or gbk, etc.) |
| Return Value | Setting successful: 0 Setting failed: -1 |
| Notes | A global font object must be created in advance. |
1.3.4 Setting the Font Size of the Global Font Object
The function prototype is as follows.
int32_t global_font_set_fontSize(uint32_t fontSize);The detailed description is as follows.
| Function name: global_font_set_fontSize() | Details |
|---|---|
| Header File | easyeai-api/common/font_engine/font_engine.h |
| Input Parameters | fontSize: target font size to set |
| Return Value | Setting successful: 0 Setting failed: -1 |
| Notes | A global font object must be created in advance. |
1.3.5 Writing Specified Text to an Image
The function prototype is as follows.
int32_t putText(uint8_t \*imgData, uint32_t imgWidth, uint32_t imgHeight, const char \*text, uint32_t posX, uint32_t posY, FontColor color);The detailed description is as follows.
| Function name: putText() | Details |
|---|---|
| Header File | easyeai-api/common/font_engine/font_engine.h |
| Input Parameters | imgData: start address of the image data. The data format is BGR888. imgWidth: image resolution size (width). imgHeight: image resolution size (height). text: string to write. posX: X coordinate of the upper-left corner of the string to write (relative position in the image). The image coordinate origin is the upper-left corner. posY: Y coordinate of the upper-left corner of the string to write (relative position in the image). The image coordinate origin is the upper-left corner. color: font color value. The structure is described later. |
| Return Value | Write successful: 0 Write failed: -1 |
| Notes | A global font object must be created in advance. |
FontColor structure:
typedef struct {uint8_t Alpha; // Color value of the transparency (alpha) channeluint8_t Red; // Color value of the red channeluint8_t Green; // Color value of the green channeluint8_t Bule; // Color value of the blue channel (as in the original text)} FontColor;1.3.6 Destroying the Global Font Object
The function prototype is as follows.
int32_t global_font_destory();The detailed description is as follows.
| Function name: global_font_destory() | Details |
|---|---|
| Header File | easyeai-api/common/font_engine/font_engine.h |
| Input Parameters | None |
| Return Value | Destruction successful: 0 Destruction failed: -1 |
| Notes | A global font object must be created in advance. |
1.4. API Test Case
The sample code path is EASY-EAI-Toolkit-1126B/Demos/common-font_engine/test-font_engine.cpp.
The following is an actual usage example of each API.
int main(void){// Initialize font transparency and colorFontColor color = {200, 135, 189, 67}; // {A, R, G, B};// Create the global fontglobal_font_create("./simhei.ttf", CODE_UTF8);// Load the background imagecv::Mat img = cv::imread("./testPic.png");// Write textglobal_font_set_fontSize(80);putText(img.data, img.cols, img.rows, "欢迎使用", 210, 940,color);global_font_set_fontSize(40);putText(img.data, img.cols, img.rows, "欢迎使用", 290, 1020,color);// Save the image after writing textcv::imwrite("./res.jpg", img);// Destroy the global fontglobal_font_destory();return 0;}