
How to Use rknn-toolkit-lite2
1.1. Introduction to rknn-toolkit-lite2
RKNN-Toolkit-Lite2 is a lightweight AI model deployment toolkit specially developed by Rockchip for its RK series chips, such as RV1126B, RK3576, and RK3588. It focuses on model inference scenarios on edge and embedded devices. It does not require complex environment dependencies and consumes very few system resources. Its core function is to load and run AI models converted by the RKNN toolchain, and it supports adapting models exported from mainstream frameworks such as TensorFlow and PyTorch.
This toolkit provides C/C++ and Python dual-language APIs, with simple and easy-to-use interfaces. It is also deeply optimized for NPU hardware acceleration on RK chips, which can greatly improve model inference efficiency. It is suitable for edge AI scenarios such as smart security, IoT, and home appliances, helping developers quickly deploy models on edge devices and greatly lowering the barrier to embedded AI development.
rknn-toolkit-lite2 has now been adapted to EASY-EAI-Nano-TB , allowing users to perform pure Python development for deep learning algorithms. It also supports compiled models, so algorithm inference can be completed with only a few lines of code, greatly reducing development costs. At the same time, it effectively lowers the development threshold for many algorithm developers who are not familiar with C/C++. This document describes how to perform inference on the board based on models that have already been converted to RKNN models.

1.1. Introduction to rknn-toolkit-lite2 Figure 1
1.2. Environment Setup
1.2.1 Installing the git Tool
sudo apt update && sudo apt install git1.2.2 Installing the miniforge3 Tool
To prevent conflicts between system requirements for multiple different Python environment versions, it is recommended to use miniforge3 to manage Python environments. Check whether miniforge3 and conda version information is already installed. If they are already installed, you can skip the steps in this section.
Download the miniforge3 installation package:
cd /userdatawgethttps://github.com/conda-forge/miniforge/releases/latest/download/Miniforge3-Linux-aarch64.sh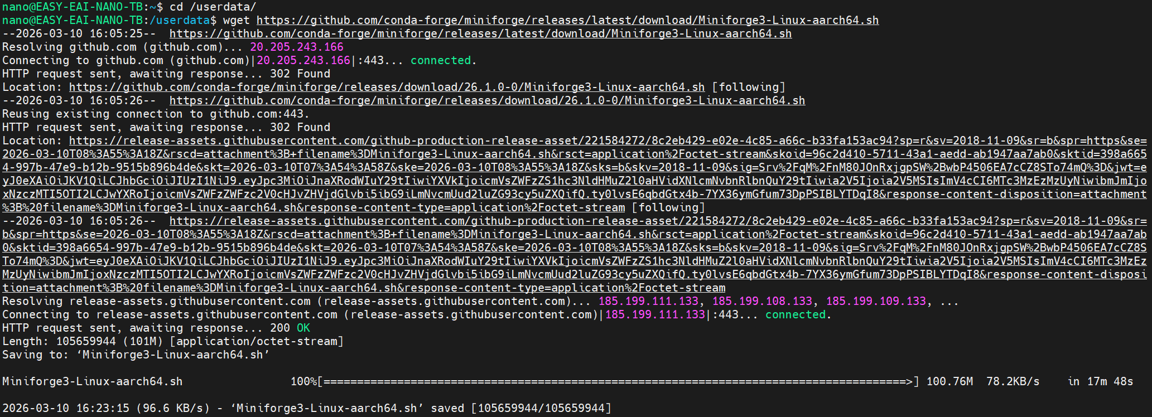
1.2.2 Installing the miniforge3 Tool Figure 2
Install miniforge3:
chmod 777 Miniforge3-Linux-aarch64.shbash Miniforge3-Linux-aarch64.sh
1.2.2 Installing the miniforge3 Tool Figure 3
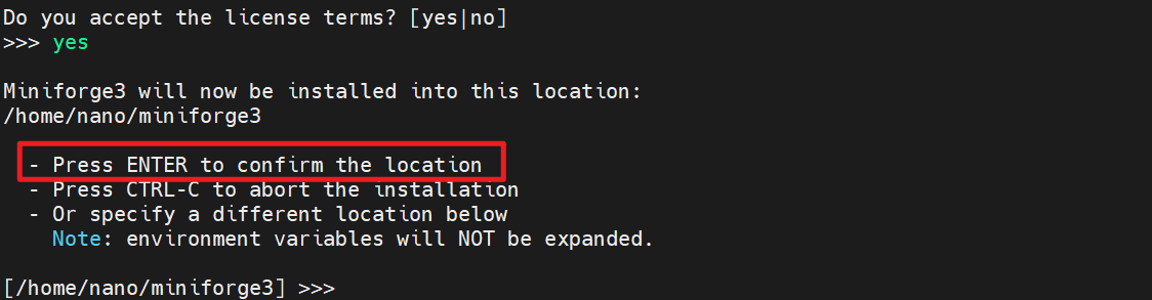
1.2.2 Installing the miniforge3 Tool Figure 4
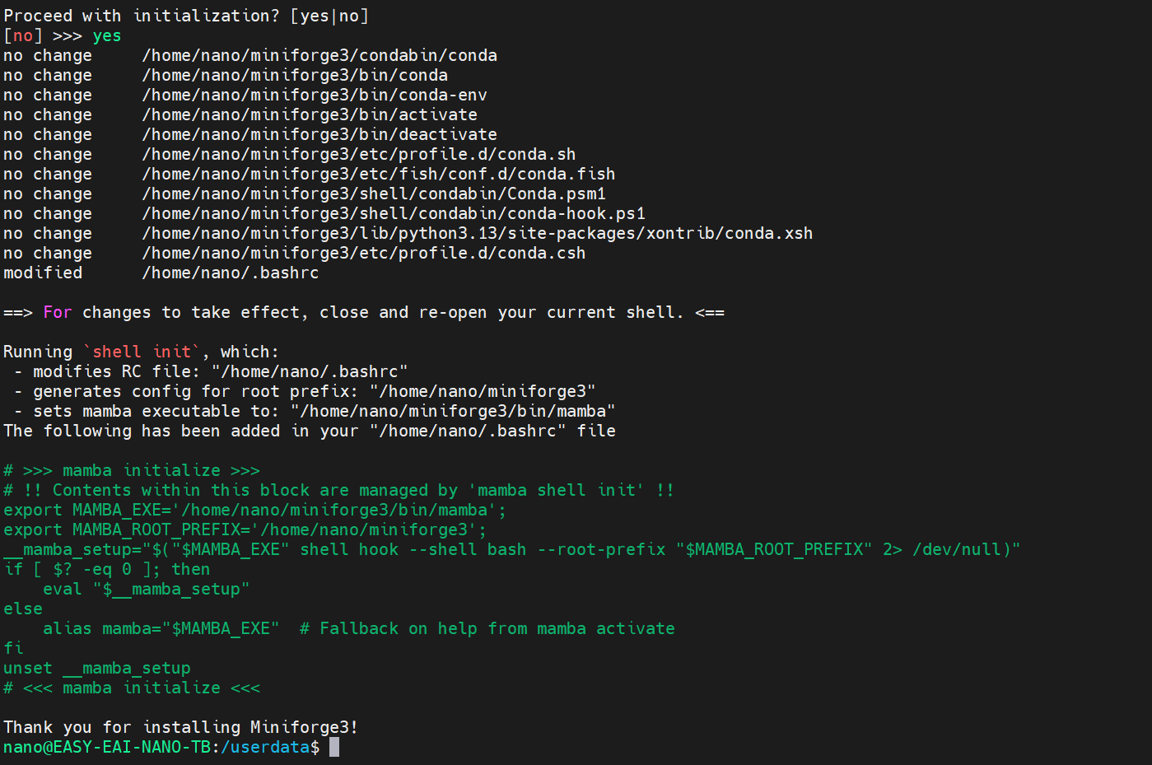
1.2.2 Installing the miniforge3 Tool Figure 5
1.2.3 Creating a Conda Environment
Enter the Conda base environment:
source ~/miniforge3/bin/activateCreate a Conda environment named `RKNN-Toolkit-lite2` with Python 3.8 (recommended version):
conda create -n RKNN-Toolkit-lite2 python=3.8Enter the RKNN-Toolkit Conda environment:
conda activate RKNN-Toolkit-lite2Exit the Conda environment:
conda deactivateDelete the Conda environment:
conda remove -n RKNN-Toolkit-lite2 --all1.2.4 Installing RKNN-Toolkit-Lite2 and the OpenCV Library
Download from cloud storage:
pip install rknn_toolkit_lite2-2.3.2-cp38-cp38-manylinux_2_17_aarch64.manylinux2014_aarch64.whl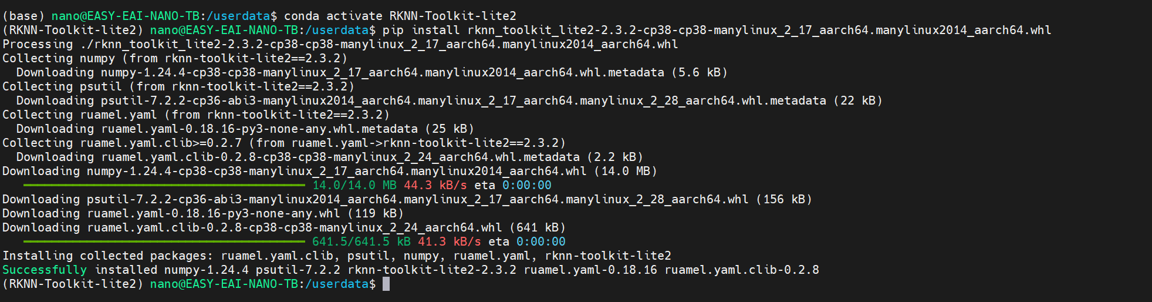
1.2.4 Installing RKNN-Toolkit-Lite2 and the OpenCV Library Figure 6
pip install opencv-python
1.2.4 Installing RKNN-Toolkit-Lite2 and the OpenCV Library Figure 7
1.3. Demo Test on the Board
Download the rknn-toolkit-lite2 test program inference_with_lite2.tar.bz2 and transfer the file to a directory on the EASY-EAI-Nano-TB board.
Run the following command to extract it:
tar -xvf inference_with_lite2.tar.bz2
1.3. Demo Test on the Board Figure 8
Run the following commands to switch directories and execute the test program:
cd /userdata/inference_with_lite/python test.pyThe result is as follows:
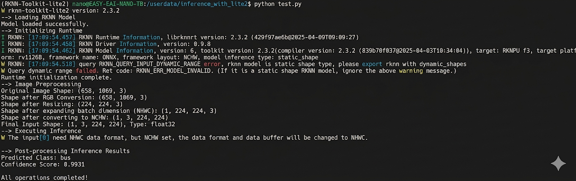
1.3. Demo Test on the Board Figure 9
1.4. Description of the rknn-toolkit-lite2 Workflow
1.4.1 Usage Flowchart
The usage flow of RKNN Toolkit Lite2 is as follows:
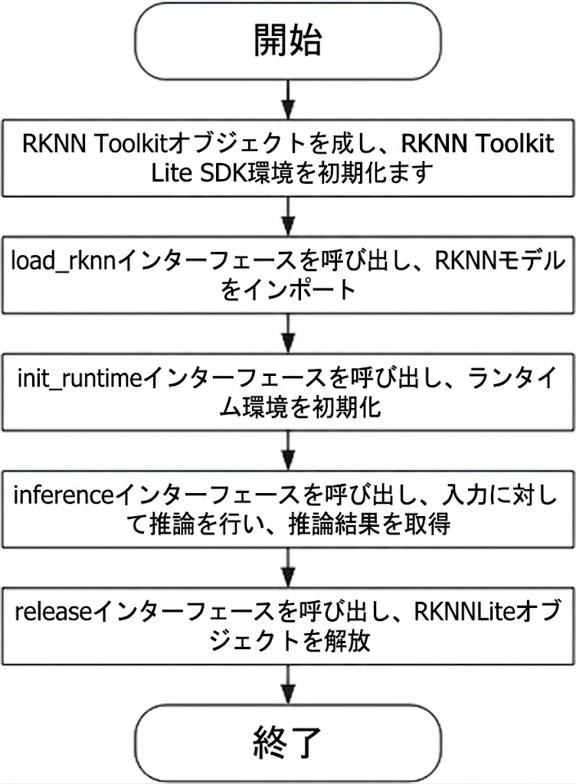
1.4.1 Usage Flowchart Figure 10
1.4.2 Sample Program
The sample program in Section 3 is as follows:
# -*- coding: utf-8 -*-import cv2import numpy as npfrom rknnlite.api import RKNNLite
# ==================== Configuration Items (Modify according to actual situation) ====================RKNN_MODEL_PATH = "10class_ResNet50_rv1126b.rknn"  # RKNN model pathTEST_IMAGE_PATH = "./test-1.jpg"                   # Test image pathINPUT_SHAPE = (224, 224)                           # Model input size (Must match the size used during model conversion)INPUT_CHANNELS = 3                                 # Number of input channelsCLASSES = ("SUV", "bus", "family sedan", "fire engine", "heavy truck", "jeep", "minibus", "racing car", "taxi", "truck")
# ==================== Core Functions ====================def preprocess_image(image_path, input_shape):    """    Image preprocessing: Read -> RGB conversion -> Resize -> Dimension expansion -> NCHW conversion -> Type conversion    Returns a 4D NCHW format input tensor    """    # 1. Read image    img = cv2.imread(image_path)    if img is None:        raise ValueError(f"Cannot read image: {image_path}. Please check if the path is correct!")    print(f"Original image shape: {img.shape}")  # Output original dimensions (H,W,C)
    # 2. BGR to RGB conversion (OpenCV defaults to BGR, while model training generally uses RGB)    img_rgb = cv2.cvtColor(img, cv2.COLOR_BGR2RGB)    print(f"Shape after RGB conversion: {img_rgb.shape}")
    # 3. Resize to model input size    img_resized = cv2.resize(img_rgb, input_shape)    print(f"Shape after resizing: {img_resized.shape}")  # (224,224,3)
    # 4. Expand to 4D (Important! Add Batch dimension, N=1)    img_4d_nhwc = np.expand_dims(img_resized, axis=0)    print(f"Shape after adding batch dimension (NHWC): {img_4d_nhwc.shape}")  # (1,224,224,3)
    # 5. Convert to NCHW format (Model log will show framework layout: NCHW)    img_4d_nchw = np.transpose(img_4d_nhwc, (0, 3, 1, 2))    print(f"Shape after NCHW conversion: {img_4d_nchw.shape}")  # (1,3,224,224)
    # 6. Type conversion (RKNN Lite2 recommends float32 or uint8. Adjust according to the model's quantization type)    img_input = img_4d_nchw.astype(np.float32)    print(f"Final input shape: {img_input.shape}, Type: {img_input.dtype}")
    return img_input
def softmax(x):    """Softmax normalization, convert output to probability"""    x = x - np.max(x)  # Prevent numerical overflow    return np.exp(x) / np.sum(np.exp(x))
def predict(rknn_lite, input_tensor):    """Model inference, explicitly specify input format"""    try:        # Explicitly specify data_format as NCHW (Important! Informs RKNN Runtime of the input format)        outputs = rknn_lite.inference(            inputs=[input_tensor],            data_format='nchw'  # Forcefully specify input format to avoid automatic recognition errors        )        return outputs    except Exception as e:        print(f"Inference failed: {str(e)}")        return None
# ==================== Main Program ====================if __name__ == "__main__":    # 1. Initialize RKNN Lite    rknn_lite = RKNNLite()    print("--> Loading RKNN model")    ret = rknn_lite.load_rknn(RKNN_MODEL_PATH)    if ret != 0:        print(f"Model load failed. Error code: {ret}")        exit(ret)    print("Model loaded successfully")
    # 2. Initialize runtime environment (Core change: removed target parameter to let the system automatically detect hardware)    print("--> Initializing runtime")    ret = rknn_lite.init_runtime()  # Remove target to let the system automatically detect RV1126B    if ret != 0:        print(f"Runtime initialization failed. Error code: {ret}")        exit(ret)    print("Runtime initialized successfully")
    # 3. Image preprocessing (Forcibly generate 4D input)    print("--> Image preprocessing")    try:        input_tensor = preprocess_image(TEST_IMAGE_PATH, INPUT_SHAPE)    except ValueError as e:        print(e)        exit(1)
    # 4. Model inference    print("--> Running inference")    outputs = predict(rknn_lite, input_tensor)    if outputs is None or len(outputs) == 0:        print("No output from inference!")        rknn_lite.release()        exit(1)
    # 5. Parse results    print("\n--> Parse inference results")    output = outputs[0][0]  # Get the first batch of the first output    prob = softmax(output)    max_idx = np.argmax(prob)    print(f"Predicted category: {CLASSES[max_idx]}")    print(f"Confidence: {prob[max_idx]:.4f}")
    # 6. Release resources    rknn_lite.release()    print("\nAll operations completed!")
1.5. Detailed API Description
1.5.1 RKNNLite2 Initialization and Object Release
When using RKNN Toolkit Lite2, you must first call the RKNNLite() method to initialize the RKNNLite object. After use, call the release()` method of the object to release resources. When initializing an RKNNLite object, you can set the verbose and verbose_file parameters to output detailed log information. The verbose parameter specifies whether to output detailed log information to the screen. If verbose_file is set and the verbose` parameter value is True, the log information is also written to the file specified by this parameter.
The example is as follows:
# Output detailed log information to the screen and also write it to the inference.log filerknn_lite = RKNNLite(verbose=True, verbose_file='./inference.log')
# Output detailed log information only to the screenrknn_lite = RKNNLite(verbose=True)...rknn_lite.release()
1.5.2 Loading an RKNN Model
| Item | Parameter Name / Value | Description |
|---|---|---|
| API | Load_rknn | Loads an RKNN model. |
| Parameter | path | Path of the RKNN model file. |
| load_model_in_npu | Whether to directly load the RKNN model inside the NPU. In this case, path is the path of the RKNN model inside the NPU. It can be set to True only when RKNN Toolkit Lite is running on a PC connected to an NPU device or on an RK3399Pro Linux development board. The default value is False. | |
| Return Value | 0 | Load succeeded |
| -1 | Load failed |
The example is as follows:
ret = rknn_lite.load_rknn('10class_ResNet50_pre.rknn')1.5.3 Initializing the Runtime Environment
Before performing model inference, you must first initialize the runtime environment and determine which chip platform the model will run on.
| Item | Parameter Name / Value | Description |
|---|---|---|
| API | init_runtime | Initializes the runtime environment. It determines the device information on which the model runs, including the chip model and device ID. |
| Parameter | target | Target hardware platform. Currently supports “rk3399pro”, “rk1806”, “rk1808”, “rv1109”, and “rv1126”. The default is None, and it is automatically selected based on the development board on which the application is running. |
| device_id | Device number. If the PC is connected to multiple smart devices, this parameter must be specified. The device number can be viewed through the “list_devices” interface. The default value is None. | |
| async_mode | Whether to use asynchronous mode. When calling the inference interface, three stages are involved: setting the input image, model inference, and obtaining inference results. If asynchronous mode is enabled, the input setup for the current frame is performed at the same time as inference for the previous frame. Therefore, except for the first frame, each subsequent frame can hide the input setup time and improve performance. In asynchronous mode, the inference result returned each time is for the previous frame. The default value is False. | |
| Return Value | 0 | Success (original text: load succeeded) |
| -1 | Failed (original text: load failed) |
The example is as follows:
# init runtime environmentprint('--> Init runtime environment')ret = rknn_lite.init_runtime(target=None)if ret != 0: print('Init runtime environment failed') exit(ret)print('done')1.5.4 Model Inference
| Item | Parameter Name / Value | Description |
|---|---|---|
| API | inference | Performs inference on the specified input and returns the inference result. |
| Parameter | inputs | Input for inference, such as an image processed by cv2. The type is list, and the elements in the list are ndarray. |
| data_type | Input data type. The following values can be specified: ‘float32’, ‘float16’, ‘uint8’, ‘int8’, and ‘int16’. The default value is ‘uint8’. | |
| data_format | Data mode (format). The following values can be specified: “nchw” and “nhwc”. The default value is ‘nhwc’. The difference between the two is the position of the channel. | |
| inputs_pass_through | Passes the input through to the NPU driver. In non-pass-through mode, before the input is passed to the NPU driver, the tool performs operations such as mean subtraction and division by variance on the input. In pass-through mode, these operations are not performed. The value of this parameter is an array. For example, if input0 is passed through and input1 is not, the value of this parameter is [1, 0]. The default value is None, which means no inputs are passed through. | |
| Return Value | results | Inference results. The type is list, and the elements in the list are ndarray. |
The example is as follows (using a classification model such as resnet50 as an example. For the complete code, see Section 3):
# Inferenceprint('--> Running model')outputs = rknn_lite.inference(inputs=[resize_img])
print("outputs[0]:", outputs[0])print("outputs[0].shape:", outputs[0].shape)show_outputs(softmax(np.array(outputs[0][0])))
1.5.5 Querying the SDK Version
| Item | Parameter Name / Value | Description |
|---|---|---|
| API | get_sdk_version | Obtains the version numbers of the SDK API and driver. Note: Before using this interface, you must complete model loading and runtime environment initialization. |
| Parameter | None | |
| Return Value | sdk_version | Version information of the API and driver. The type is string. |
The example is as follows:
# Get SDK version information...sdk_version = rknn_lite.get_sdk_version()The returned SDK information is as follows:
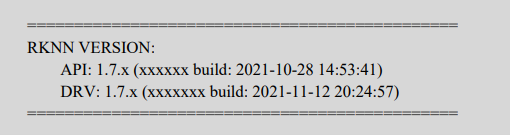
1.5.5 Querying the SDK Version Figure 11