
Flame Detection
Revision History
| No. | Version | Description | Date |
|---|---|---|---|
| 1 | Ver1.0 | Initial release | 2026/06/28 |
The information in this document may be changed without prior notice for the purpose of improving the document. Please refer to our website for the latest version.
Reproduction in any form without the written permission of Nissho Technology Co., Ltd. is strictly prohibited.
1. Flame Detection Overview
Flame detection is an object detection algorithm that detects the position of flames based on deep learning. Trained on large-scale flame datasets, it works with cameras to recognize open flames in monitored areas in real time, immediately raise alarms, and prompt confirmation in the monitoring room, thereby minimizing losses.
The performance of this flame detection algorithm on the dataset is as follows:
| Flame Detection Algorithm | mAP@0.5 |
|---|---|
| FIRE | 0.86 |
The execution efficiency on the RV1126B board is as follows:
| Algorithm Type | Execution Efficiency |
|---|---|
| fire_detect | 64ms |
2. Quick Start
2.1 Preparing the Development Environment
If you are reading this document for the first time, refer to Getting Started / Preparing and Updating the Development Compilation Environment, and deploy the compilation environment according to the related steps.
On the Ubuntu system of the PC side, run the run script to enter the Docker development environment. The steps are as follows:
cd ~/linuxshare/work/rv1126b/jp/embedded/images/develop_environment./run.sh 2204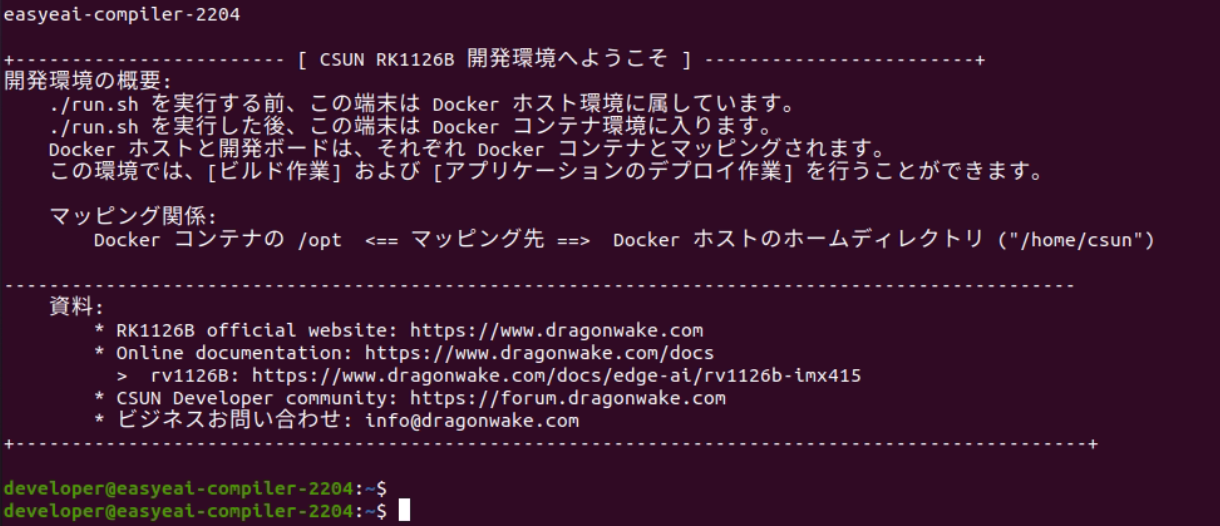
Figure 2-1 Starting the Docker Development Environment
2.2 Downloading the Source Code
In the Docker development environment, create a management directory for storing the source code repository.
cd /opt/linuxshare/work/rv1126b/jp/AI/demo/ai-algorithmUse the git tool to clone the remote repository into the management directory.
git clone https://github.com/csunltd/rv1126b-ai-toolkit.git※ Even when downloading from the GitHub web page, download the entire repository. Do not download only the directory corresponding to this sample.
※ If the repository has already been downloaded, skip this step.
2.3 Model Deployment
To run the algorithm demo, first download the helmet detection algorithm model.
Download link:
https://dl.dragonwake.com/download/rv1126b/AI/demo/05_fire-detect.zip
Then copy the downloaded flame detection algorithm model to the Release/ directory.
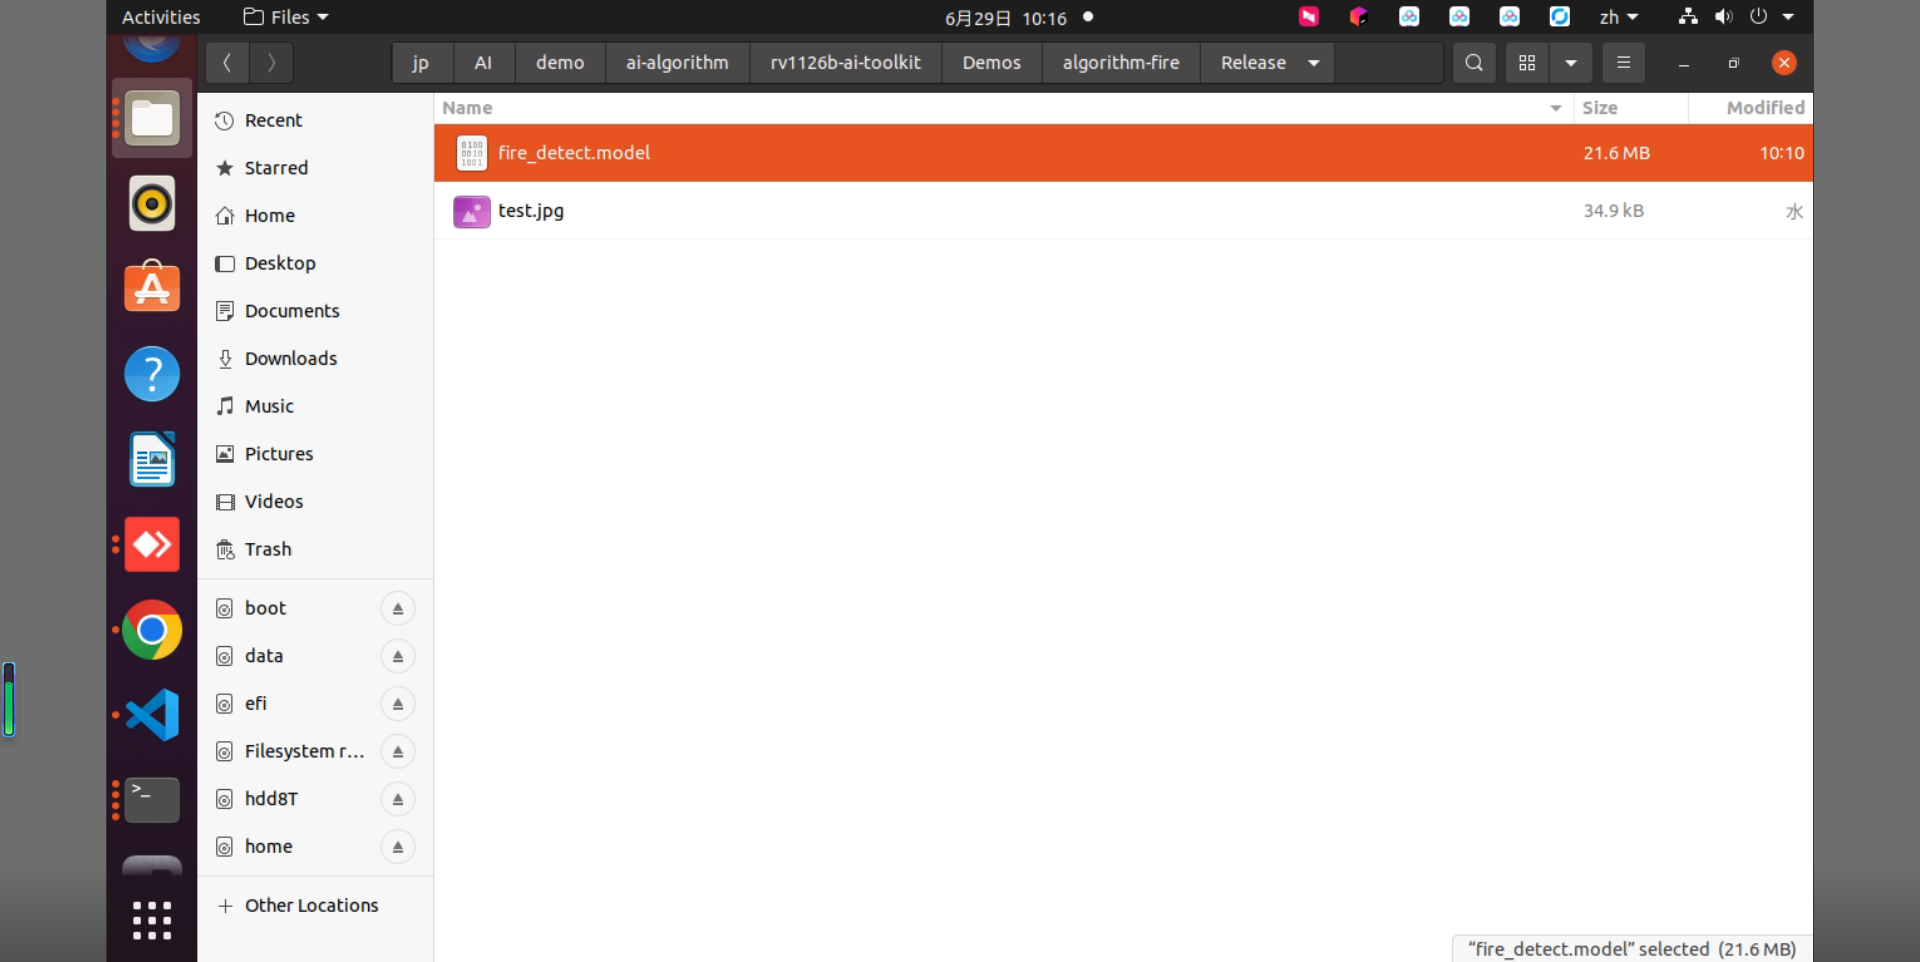
Figure 2-2 Files in the Release Directory
2.4 Building the Sample
Move to the directory containing the sample and build it. The specific commands are as follows:
cd rv1126b-ai-toolkit/Demos/algorithm-fire/./build.sh cpres* The dependent libraries are placed on the development board, so the /mnt mount must be kept during cross-compilation.
sudo mount -t nfs -o vers=3,proto=tcp,mountproto=tcp,nolock,retrans=5,timeo=5 192.168.10.85:/ /mnt* When the cpres parameter is specified for the build.sh script, all resources in the Release/ directory are copied to the development board.
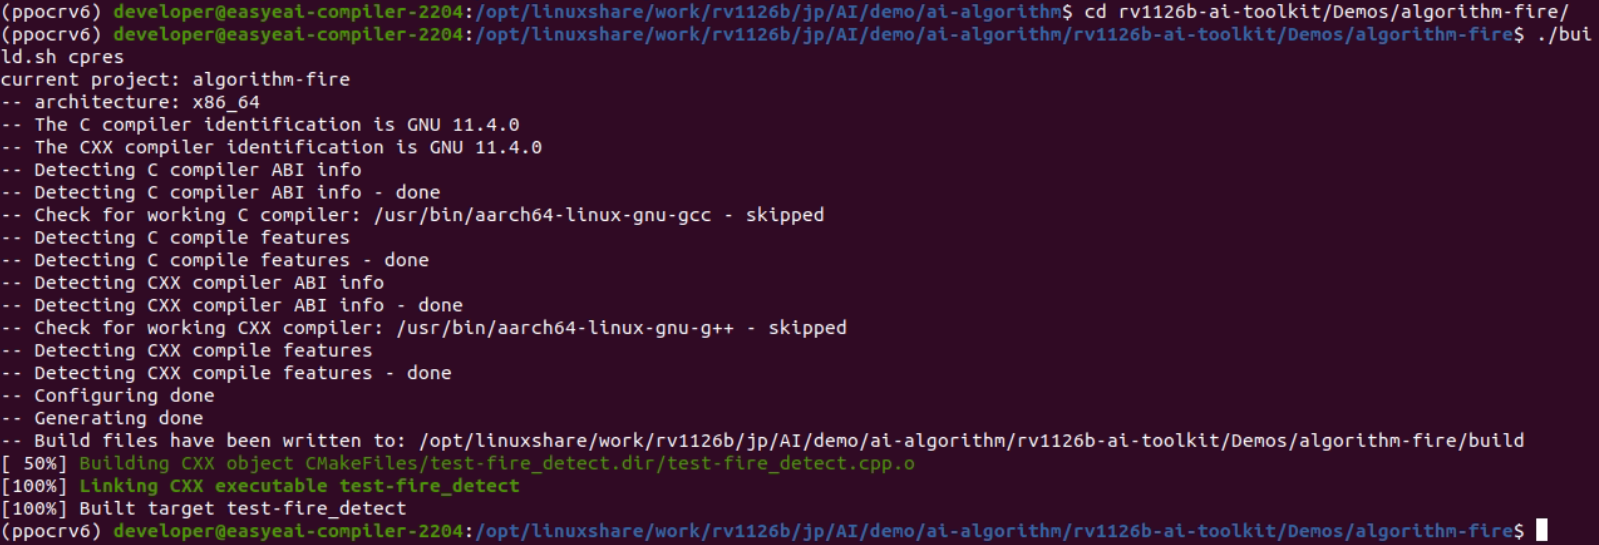
Figure 2-3 Sample Build Result
2.5 Running the Sample and Checking the Result
Copy the compiled files to the board.
cp Release/\* /mnt/userdata/Demo/algorithm-fire/Enter the backend of the development board through serial debugging or SSH debugging, and move to the sample deployment directory as follows:
cd /userdata/Demo/algorithm-fire/The command to run the sample is as follows:
./test-fire_detect fire_detect.model test.jpg
Figure 2-4 Sample Execution Result
In the Docker development environment, copy the test result image from the board.
cp /mnt/userdata/Demo/algorithm-fire/result.jpg .
Figure 2-5 Command for Copying the Result Image
The recognition result is shown in the following figure.
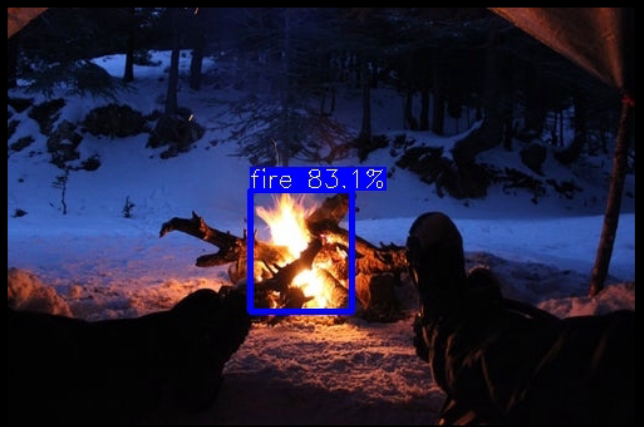
Figure 2-6 Flame Detection Result Image
For detailed API descriptions and API calls, that is, the source code of this sample, refer to the following sections.
3. Flame Detection API Description
3.1 Reference Method
To allow customers to directly call the EASY EAI API library from a local project, the libraries, header files, and other items that must be linked in this project are shown below. Users can add them directly.
| Item | Description |
|---|---|
| Header file directory | easyeai-api/algorithm/fire_detect |
| Library file directory | easyeai-api/algorithm/fire_detect |
| Library link parameter | -lfire_detect |
3.2 Flame Detection Initialization Function
The prototype of the flame detection initialization function is as follows:
int fire_detect_init(rknn_context \*ctx, const char \* path)The details are as follows:
| Function name: fire_detect_init() | |
|---|---|
| Header file | fire_detect.h |
| Input parameter | ctx: rknn_context handle |
|---|---|
| Input parameter | path: path of the algorithm model |
| Return value | Return value on success: 0 |
| Return value on failure: -1 | |
| Notes | None |
3.3 Flame Detection Execution Function
The prototype of the flame detection execution function fire_detect_run is as follows:
int fire_detect_run(rknn_context ctx, cv::Mat input_image, person_detect_result_group_t \*detect_result_group)The details are as follows:
| Function name: fire_detect_run() | |
|---|---|
| Header file | fire_detect.h |
| Input parameter | ctx: rknn_context handle |
| Input parameter | input_image: image data input (cv::Mat is an OpenCV type) |
| Output parameter | output_dets: object detection box output |
| Return value | Return value on success: 0 |
| Return value on failure: -1 | |
| Notes | None |
3.4 Flame Detection Release Function
The prototype of the flame detection release function is as follows:
int fire_detect_release(rknn_context ctx)The details are as follows:
| Function name: fire_detect_release() | |
|---|---|
| Header file | fire_detect.h |
| Input parameter | ctx: rknn_context handle |
| Return value | Return value on success: 0 |
|---|---|
| Return value on failure: -1 | |
| Notes | None |
4. Flame Detection Algorithm Sample
The sample directory is Demos/algorithm-fire/test-fire_detect.cpp, and the operation flow is as follows.
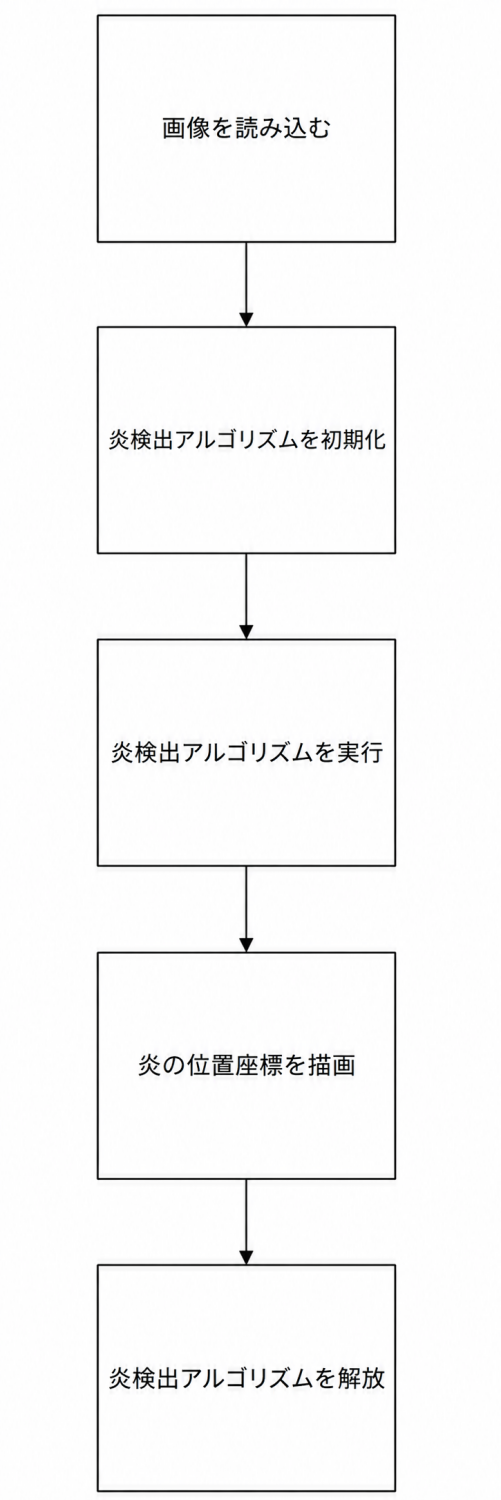
Figure 4-1 Flame Detection Algorithm Processing Flow
The reference sample is as follows.
#include <opencv2/opencv.hpp>#include <stdio.h>#include <sys/time.h>#include"fire_detect.h"
using namespace cv;using namespace std;
static Scalar colorArray[10]={    Scalar(255, 0, 0, 255),    Scalar(0, 255, 0, 255),    Scalar(0,0,139,255),    Scalar(0,100,0,255),    Scalar(139,139,0,255),    Scalar(209,206,0,255),    Scalar(0,127,255,255),    Scalar(139,61,72,255),    Scalar(0,255,0,255),    Scalar(255,0,0,255),};
int plot_one_box(Mat src, int x1, int x2, int y1, int y2, char *label, char colour){    int tl = round(0.002 * (src.rows + src.cols) / 2) + 1;    rectangle(src, cv::Point(x1, y1), cv::Point(x2, y2), colorArray[(unsigned char)colour], 3);
    int tf = max(tl -1, 1);
    int base_line = 0;    cv::Size t_size = getTextSize(label, FONT_HERSHEY_SIMPLEX, (float)tl/3, tf, &base_line);    int x3 = x1 + t_size.width;    int y3 = y1 - t_size.height - 3;
    rectangle(src, cv::Point(x1, y1), cv::Point(x3, y3), colorArray[(unsigned char)colour], -1);    putText(src, label, cv::Point(x1, y1 - 2), FONT_HERSHEY_SIMPLEX, (float)tl/3, cv::Scalar(255, 255, 255, 255), tf, 8);    return 0;}
int main(int argc, char **argv){  if (argc != 3)    {        printf("%s <model_path> <image_path>\n", argv[0]);        return -1;    }
    const char *model_path = argv[1];    const char *image_path = argv[2];
  /* パラメータ初期化 */  detect_result_group_t detect_result_group;
  /* アルゴリズムモデル初期化 */  rknn_context ctx;  fire_detect_init(&ctx, model_path);
  /* アルゴリズム実行 */  cv::Mat src;  src = cv::imread(image_path, 1);
  struct timeval start;  struct timeval end;  float time_use=0;
  gettimeofday(&start,NULL);
  fire_detect_run(ctx, src, &detect_result_group);
  gettimeofday(&end,NULL);  time_use=(end.tv_sec-start.tv_sec)*1000000+(end.tv_usec-start.tv_usec);//マイクロ秒  printf("time_use is %f\n",time_use/1000);
  /* アルゴリズム結果を画像上に描画して保存します */  // Draw Objects  char text[256];  for (int i = 0; i < detect_result_group.count; i++)  {
    detect_result_t* det_result = &(detect_result_group.results[i]);    if( det_result->prop < 0.4)    {      continue;    }
    sprintf(text, "%s %.1f%%", det_result->name, det_result->prop * 100);    printf("%s @ (%d %d %d %d) %f\n", det_result->name, det_result->box.left, det_result->box.top,         det_result->box.right, det_result->box.bottom, det_result->prop);    int x1 = det_result->box.left;    int y1 = det_result->box.top;    int x2 = det_result->box.right;    int y2 = det_result->box.bottom;    /*    rectangle(src, cv::Point(x1, y1), cv::Point(x2, y2), cv::Scalar(255, 0, 0, 255), 3);    putText(src, text, cv::Point(x1, y1 + 12), cv::FONT_HERSHEY_SIMPLEX, 0.5, cv::Scalar(0, 0, 0));    */    plot_one_box(src, x1, x2, y1, y2, text, i%10);  }
  cv::imwrite("result.jpg", src);

  /* アルゴリズムモデルのリソースを解放します */  fire_detect_release(ctx);
  return 0;}