
Network Protocol Software Manual
1.HTTP/HTTPS
1.1. Overview of HTTP/HTTPS
HTTP (Hyper Text Transfer Protocol) is the most widely used network protocol on the Internet. It is the standard for requests and responses between clients and servers, and it is a communication protocol used to transfer hypertext from a WWW server to a local system.
By contrast, HTTPS (Hyper Text Transfer Protocol over Secure Socket Layer) is an HTTP channel designed for security. Based on traditional HTTP, it encrypts communication and performs identity authentication (by adding the SSL/TLS security protocol), thereby ensuring security during the communication process.
1.1.1 Differences Between HTTP and HTTPS
The differences between HTTP and HTTPS are shown in the following table.
| Protocol | HTTP | HTTPS |
|---|---|---|
| CA Certificate | Not required | Required |
| Communication Encryption Method | Plaintext communication, no encryption | SSL/TLS encrypted communication |
| Connection Method | Uses port 80 | Uses port 443 |
| Connection State | Stateless | A network protocol built on SSL+HTTP that supports encrypted communication and identity authentication |
1.1.2 Requests and Responses
Typical HTTP/HTTPS communication takes place between a browser and a web server. The browser acts as the “client” and is responsible for sending requests, receiving messages, and rendering the display. The web server acts as the “server” and is responsible for responding to requests, managing server files, and handling specific business logic. In certain situations, HTTP can also serve as a communication rule for exchanging information.
The message sent by a client when it needs a resource is a “request message” (Request), and the message returned by the server to the client after receiving the request is a “response message” (Response). HTTP defines the formats of these request and response messages.
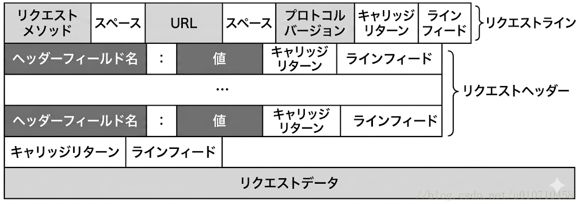
Request Message Format
The request message format is as follows.
| Message Element | Description |
|---|---|
| Request Line | Request method: Common methods are as follows. ・GET: Used to query and obtain resources from the server. The request content is displayed in the URL. ・POST: Used to create or update content on the server. The request content is not displayed in the URL, but is included in the message body. URL: The virtual file path on the server. Details are described in the next section. |
The main components of a response message are as follows.
-
Status Line: Contains the protocol version, status code, and status phrase.
-
Response Header: Exists in key-value pair format (for example, date and time, data type, data length, etc.).
-
Blank Line: A blank line used to distinguish the header from the body.
-
Response Body: For web pages, this is usually HTML code, but it can also be an audio/video file or an image. It is usually specified by Content-Type in the header.
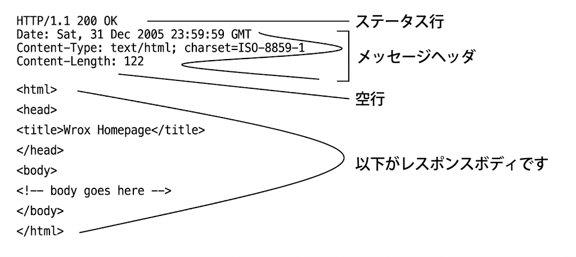
Response Message Format
1.1.3 URL
Assume that an environmental monitoring server system is built to collect and record environmental data from observation points around a city. Suppose the domain name on the public network is www.huanjin.com, and there are two devices in the server, each storing temperature data for different dates. When a client calls specific data from a specific device, it must send a unique path for the server to search. This unique path is the URL.

Example URL Structure of an Environmental Monitoring Server
A URL (Uniform Resource Locator) is placed in the request line of a request message and acts as a guidepost. When you browse a web page and click different components, the browser automatically completes different URLs. A complete URL consists of the protocol part, the URL (domain) part, and the file address.

Example URL Components
The details are as follows.
| Component | Description |
|---|---|
| Protocol | Separated by //. Common protocols include http and https. |
| URL (Domain) | A unique domain name on the public network. |
| File Address | The content from the first / after the domain name to before the last / is called the “virtual directory”. The content from after the last / to before # is the “file name”. |
For example, if you want to obtain the data for “December 25” from “Device 1” on the environmental monitoring server, use a GET request, and the URL will look like http://www.huanjin.com/Device-1/日付データ/20211225.
A URL can also contain variable information (URL query string). The format is as follows.
https://www.Adblock.com/s?a=123&b=234Variables are placed at the end of the URL, start with ?, and are stored as key-value pairs in the form parameter name=value. Multiple parameters are separated by &.
1.1.4 Key Points for Using HTTPS
From the description above, the following points should always be kept in mind when using HTTPS.
-
CA Certificate: The HTTPS protocol uses SSL/TLS.
-
Data Sending: Use POST requests, and express the server address in URL format.
-
Receiving Data/Files: Use GET requests, and express the server address in URL format.
Our easyeai-api open-source software library uniformly encapsulates complex message formats and send/receive operations, allowing users to implement HTTP/HTTPS communication functions through simple and convenient calls.
1.2. Quick Start
1.2.1 Preparing the Development Environment
If you are reading this document for the first time, please read “Getting Started Guide / Development Environment Preparation / Preparing and Updating the Easy-EAI Compilation Environment” and follow its steps to build the compilation environment.
Run the run script on the Ubuntu system of the PC to enter the EASY-EAI compilation environment. The details are as follows.
cd ~/develop_environment./run.sh 22041.2.2 Downloading the Source Code and Compiling the Sample
In the EASY-EAI compilation environment, create a directory for managing the source code repository.
cd /optmkdir EASY-EAI-Toolkitcd EASY-EAI-Toolkithttps://dl.dragonwake.com/download/rv1126b/embedded/EASY-EAI-Toolkit-1126B/Demos.zip
Download the Demos.zip archive from the link above, upload it to the /opt/EASY-EAI-Toolkit directory of the virtual machine, and extract it. Move to the corresponding sample directory and perform the compilation operation. The specific commands are as follows.
cd EASY-EAI-Toolkit-1126B/Demos/netProtocol-http/./build.sh💡 Note: Because the dependent libraries are located on the board, be sure to keep /mnt mounted during cross-compilation.
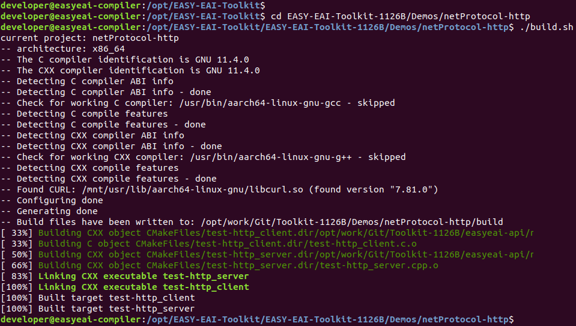
HTTP Sample Build Result
1.2.3 Running the Sample
Enter the board backend through serial debugging or SSH debugging, and move to the location where the sample is placed, as follows.
cd /userdata/Demo/netProtocol-http
HTTP Sample Directory
The command to run the sample is as follows.
./test-http_server & ./test-http_client1.2.4 Execution Result
The execution result is as follows.

HTTP Sample Execution Result
1.3. HTTPS Library Function Description
This section describes how to use the HTTPS library functions of EASY EAI.
1.3.1 Include/Reference Method
The EASY EAI api library is located in the easyeai-api directory of this repository. To allow users to directly call the EASY EAI api library in their local projects, the libraries and header files that need to be linked in the project are listed below.
| Description | CMake Entry | Makefile Entry |
|---|---|---|
| api.cmake | ${netProtocol_root}/http/api.cmake | None |
| Header File Directory | ${HTTP_INCLUDE_DIRS} | -I ../../easyeai-api/netProtocol/http |
| Source File Directory | ${HTTP_SOURCE_DIRS} | ../../easyeai-api/netProtocol/http |
| Library File Directory | None | None |
| Library Link Parameters | ${HTTP_LIBS} | None |
The API source code path is EASY-EAI-Toolkit-1126B/easyeai-api/netProtocol/http/. Users can check the interface implementation through the source code and can also directly modify the source code.
1.3.2 Certificate Setting
The prototype of the function for setting the certificate is as follows.
void set_customer_crt(const char \*crt_file);The details are as follows.
| Function Name: set_customer_crt() | Details |
|---|---|
| Header File | easyeai-api/netProtocol/http/https_request.h |
| Input Parameters | crt_file: certificate path |
| Return Value | None |
| Notes | None |
1.3.3 Sending form-data Data to an HTTP/HTTPS Server
1.3.3.1 Clearing the form_data Cache
The prototype of the function for clearing the cache is as follows.
void clear_multipart();The details are as follows.
| Function Name: clear_multipart() | Details |
|---|---|
| Header File | easyeai-api/netProtocol/http/https_request.h |
| Input Parameters | None |
| Return Value | None |
| Notes | Because only one form-data cache exists, executing this function anywhere will clear the form-data cache. If this function is executed in multiple threads, pay attention to thread synchronization issues. |
1.3.3.2 Adding to the form_data Cache (Padding)
The prototype of the function for adding to the cache is as follows. The data to be sent is added in key-value pair format.
void add_multipart_form_data(const char \*key, const char \*value);The details are as follows.
| Function Name: add_multipart_form_data() | Details |
|---|---|
| Header File | easyeai-api/netProtocol/http/https_request.h |
| Input Parameters | key: key name of the form-data data value: content of the form-data data |
| Return Value | None |
| Notes | Only one form-data cache exists. When clear_multipart() is executed, all form-data data added to the cache up to that point is cleared. If executing in multiple threads, pay attention to thread synchronization issues. |
1.3.3.3 Sending form-data Data
Because HTTP and HTTPS use different encryption methods, two functions are defined although their parameters are the same. The function prototypes are as follows.
int32_t send_data_to_Http(const char *server, const char *func, char *result, uint32_t result_lenth);int32_t send_data_to_Https(const char *server, const char *func, char *result, uint32_t result_lenth);The details are as follows.
| HTTP Sending Function: send_data_to_Http() HTTPS Sending Function: send_data_to_Https() | Details |
|---|---|
| Header File | easyeai-api/netProtocol/https/https_request.h (kept as in the original text) |
| Input Parameters | server: server URL func: method (path/API name) result: buffer for storing response body data from HTTP/HTTPS result_lenth: maximum size of the buffer allocated by the user for body data |
| Return Value | -1: failure 0: success. clear_multipart() is automatically called inside the function to clear the cache. |
| Notes | This interface encapsulates HTTP/HTTPS POST requests and sends the form-data cache. After a successful call, the cache is cleared. In a multithreaded environment, pay attention to synchronization. |
1.3.4 Sending JSON Data to an HTTP/HTTPS Server
Because HTTP and HTTPS use different encryption methods, separate functions are defined for each (the parameters are identical).
int32_t send_json_to_Http(const char *server, const char *func, const char *json, char *result, uint32_t result_length);int32_t send_json_to_Https(const char *server, const char *func, const char *json, char *result, uint32_t result_length);The details are as follows.
| HTTP Sending Function: send_json_to_Http() HTTPS Sending Function: send_json_to_Https() | Details |
|---|---|
| Header File | easyeai-api/netProtocol/https/https_request.h |
| Input Parameters | server: server URL func: method (path/API name) json: JSON string to send result: buffer for storing response body data result_lenth: maximum size of the buffer allocated by the user for body data |
| Return Value | -1: failure 0: success |
| Notes | None |
1.3.5 Obtaining Files from an HTTP/HTTPS Server
Because HTTP and HTTPS use different encryption methods, separate functions are defined for each (the parameters are identical).
int32_t get_file_from_https(const char *url, const char *func, const char *filePath);int32_t get_file_from_http(const char *url, const char *func, const char *filePath);The details are as follows.
| HTTP File Obtaining Function: get_file_from_https() (kept as in the original text) HTTPS File Obtaining Function: get_file_from_http() (kept as in the original text) | Details |
|---|---|
| Header File | easyeai-api/netProtocol/https/https_request.h |
| Input Parameters | url: server URL path func: method (path) filePath: local path for saving the obtained file |
| Return Value | Success, Unknown, Connection, BindIPAddress, ReadWrite, ExceedRedirectCount, Canceled, SSLConnection, SSLLoadingCerts, SSLServerVerification, UnsupportedMultipartBoundaryChars, Compression, etc. |
| Notes | This interface encapsulates HTTP/HTTPS GET requests. |
1.4. Usage Examples
The sample code path is EASY-EAI-Toolkit-1126B/Demos/netProtocol-http/test-http_client.c.
1.4.1 Setting the CRT Key File (Certificate)
The key file setting operation is as follows.
set_customer_crt("/userdata/customer.crt");1.4.2 Sending form_data Data
1.4.2.1 Adding Data
Clear the form_data data buffer, and then add data to the form_data buffer.
clear_multipart();add_multipart_form_data("name", "gzlmo");add_multipart_form_data("id", "888888");add_multipart_form_data("pwd", "123456");1.4.2.2 Sending Data
The sending operation is as follows.
send_data_to_Http("192.168.3.191:50000", "/add", res, sizeof(res));1.4.3 Sending JSON Data
The JSON data sending operation is as follows.
send_json_to_Http("192.168.3.191:50000", "/add", "{name : \\gzlmo\\}", res, sizeof(res));2.MQTT
2.1. Overview of MQTT
MQTT (Message Queuing Telemetry Transport) is a “lightweight” communication protocol based on the publish/subscribe model. The greatest advantage of MQTT is that it can provide real-time and reliable messaging services for remote device connections with very little code and limited bandwidth. As an instant communication protocol with low overhead and low bandwidth consumption, it is widely used in IoT (Internet of Things), small devices, mobile applications, and more.
2.1.1 Publish and Subscribe
The publish/subscribe messaging model used by MQTT provides a one-to-many message distribution mechanism and achieves loose coupling between applications. In this model, messages are not sent directly from the sender to the receiver (peer-to-peer), but are distributed through an MQTT server, also known as an MQTT broker.
-
The MQTT communication process includes three roles: Publisher, Broker, and Subscriber.
-
Messages transferred by MQTT are divided into two parts: the Topic and the Payload.

MQTT Publish/Subscribe Model
A publisher publishes a message for a specific topic to the broker (MQTT Broker), and the broker pushes the message to all subscribers that subscribe to that topic.
- The client that publishes messages is the publisher, and the client that subscribes to messages for a topic is the subscriber.
2.1.2 Quality of Service (QoS: Quality of Service Levels)
Quality of Service is one of the important features of MQTT. When TCP/IP is used, the connection is protected to some extent. However, disconnections and interference frequently occur in wireless networks, so MQTT QoS levels help prevent information loss.
2.1.2.1 QoS 0
“At most once.” Message delivery depends entirely on the underlying TCP/IP network. Message loss or duplication may occur. This level is used in situations such as environmental sensor data, where the next data is sent immediately and missing one record is not a problem.
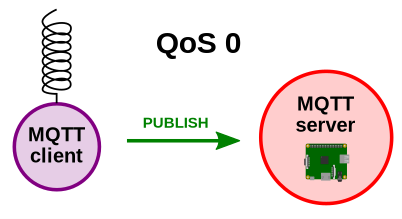
MQTT QoS 0 Communication Flow
2.1.2.2 QoS 1
“At least once.” Message arrival is guaranteed, but duplicate messages may arrive.
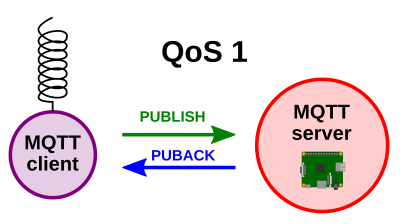
MQTT QoS 1 Communication Flow
2.1.2.3 QoS 2
“Exactly once.” This guarantees that the message arrives exactly once. This level is used in situations such as billing systems, where message duplication or loss would cause incorrect results.
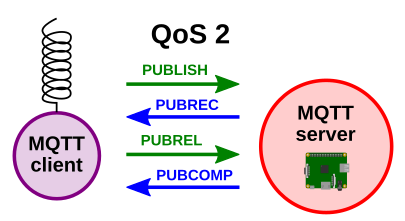
MQTT QoS 2 Communication Flow
- Messages with a unique message ID are stored on both the sender and receiver sides. Because QoS level 2 requires two flows on both the sender and receiver sides, it has the highest network overhead.
2.1.3 Introduction to Open-Source Projects
As a widely used project with an active community, the Eclipse Paho C library is currently the most common and popular open-source MQTT client library for the C language. It is applicable to platforms such as Windows, macOS, Linux, FreeRTOS, and ESP32.
-
Official website: https://www.eclipse.org/
-
GitHub repository: https://github.com/eclipse-paho/paho.mqtt.c
On an Ubuntu system, you can directly compile the GitHub repository to obtain the required libraries and header files, or you can install them directly with the following commands (this step is optional):
sudo apt-get updatesudo apt-get install libpaho-mqtt-devPaho C has the advantages of broad platform support and high compatibility, but it also has limitations: its API is relatively low-level, it is not very convenient to use, and it requires additional custom wrapping (encapsulation).
Therefore, this document uses mosquitto, another MQTT project under Eclipse. This project is more suitable for resource-constrained embedded devices. Although it is not as comprehensive as Paho C, it meets basic requirements and is very easy to use.
- Official website: https://mosquitto.org/
On an Ubuntu system, you can directly install the related development libraries with the following commands:
sudo apt-get updatesudo apt-get install libmosquitto-dev2.1.4 Common Communication Model
A common usage model is to deploy an MQTT Server (broker) program in the cloud, while the board (development board) acts as both publisher and subscriber to send and receive data.
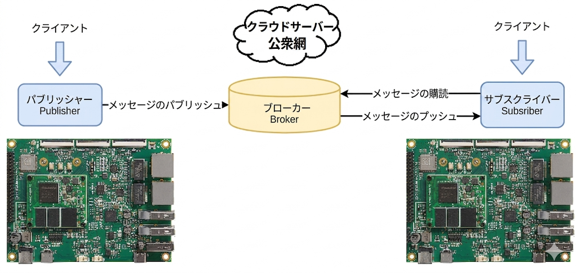
MQTT Communication Model
If you want to use it inside a local network (LAN), you can also deploy an MQTT Server on a PC platform (Windows/Linux), and have the board communicate as the publisher and subscriber.
For example, on an Ubuntu system, run the following commands to deploy the MQTT Server:
sudo apt-get updatesudo apt-get install mosquittosudo systemctl start mosquittoIf you want MQTT Server to start automatically when Ubuntu starts, run the following additional command:
sudo systemctl enable mosquitto2.1.5 Demo Description
To simplify the demo explanation in this document, the broker, subscriber, and publisher are all deployed on the same board device.
First, power on the board and connect it to the network. Then enter the board backend through the serial port or SSH and install the MQTT-related resources:
sudo apt-get updatesudo apt-get install libmosquitto-dev mosquittosudo systemctl enable mosquitto && sudo systemctl start mosquitto2.2. Quick Start
2.2.1 Preparing the Development Environment
If you are reading this document for the first time, please read “Getting Started Guide / Development Environment Preparation / Preparing and Updating the Easy-EAI Compilation Environment” and follow its steps to build the compilation environment.
Run the run script on the Ubuntu system of the PC to enter the EASY-EAI compilation environment.
cd ~/develop_environment./run.sh 22042.2.2 Downloading the Source Code and Compiling the Sample
In the EASY-EAI compilation environment, create a directory for managing the source code repository.
cd /optmkdir EASY-EAI-Toolkitcd EASY-EAI-Toolkithttps://dl.dragonwake.com/download/rv1126b/embedded/EASY-EAI-Toolkit-1126B/Demos.zip
Download the Demos.zip archive from the link above, upload it to the /opt/EASY-EAI-Toolkit directory of the virtual machine, and extract it. Move to the corresponding sample directory and perform the compilation operation.
cd EASY-EAI-Toolkit-1126B/Demos/netProtocol-mqtt/./build.sh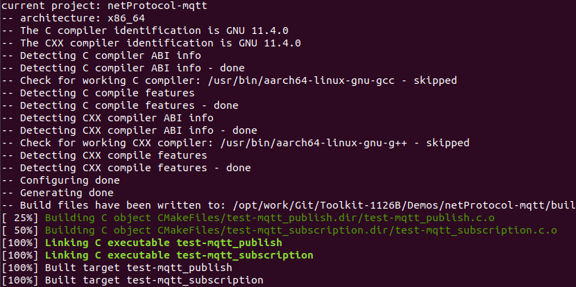
MQTT Sample Build Result
💡 Note: Because the dependent libraries are located on the board, be sure to keep /mnt mounted during cross-compilation. If compilation fails with an error saying mosquitto.h cannot be found, check the 1.5 Demo Description section.
2.2.3 Running the Sample
Enter the board backend through serial debugging or SSH and move to the location of the sample program.
cd /userdata/Demo/netProtocol-mqtt
MQTT Sample Directory
First, run the subscriber program:
./test-mqtt_subscription &
MQTT Subscriber Startup Result
💡 Note: If execution fails and “Connection refused” is displayed, check the 1.5 Demo Description section. Because the subscriber runs in the background, terminate the process with the kill command before running it again.
Next, run the publisher program:
./test-mqtt_publish2.2.4 Execution Result
As the execution result, you can confirm that the subscriber successfully receives and outputs the message sent by the publisher.

MQTT Publish/Subscribe Execution Result
2.3. Mosquitto Library Function Description
This section describes the interfaces of the mosquitto library used in this sample. For a more detailed API description, refer to the API documentation on the official website (https://mosquitto.org/api/files/mosquitto-h.html).
2.3.1 Reference Method
The EASY EAI api library is located in the easyeai-api directory of this repository. The libraries and header files that need to be linked in the project are as follows.
| Description | CMake Entry | Makefile Entry |
|---|---|---|
| api.cmake | ${netProtocol_root}/mqtt/api.cmake | None |
| Header File Directory | ${MQTT_INCLUDE_DIRS} | $SYSROOT/usr/include/ |
| Source File Directory | ${MQTT_SOURCE_DIRS} | None |
| Library File Directory | None | $SYSROOT/usr/lib/aarch64-linux-gnu/ |
| Library Link Parameters | ${MQTT_LIBS} | -lmosquitto -lcrypto -lssl -lstdc++ |
The API source code path is EASY-EAI-Toolkit-1126B/easyeai-api/netProtocol/mqtt/.
2.3.2 Initializing the Mosquitto Library
int mosquitto_lib_init(void);| Item | Details |
|---|---|
| Function Name | mosquitto_lib_init() |
| Header File | $SYSROOT/usr/include/mosquitto.h |
| Input Parameters | None |
| Return Value | MOSQ_ERR_SUCCESS (0): initialization successful |
2.3.3 Creating a New Mosquitto Client Instance
struct mosquitto \*mosquitto_new(const char \*id, bool clean_session, void \*userdata);| Item | Details |
|---|---|
| Function Name | mosquitto_new(const char *id, bool clean_session, void *userdata) |
| Header File | $SYSROOT/usr/include/mosquitto.h |
| Input Parameters | id: client identifier (string) clean_session: if true, session information is cleared when disconnected. If false, session information is retained. userdata: pointer to user-defined data |
| Return Value | struct mosquitto * (pointer to the instance) |
2.3.4 Setting the Connection Callback Function
Handles changes in the connection state with the broker.
void mosquitto_connect_callback_set(struct mosquitto \*mosq, void (\*on_connect)(struct mosquitto \*, void \*,int));| Item | Details |
|---|---|
| Function Name | mosquitto_connect_callback_set(struct mosquitto *mosq, void (*on_connect)(struct mosquitto *, void *, int)) |
| Header File | $SYSROOT/usr/include/mosquitto.h |
| Input Parameters | mosq: client instance on_connect: pointer to the connection callback function (return value: void; arguments: client instance, user data, connection return code) |
2.3.5 Setting the Disconnection Callback Function
Handles disconnection events from the broker.
void mosquitto_disconnect_callback_set(struct mosquitto \*mosq, void (\*on_disconnect)(struct mosquitto \*, void \*, int));| Item | Details |
|---|---|
| Function Name | mosquitto_disconnect_callback_set(struct mosquitto *mosq, void (*on_disconnect)(struct mosquitto *, void *, int)) |
| Header File | $SYSROOT/usr/include/mosquitto.h |
| Input Parameters | mosq: client instance on_disconnect: pointer to the disconnection callback function (return value: void; arguments: client instance, user data, disconnection return code) |
2.3.6 Setting the Message Publish Callback Function
Handles the event that occurs when a message is successfully sent to the broker.
void mosquitto_publish_callback_set(struct mosquitto \*mosq, void (\*on_publish)(struct mosquitto \*, void \*, int));| Item | Details |
|---|---|
| Function Name | mosquitto_publish_callback_set(struct mosquitto *mosq, void (*on_publish)(struct mosquitto *, void *, int)) |
| Header File | netProtocol-mqtt/include/mosquitto.h |
| Input Parameters | mosq: client instance on_publish: pointer to the message publish callback function (arguments: client instance, user data, message ID) |
2.3.7 Setting the Subscribe Callback Function
Handles the event that occurs when subscription to a topic succeeds.
void mosquitto_subscribe_callback_set(struct mosquitto \*mosq, void (\*on_subscribe)(struct mosquitto \*, void \*, int, int, const int \*));| Item | Details |
|---|---|
| Function Name | mosquitto_subscribe_callback_set(struct mosquitto *mosq, void (*on_subscribe)(struct mosquitto *, void *, int, int, const int *)) |
| Header File | $SYSROOT/usr/include/mosquitto.h |
| Input Parameters | mosq: client instance on_subscribe: callback function pointer. The arguments, in order, are: client instance, user data pointer, message ID, number of successfully subscribed topics, and QoS level array. |
2.3.8 Connecting to the Specified Broker
int mosquitto_connect(struct mosquitto \*mosq, const char \*host, int port, int keepalive);| Item | Details |
|---|---|
| Function Name | mosquitto_connect(struct mosquitto *mosq, const char *host, int port, int keepalive) |
| Header File | $SYSROOT/usr/include/mosquitto.h |
| Input Parameters | mosq: client instance host: broker address port: broker port number keepalive: keep-alive time (seconds) |
2.3.9 Subscribing to a Topic
int mosquitto_subscribe(struct mosquitto \*mosq, int \*mid, const char \*sub, int qos);| Item | Details |
|---|---|
| Function Name | mosquitto_subscribe(struct mosquitto *mosq, int *mid, const char *sub, int qos) |
| Header File | $SYSROOT/usr/include/mosquitto.h |
| Input Parameters | mosq: client instance mid: pointer to the variable that stores the message ID (NULL is also allowed) sub: topic string to subscribe to qos: QoS level for the subscription |
| Return Value | MOSQ_ERR_SUCCESS indicates success; any other value indicates failure |
2.3.10 Publishing a Message to the Specified Topic
int mosquitto_publish(struct mosquitto \*mosq, int \*mid, const char \*topic, int payloadlen, const void \*payload, int qos, bool retain);| Item | Details |
|---|---|
| Function Name | mosquitto_publish(struct mosquitto *mosq, int *mid, const char *topic, int payloadlen, const void *payload, int qos, bool retain) |
| Header File | $SYSROOT/usr/include/mosquitto.h |
| Input Parameters | mosq: client instance mid: pointer for storing the message ID (NULL is also allowed) topic: destination topic string payloadlen: length of the message payload payload: pointer to the message payload data qos: QoS level retain: if true, retain the message |
| Return Value | MOSQ_ERR_SUCCESS indicates success; any other value indicates failure |
2.3.11 Disconnecting from the Broker
void mosquitto_destroy(struct mosquitto \*mosq);| Item | Details |
|---|---|
| Function Name | mosquitto_disconnect(struct mosquitto *mosq) |
| Header File | $SYSROOT/usr/include/mosquitto.h |
| Input Parameters | mosq: client instance |
2.3.12 Destroying the Mosquitto Client Instance
void mosquitto_destroy(struct mosquitto \*mosq);| Item | Details |
|---|---|
| Function Name | mosquitto_destroy(struct mosquitto *mosq) |
| Header File | $SYSROOT/usr/include/mosquitto.h |
| Input Parameters | mosq: client instance |
2.3.13 Cleaning Up Resources Used by the Mosquitto Library
void mosquitto_lib_cleanup(void);| Item | Details |
|---|---|
| Function Name | mosquitto_lib_cleanup(void) |
| Header File | $SYSROOT/usr/include/mosquitto.h |
| Input Parameters | None |
2.4. Usage Examples
- Sending (Publish) Sample Code Path:
EASY-EAI-Toolkit-1126B/Demos/netProtocol-mqtt/test-mqtt_publish.c
- Subscribe Sample Code Path:
EASY-EAI-Toolkit-1126B/Demos/netProtocol-mqtt/test-mqtt_subscription.c
3.MODBUS
3.1. Overview of MODBUS
MODBUS is an application-layer message transfer protocol for client/server communication between devices connected through different types of buses or networks. The main reasons Modbus is more widely used than other communication protocols are that it is publicly available and has no copyright requirements, it is easy to deploy and maintain, and it imposes fewer restrictions on vendors when moving local bits and bytes.
3.1.1 Protocol Versions and Contents
Currently, the Modbus protocol has versions for networks that support serial ports, Ethernet, and other Internet protocols.
Most Modbus devices communicate through the serial EIA-485 physical layer. Serial connections have two variants, with slight differences in numeric data representation and protocol details. MODBUS modes are divided into three categories: RTU (Remote Terminal Unit) mode, ASCII (American Standard Code for Information Interchange) mode, and TCP (a protocol running over Ethernet) mode.
-
Modbus RTU: A compact method that represents data in binary (specified by the Modbus protocol; the default mode must be RTU, and ASCII is optional).
-
Modbus ASCII: A verbose representation method that is human-readable.
Both of these variants use serial communication. For connections through TCP/IP (such as Ethernet), there are multiple Modbus/TCP variants, and this method does not require checksum calculation. All three communication protocols are the same in terms of data model and function calls; only the encapsulation method differs.
3.1.2 Communication and Devices
The Modbus protocol uses a master/slave architecture. One node is the master node, and the other nodes participating in communication using the Modbus protocol are slave nodes. Each slave device has a unique address. In serial networks and MB+ networks, only the node designated as the master node can initiate commands (on Ethernet, any device can send Modbus commands, but usually only one master-node device initiates commands).
A Modbus command includes the Modbus address of the device on which it is to be executed. All devices receive the command, but only the device with the specified address executes and responds to it (address 0 is an exception; commands specifying address 0 are broadcast commands. All devices that receive the command execute it, but they do not respond). Every Modbus command includes a check code to verify that the received command has not been corrupted. Basic Modbus commands can instruct an RTU to change a specific value in its register, control or read an I/O port, or send one or more data items in its register back to the device.
3.1.3 Key Points for Using MODBUS
From the description above, the following points should always be noted when using Modbus.
-
Modbus is master-slave communication and cannot communicate asynchronously.
-
If the master does not send, no data communication occurs on the bus.
-
The device must support the RTU protocol (this is specified by the Modbus protocol).
-
The basic flow is as follows.
-
Send: slave address + function code + register address + number of register addresses + check code
-
Response: slave address + function code + number of bytes of data sent to the master + data + check code
-
Our easyeai-api open-source software library integrally encapsulates complex message formats and send/receive operations, allowing users to implement Modbus communication functions through simple and convenient calls.
3.2. Quick Start
3.2.1 Preparing the Development Environment
Run the run script on the Ubuntu system of the PC to enter the EASY-EAI compilation environment. The specific steps are as follows.
cd ~/develop_environment./run.sh 22043.2.2 Downloading the Source Code and Compiling the Sample Program
In the EASY-EAI compilation environment, create a management directory for storing the source code repository.
cd /optmkdir EASY-EAI-Toolkitcd EASY-EAI-Toolkithttps://dl.dragonwake.com/download/rv1126b/embedded/EASY-EAI-Toolkit-1126B/Demos.zip Download the Demos.zip archive from the link above, upload it to the /opt/EASY-EAI-Toolkit directory of the virtual machine, and extract it.
Move to the corresponding sample program directory and perform the compilation operation. The specific commands are as follows.
cd EASY-EAI-Toolkit-1126B/Demos/netProtocol-modbus/./build.sh💡 Note: Because the dependent libraries are located on the board, be sure to keep the /mnt mount during the cross-compilation process.
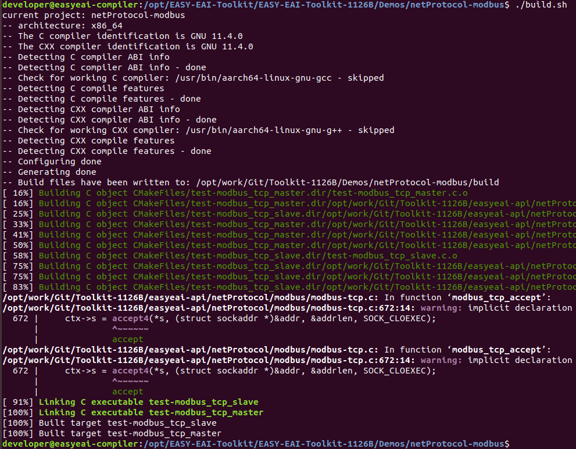
MODBUS Sample Build Result
3.2.3 Running the Sample Program
Enter the board backend through serial debugging or SSH debugging, and move to the location where the sample program is deployed, as follows.
cd /userdata/Demo/netProtocol-modbus
MODBUS Sample Directory
The command to run the sample program is as follows.
./test-modbus_tcp_master & ./test-modbus_tcp_slave3.2.4 Execution Result
The execution result in TCP mode is as follows.
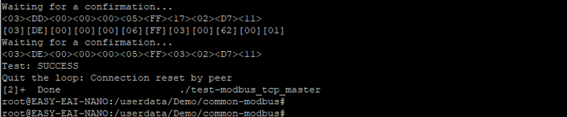
MODBUS TCP Execution Result
If you need to change to RTU mode, you can modify the code yourself.
- Code Path: EASY-EAI-Toolkit-1126B/Demos/netProtocol-modbus/test-modbus_tcp_slave.c
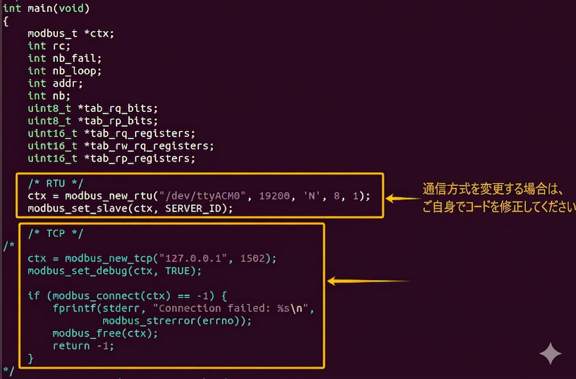
MODBUS RTU Code Modification Location
For detailed API descriptions and API calls (the source code of this sample program), refer to the following description.
3.3. MODBUS Library Function Description
This section introduces how to use the MODBUS library functions of EASY EAI.
3.3.1 Include Method
The EASY EAI api library is located in the easyeai-api directory of this repository. To allow users to directly call our EASY EAI api library in their local projects, the libraries and header files that need to be linked in the project are listed below.
| Description | CMake Entry | Makefile Entry |
|---|---|---|
| api.cmake | ${netProtocol_root}/modbus/api.cmake | None |
| Header Directory | ${MODBUS_INCLUDE_DIRS} | -I ../../easyeai-api/netProtocol/modbus |
| Source Directory | ${MODBUS_SOURCE_DIRS} | ../../easyeai-api/netProtocol/modbus |
| Library Directory | None | None |
| Link Parameters | ${MODBUS_LIBS} | None |
The API source code path is EASY-EAI-Toolkit-1126B/easyeai-api/netProtocol/modbus/. You can check the interface implementation through the source code and can also modify the source code.
3.3.2 Creating an Instance
Creates and initializes a Modbus instance using the TCP method.
modbus_t\* modbus_new_tcp(const char \*ip, int port);| Function Name: modbus_new_tcp() | Details |
|---|---|
| Header File | easyeai-api/netProtocol/modbus/modbus.h |
| Input Parameters | ip: IP address port: port number |
| Return Value | Success: Modbus instance Failure: NULL |
| Notes | None |
3.3.3 Setting the Slave ID
The prototype of the function for setting the slave ID is as follows.
void modbus_set_slave(modbus_t \*ctx, int slave);| Function Name: modbus_set_slave() | Details |
|---|---|
| Header File | easyeai-api/netProtocol/modbus/modbus.h |
| Input Parameters | ctx: Modbus instance slave: slave ID |
| Return Value | Success: 0 Failure: -1 |
| Notes | None |
3.4 Connecting to the Slave
The prototype of the function for establishing a connection with the slave is as follows.
void modbus_connect(modbus_t \*ctx);| Function Name: modbus_connect() | Details |
|---|---|
| Header File | easyeai-api/netProtocol/modbus/modbus.h |
| Input Parameters | ctx: Modbus instance |
| Return Value | Success: 0 Failure: -1 |
| Notes | None |
3.4.1 Register Operations (Functions Corresponding to Function Codes)
3.4.1.1 Reading Coil Status (Function Code: 0x01)
Multiple consecutive coil states can be read.
int modbus_read_bits(modbus_t \*ctx, int addr, int nb, uint8_t \*dest);| Function Name: modbus_read_bits() | Details |
|---|---|
| Header File | easyeai-api/netProtocol/modbus/modbus.h |
| Input Parameters | ctx: Modbus instance addr: register start address nb: number of registers dest: obtained status values |
| Return Value | Number of registers read (returns -1 on failure) |
| Notes | None |
3.4.1.2 Reading Input Status (Function Code: 0x02)
Multiple consecutive input states can be read.
int modbus_read_input_bits(modbus_t \*ctx, int addr, int nb, uint8_t \*dest);| Function Name: modbus_read_input_bits() | Details |
|---|---|
| Header File | easyeai-api/netProtocol/modbus/modbus.h |
| Input Parameters | ctx: Modbus instance addr: register start address nb: number of registers dest: obtained status values |
| Return Value | Success: returns the value of nb (returns -1 on failure) |
| Notes | None |
3.4.1.3 Reading Holding Registers (Function Code: 0x03)
The values of multiple consecutive holding registers can be read.
int modbus_read_registers(modbus_t \*ctx, int addr, int nb, uint16_t \*dest);| Function Name: modbus_read_registers() | Details |
|---|---|
| Header File | easyeai-api/netProtocol/modbus/modbus.h |
| Input Parameters | ctx: Modbus instance addr: register start address nb: number of registers dest: obtained register values |
| Return Value | Success: number of registers read Failure: -1 |
| Notes | None |
3.4.1.4 Reading Input Registers (Function Code: 0x04)
The values of multiple consecutive input registers can be read.
int modbus_read_input_registers(modbus_t \*ctx, int addr, int nb, uint16_t \*dest);| Function Name: modbus_read_input_registers() | Details |
|---|---|
| Header File | easyeai-api/netProtocol/modbus/modbus.h |
| Input Parameters | ctx: Modbus instance addr: register start address nb: number of registers dest: obtained register values |
| Return Value | Success: number of registers read Failure: -1 |
| Notes | None |
3.4.1.5 Writing a Single Coil Status (Function Code: 0x05)
int modbus_write_bit(modbus_t \*ctx, int addr, int status);| Function Name: modbus_write_bit() | Details |
|---|---|
| Header File | easyeai-api/netProtocol/modbus/modbus.h |
| Input Parameters | ctx: Modbus instance addr: coil address status: coil status |
| Return Value | Success: 0 Failure: -1 |
| Notes | None |
3.4.1.6 Writing Multiple Consecutive Coil States (Function Code: 15)
int modbus_write_bits(modbus_t \*ctx, int addr, int nb, const uint8_t \*src);| Function Name: modbus_write_bits() | Details |
|---|---|
| Header File | easyeai-api/netProtocol/modbus/modbus.h |
| Input Parameters | ctx: Modbus instance addr: coil start address nb: number of coils src: multiple coil states to write |
| Return Value | Success: 0 Failure: -1 |
| Notes | None |
3.4.1.7 Writing a Single Register (Function Code: 0x06)
int modbus_write_register(modbus_t \*ctx, int addr, int value);| Function Name: modbus_write_register() | Details |
|---|---|
| Header File | easyeai-api/netProtocol/modbus/modbus.h |
| Input Parameters | ctx: Modbus instance addr: register address value: register value |
| Return Value | Success: 0 Failure: -1 |
| Notes | None |
3.4.1.8 Writing Multiple Consecutive Registers (Function Code: 16)
int modbus_write_registers(modbus_t \*ctx, int addr, int nb, const uint16_t \*src);| Function Name: modbus_write_registers() | Details |
|---|---|
| Header File | easyeai-api/netProtocol/modbus/modbus.h |
| Input Parameters | ctx: Modbus instance addr: register start address nb: number of registers src: values of multiple registers to write |
| Return Value | Success: 0 Failure: -1 |
| Notes | None |
3.4.2 Closing the Socket
The prototype of the function for closing the socket is as follows.
void modbus_close(modbus_t \*ctx);| Function Name: modbus_close() | Details |
|---|---|
| Header File | easyeai-api/netProtocol/modbus/modbus.h |
| Input Parameters | ctx: Modbus instance |
| Return Value | None |
| Notes | None |
3.4.3 Releasing the Instance
The prototype of the function for releasing the instance is as follows.
void modbus_free(modbus_t \*ctx);| Function Name: modbus_free() | Details |
|---|---|
| Header File | easyeai-api/netProtocol/modbus/modbus.h |
| Input Parameters | ctx: Modbus instance |
| Return Value | None |
| Notes | None |