
YOLOv8 Training and Deployment Guide
Document Information
This tutorial describes how to train the YOLOv8 object detection model and deploy it to the CSUN RV1126B board.
| Item | Description |
|---|---|
| Document Name | YOLOv8 Training and Deployment Guide |
| Company | Nissho Technology Co., Ltd. |
| URL | http://www.dragonwake.com |
| info@dragonwake.com | |
| Created Date | 2026/06/05 |
| Version | Ver1.0 |
| Revision | New document |
1. YOLOv8 Overview
YOLOv8 is a next-generation major YOLO release open-sourced by Ultralytics on January 10, 2023. It is updated based on YOLOv5 and supports tasks such as image classification, object detection, and instance segmentation. Thanks to the strong track record of YOLOv5, YOLOv8 attracted wide attention even before its release. The main network architecture is shown below.
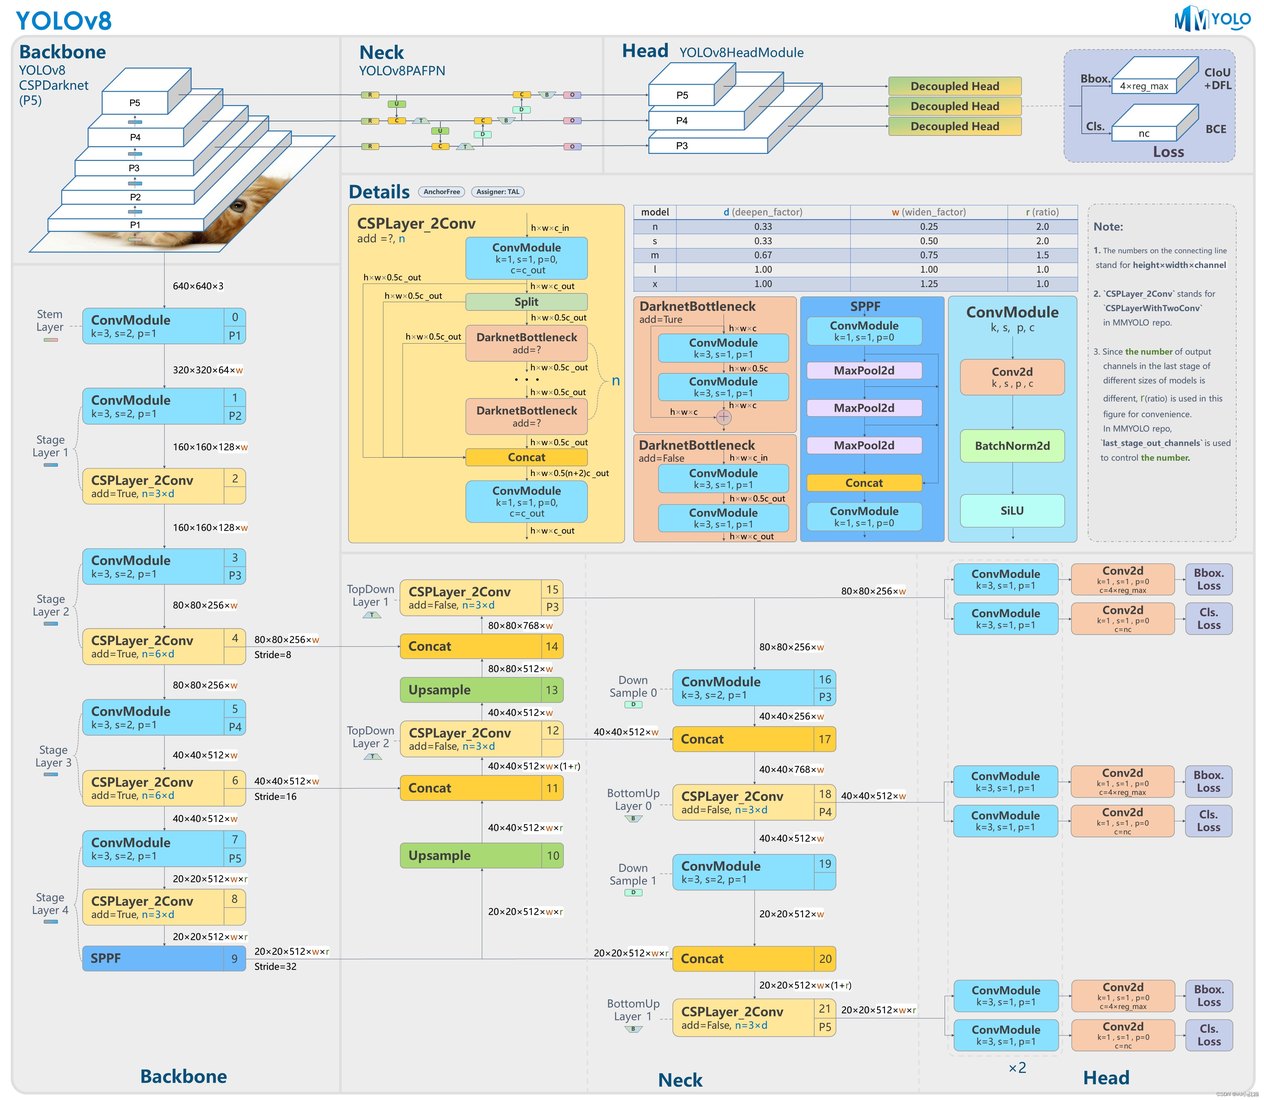
Figure 1-1 YOLOv8 network architecture
This tutorial describes how to train a YOLOv8 object detection model and deploy it to the CSUN RV1126B board. For data annotation methods, refer to the previously published annotation documents.
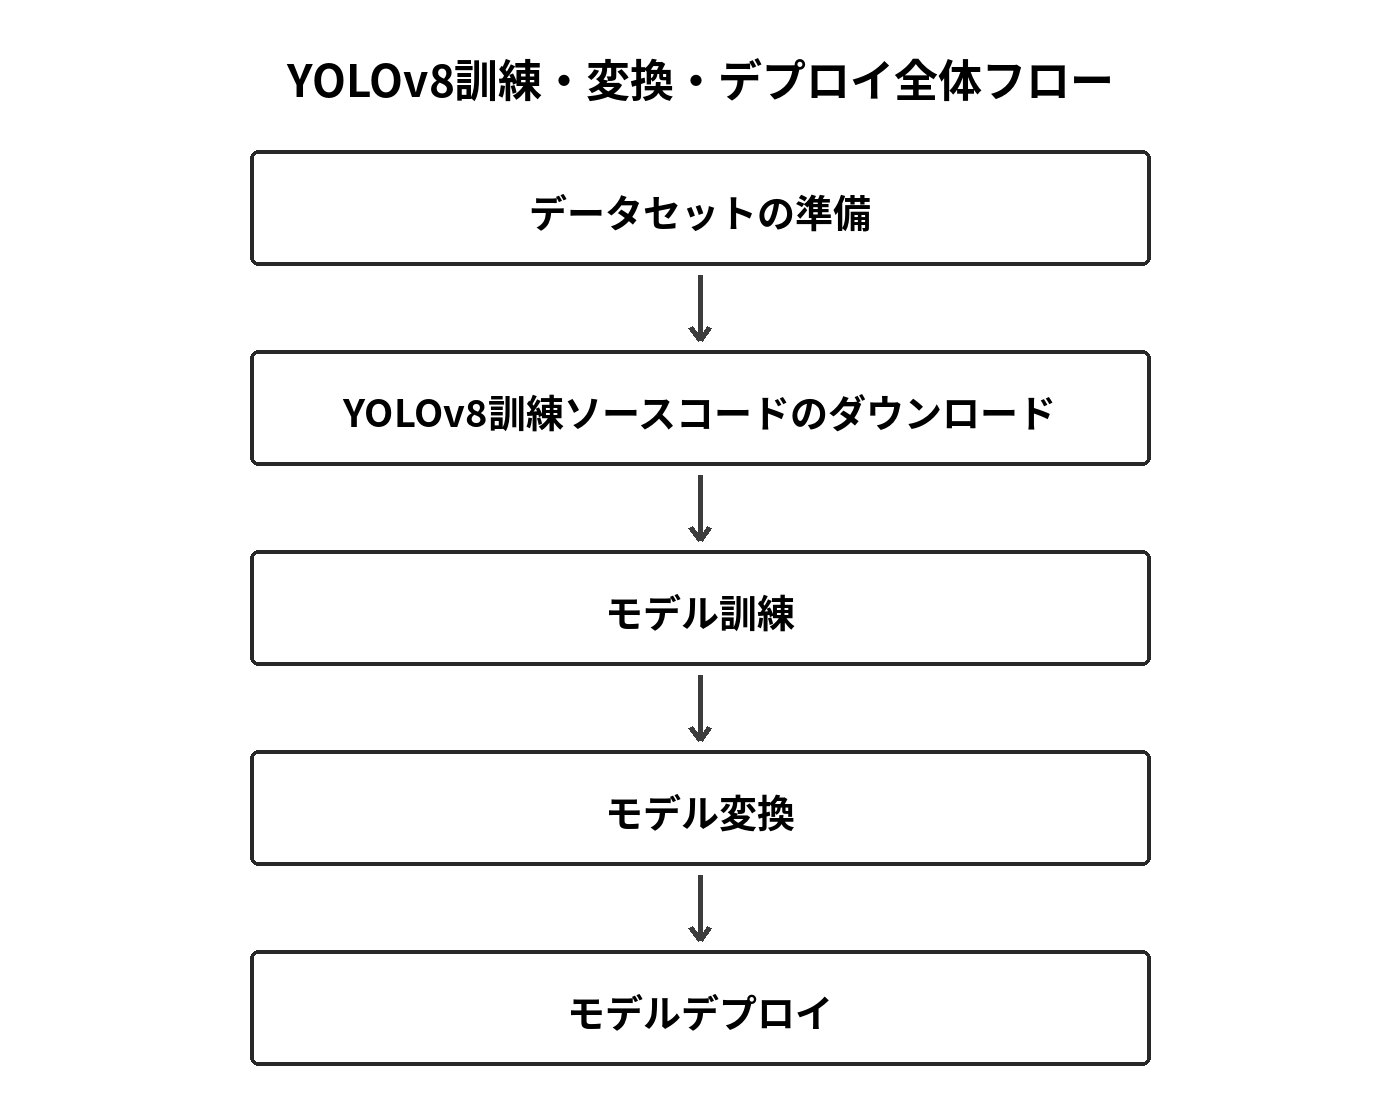
Figure 1-2 Overall YOLOv8 training, conversion, and deployment workflow
2. Download Resources
Download the required materials and source code from the following link.
After extraction, the directory structure is as follows.
02-training Source code for training03-model_convert Source code for AI model conversion04-AI_deploy Source code for AI model deployment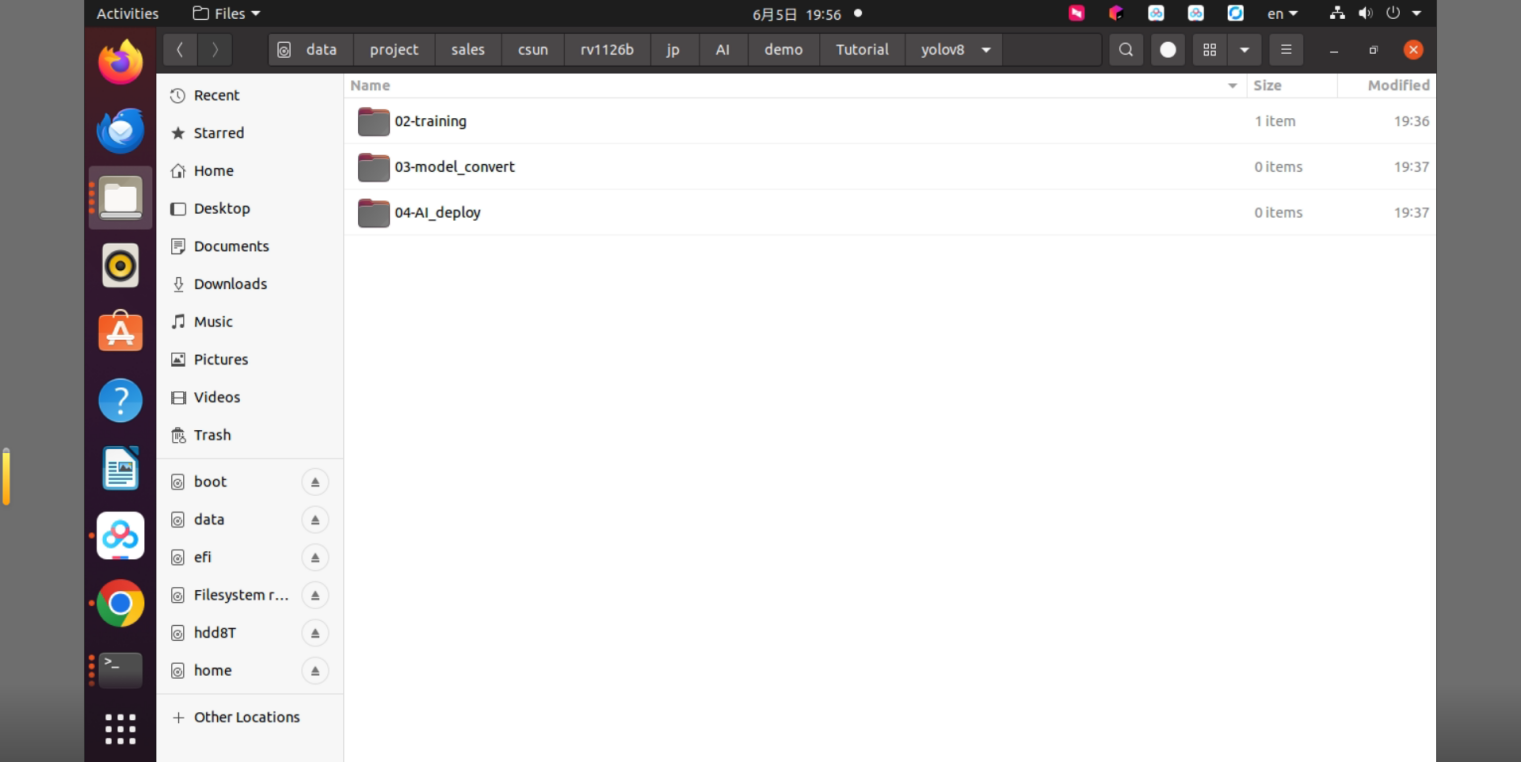
Figure 2-1 YOLOv8 resource package directory structure
3. Training the YOLOv8 Object Detection Algorithm
3.1 Download the Training Source Code
Use Git on the PC side to clone the remote repository. The download may take some time depending on the network environment. This tutorial uses the YOLOv8 repository with operators adjusted for RV1126B.
Run the following commands in the RV1126B Docker development environment.
cd ~/linuxshare/work/rv1126b/jp/embedded/images/develop_environment./run.sh 2204
cd /opt/linuxshare/work/rv1126b/jp/AI/demo/Tutorial/yolov8/02-traininggit clone https://github.com/airockchip/ultralytics_YOLOv8.git
Figure 3-1 Example of cloning the YOLOv8 training source code
After the command completes, the following files are obtained.
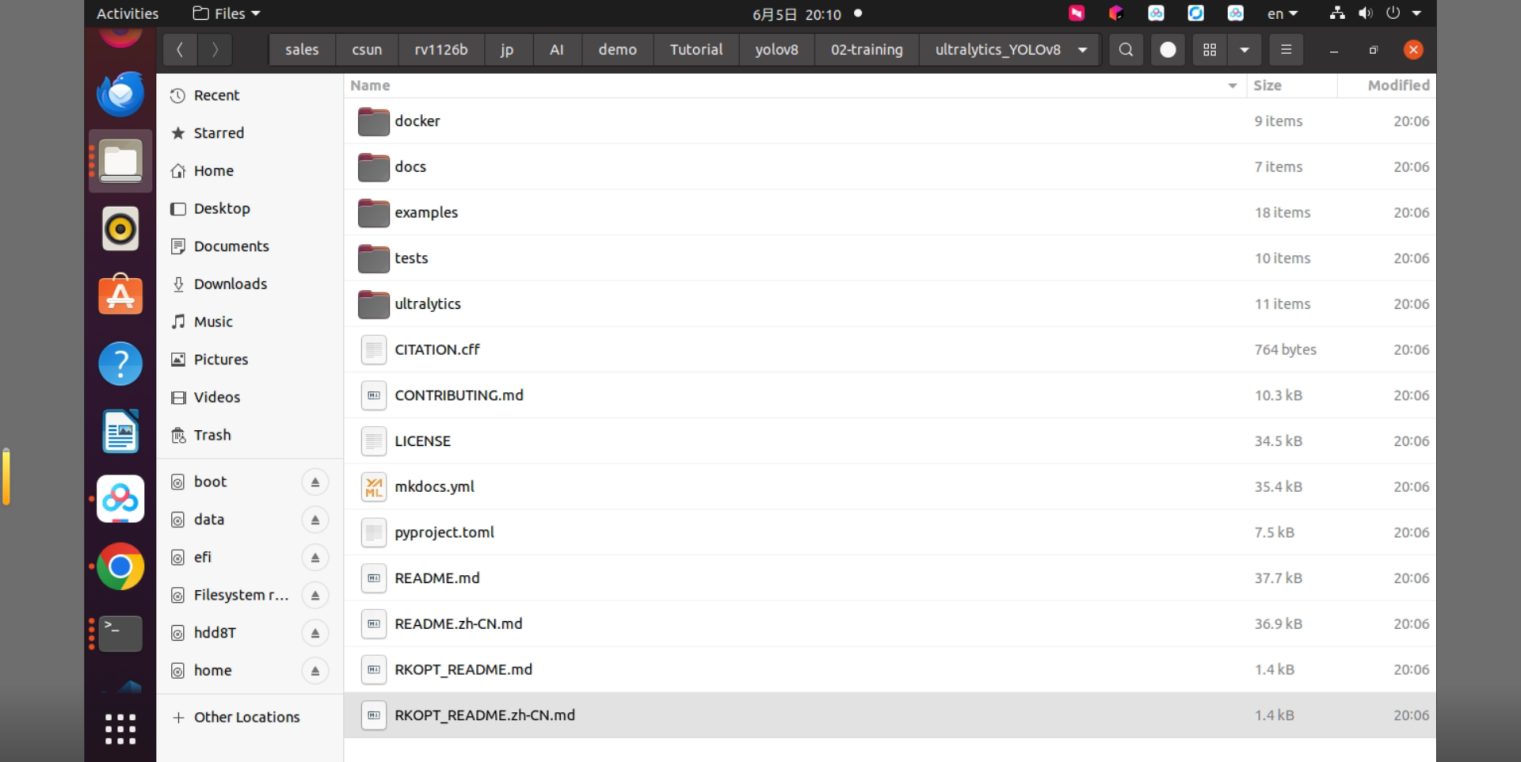
Figure 3-2 Ultralytics YOLOv8 source directory
3.2 Model Training
This section describes how to train a YOLOv8 object detection model. To verify the training workflow, this example uses the small sample dataset configuration coco8.yaml provided by Ultralytics and trains a YOLOv8m model.
coco8.yaml is a small dataset configuration for operation verification only. It is not intended to provide production-level detection accuracy. For an actual product or application, prepare images and annotation data for the target objects and create a dedicated data.yaml file for training.
3.2.1 Enter the Training Directory
First, enter the YOLOv8 training directory in the RV1126B Docker development environment.
cd /opt/linuxshare/work/rv1126b/jp/AI/demo/Tutorial/yolov8/02-training/ultralytics_YOLOv8Run the following command to confirm that coco8.yaml exists.
ls ultralytics/cfg/datasets/coco8.yaml
Figure 3-3 coco8.yaml file check result
coco8.yaml is a sample dataset configuration file used to quickly verify the YOLOv8 training process.
3.2.2 Train the YOLOv8m Model
The yolo command may not be registered in this environment, so training is executed from a Python script. Create train_coco8_yolov8m.py with the following content.
cat > train_coco8_yolov8m.py <<'PY'from ultralytics import YOLO
if __name__ == "__main__":    model = YOLO("yolov8m.pt")
    model.train(        data="ultralytics/cfg/datasets/coco8.yaml",        imgsz=640,        epochs=10,        batch=4,        workers=4,        device=0,        project="runs/train",        name="coco8_yolov8m",    )PY
Run the script to start training.
python train_coco8_yolov8m.pyAn example terminal output at the start of training is shown below.
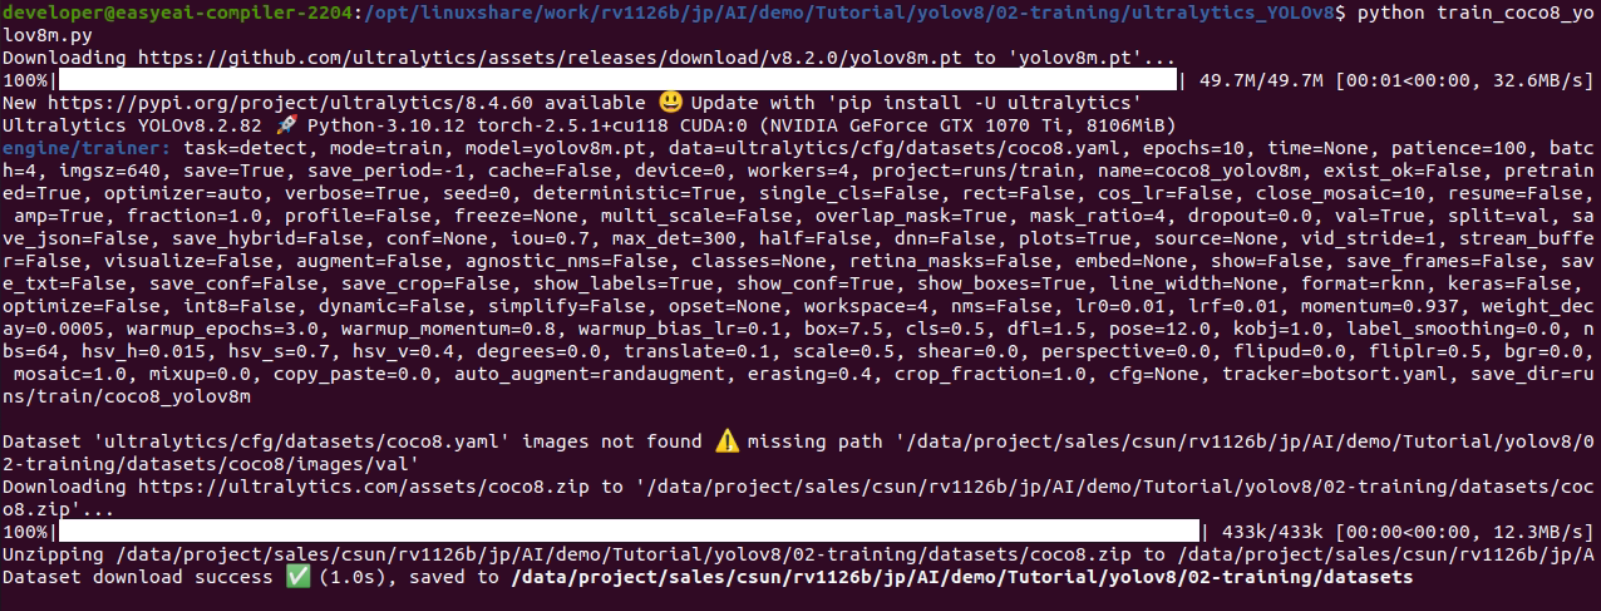
Figure 3-4 Terminal output when starting YOLOv8m model training
An example terminal output after training completes is shown below.
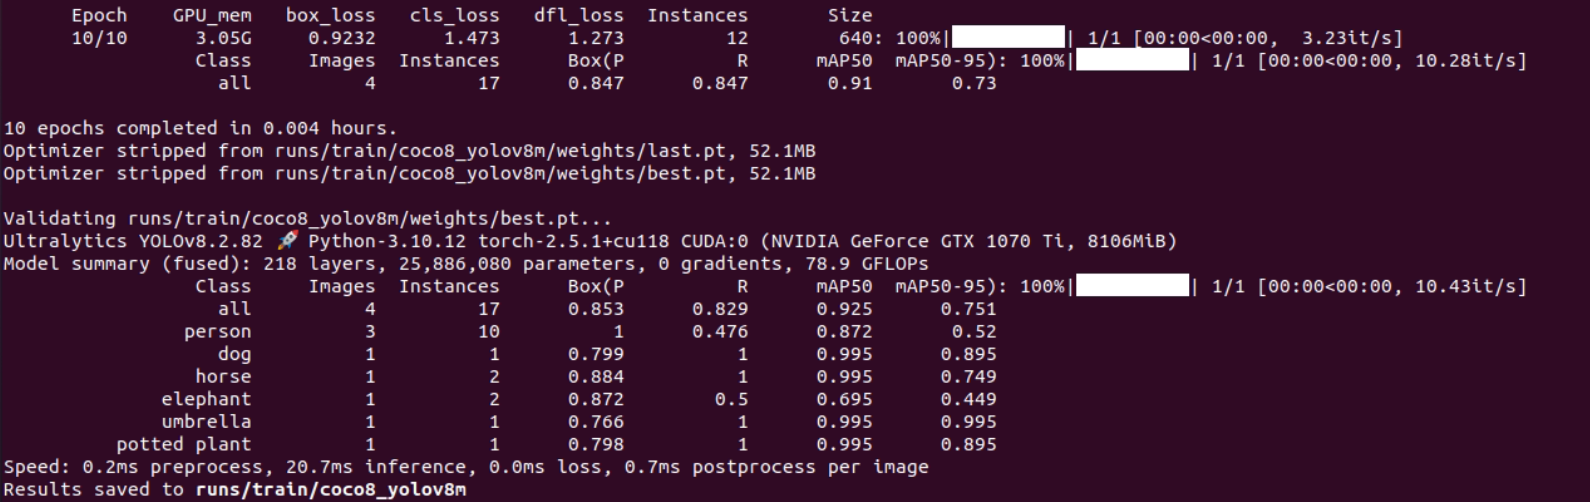
Figure 3-5 Terminal output after YOLOv8m model training completes
In the script above, YOLO("yolov8m.pt") loads the YOLOv8m pretrained model. If yolov8m.pt does not exist in the current directory, Ultralytics downloads it automatically at the first execution.
The yolov8m.pt file used here is the pretrained model before training. The best.pt and last.pt files generated after training are the model files saved from this training run.
The model files are saved in ./runs/train/coco8_yolov8m. Training accuracy results can be checked in ./runs/train/coco8_yolov8m/results.csv.
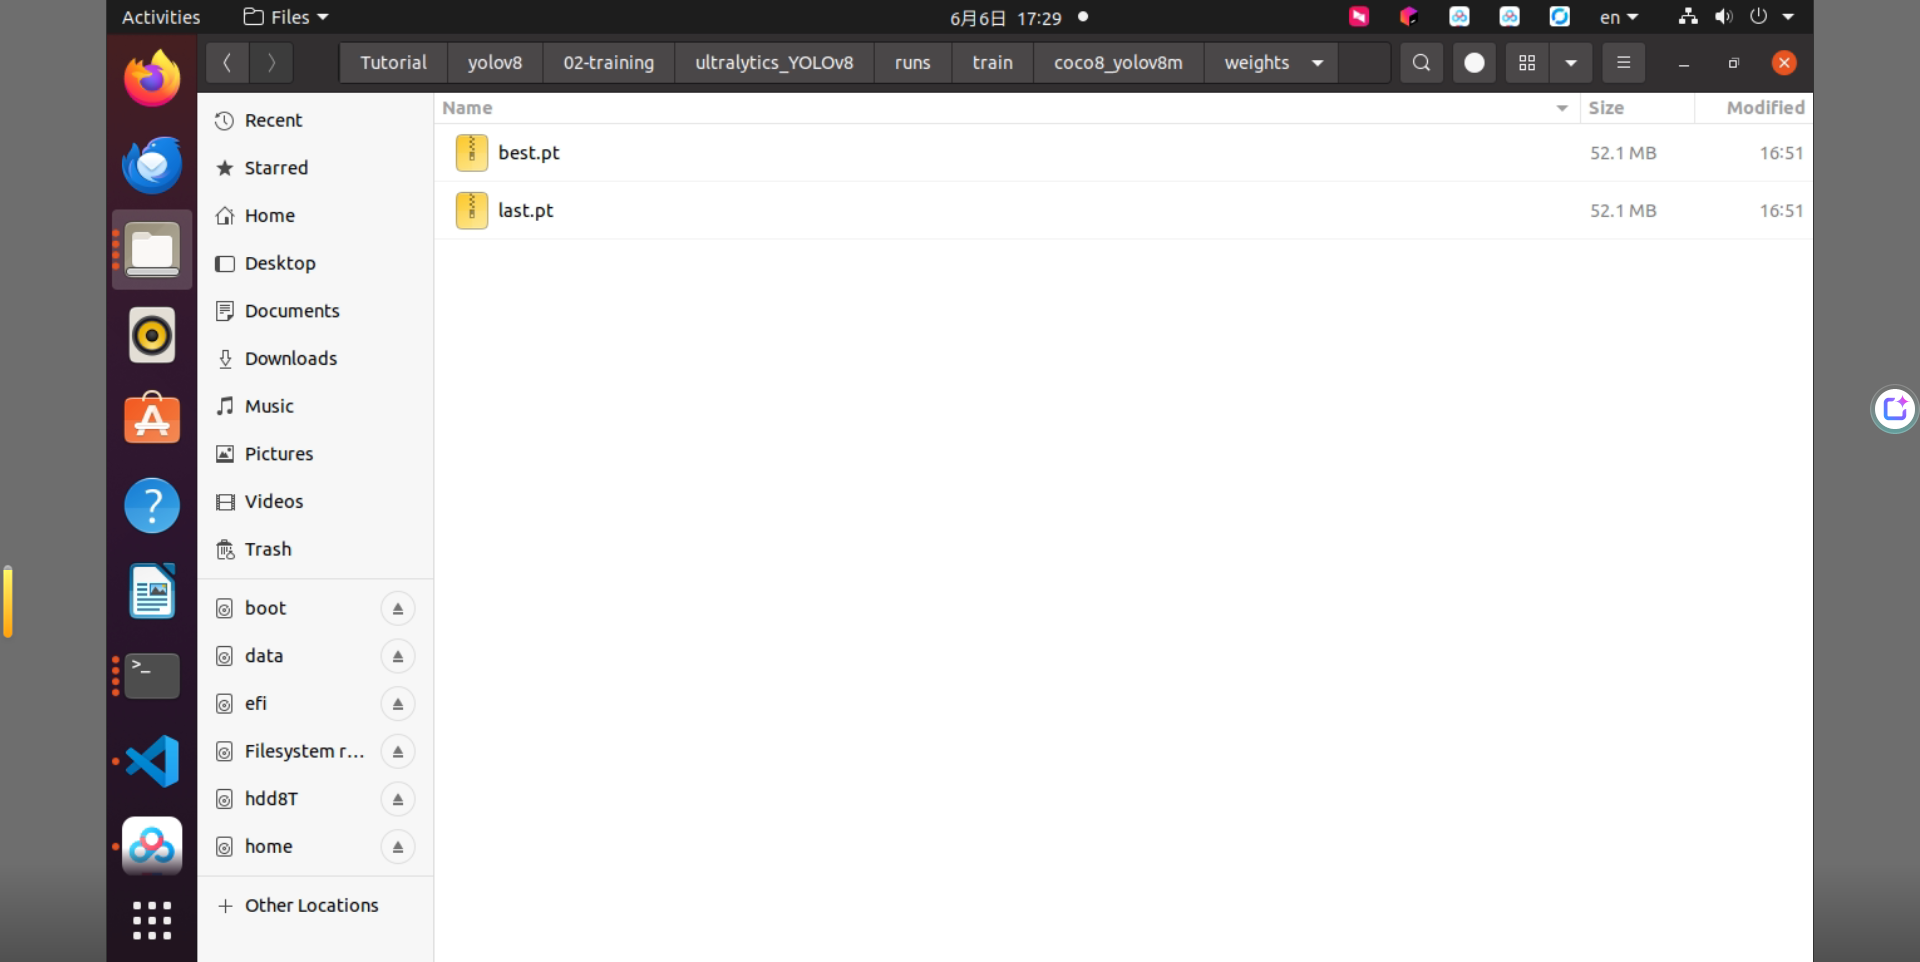
Figure 3-6 weights directory after YOLOv8m training
The main output files are as follows.
best.pt : Model with the best evaluation result on the validation datalast.pt : Model saved at the end of the final epochNormally, use best.pt for inference or ONNX export because it has the best validation result. Use last.pt when resuming training.
3.3 Convert the PT Model to ONNX
Convert the trained best.pt model to ONNX format. Create the Python script export_yolov8m_onnx.py with the following command.
cat > export_yolov8m_onnx.py <<'PY'from ultralytics import YOLO
if __name__ == "__main__":    model = YOLO("./runs/train/coco8_yolov8m/weights/best.pt")
    model.export(        format="onnx",        imgsz=640,        opset=12,        half=False,        simplify=False,        dynamic=False,    )PY
Run the following command to export the ONNX model.
python export_yolov8m_onnx.py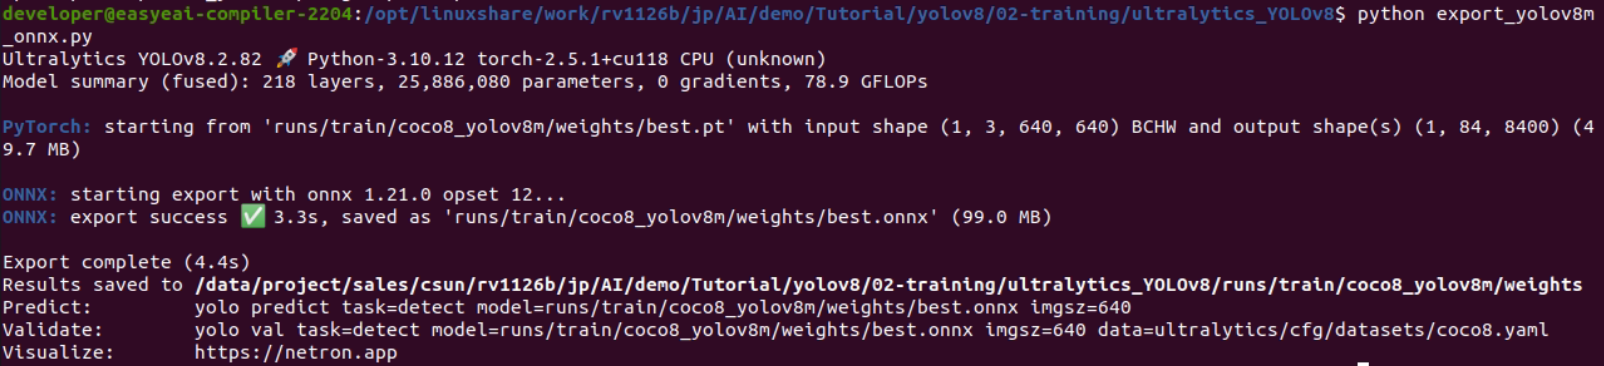
Figure 3-7 YOLOv8m ONNX export result
After the conversion completes successfully, best.onnx is generated under runs/train/coco8_yolov8m/weights. Rename it to yolov8m.onnx when using it as the RKNN conversion input.
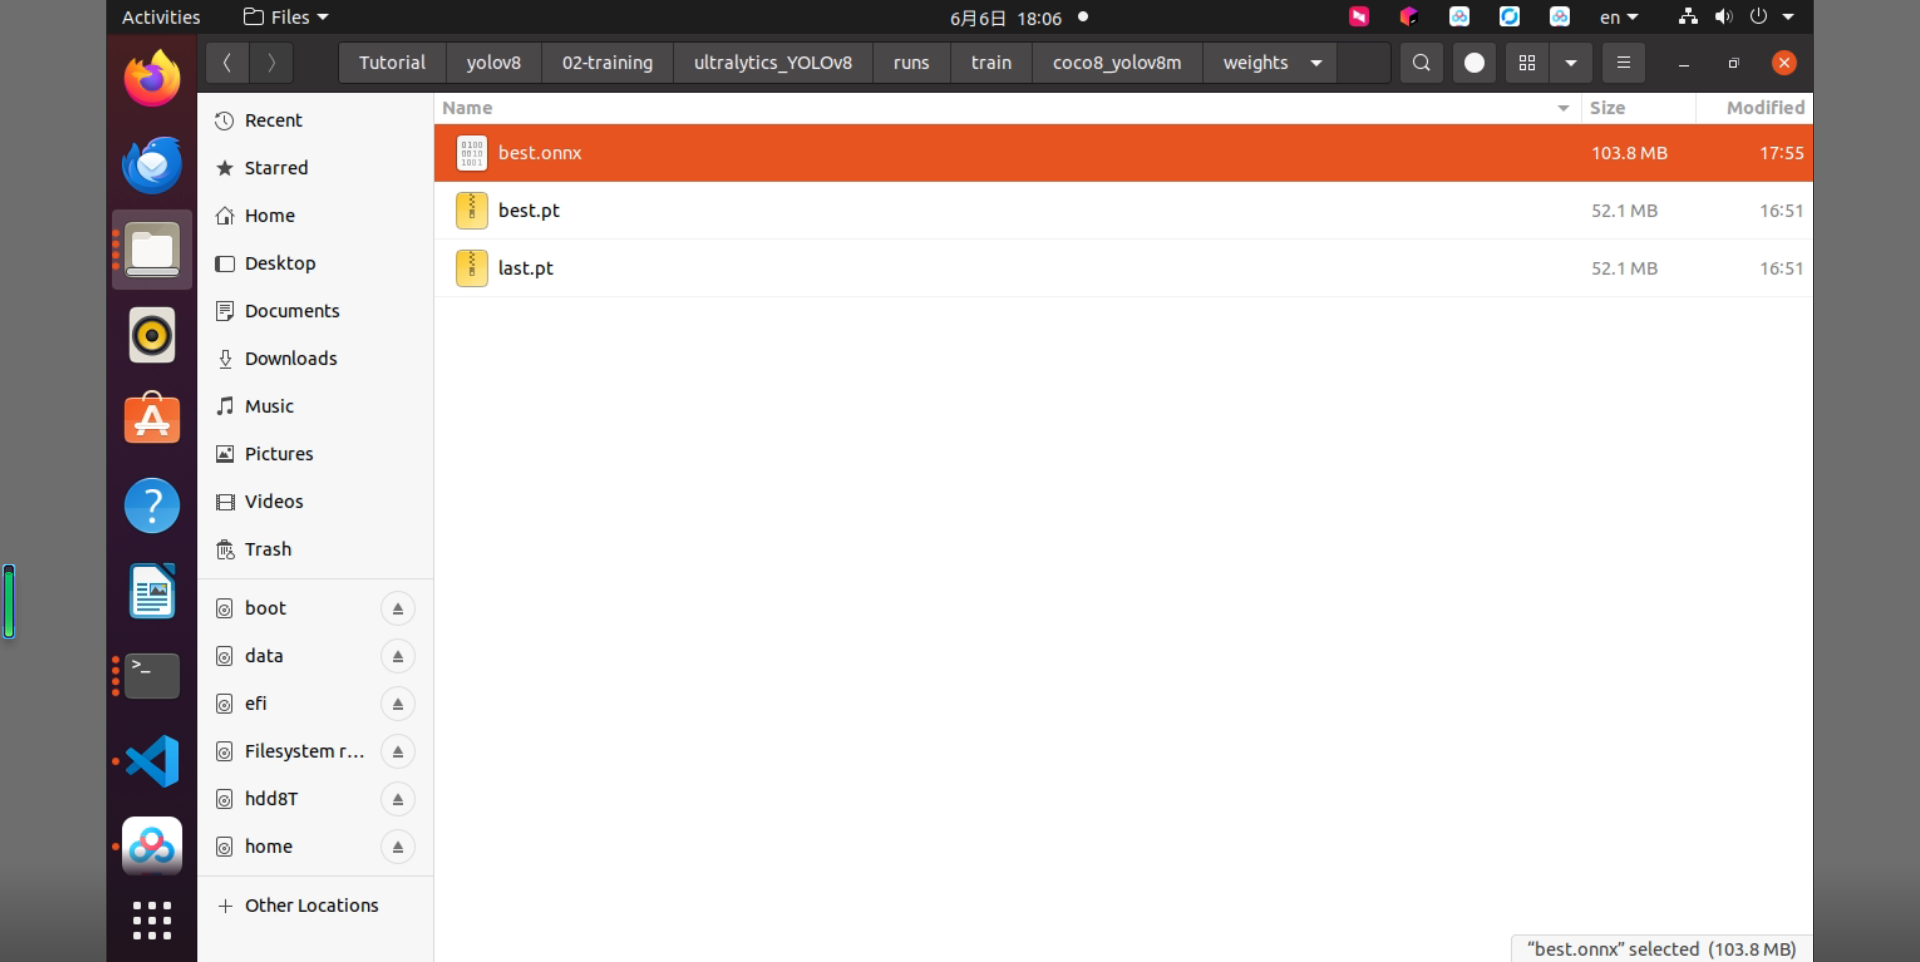
Figure 3-8 Generated best.onnx file
4. RKNN-Toolkit Model Conversion
4.1 Build the RKNN-Toolkit Conversion Environment
To run the ONNX model on the CSUN RV1126B board, it must be converted to an RKNN model. Therefore, build the RKNN-Toolkit model conversion environment in advance. TensorFlow, TensorFlow Lite, Caffe, and Darknet models can also be converted with a similar workflow. This tutorial uses an ONNX model as an example.
For instructions on building the conversion environment, refer to the AI Model Conversion Environment Setup Guide.
4.2 Convert the ONNX Model to an RKNN Model
EASY-EAI Nano-TB supports model evaluation and execution for files with the .rknn extension. Common trained models from TensorFlow, TensorFlow Lite, Caffe, Darknet, ONNX, and PyTorch can be converted to RKNN models by using RKNN-Toolkit2. Models trained with other frameworks can also be converted to ONNX first and then converted to RKNN.
For detailed conversion steps, refer to the RKNN Model Conversion Tutorial Example.
4.2.1 Extract the Model Conversion Demo
The model conversion demo is included in the package downloaded in Section 2. Extract it with the following commands.
cd /data/project/sales/csun/rv1126b/jp/AI/demo/Tutorial/yolov8/03-model_convertunzip quant_dataset.ziptar -xJf yolov8_model_convert.tar.xz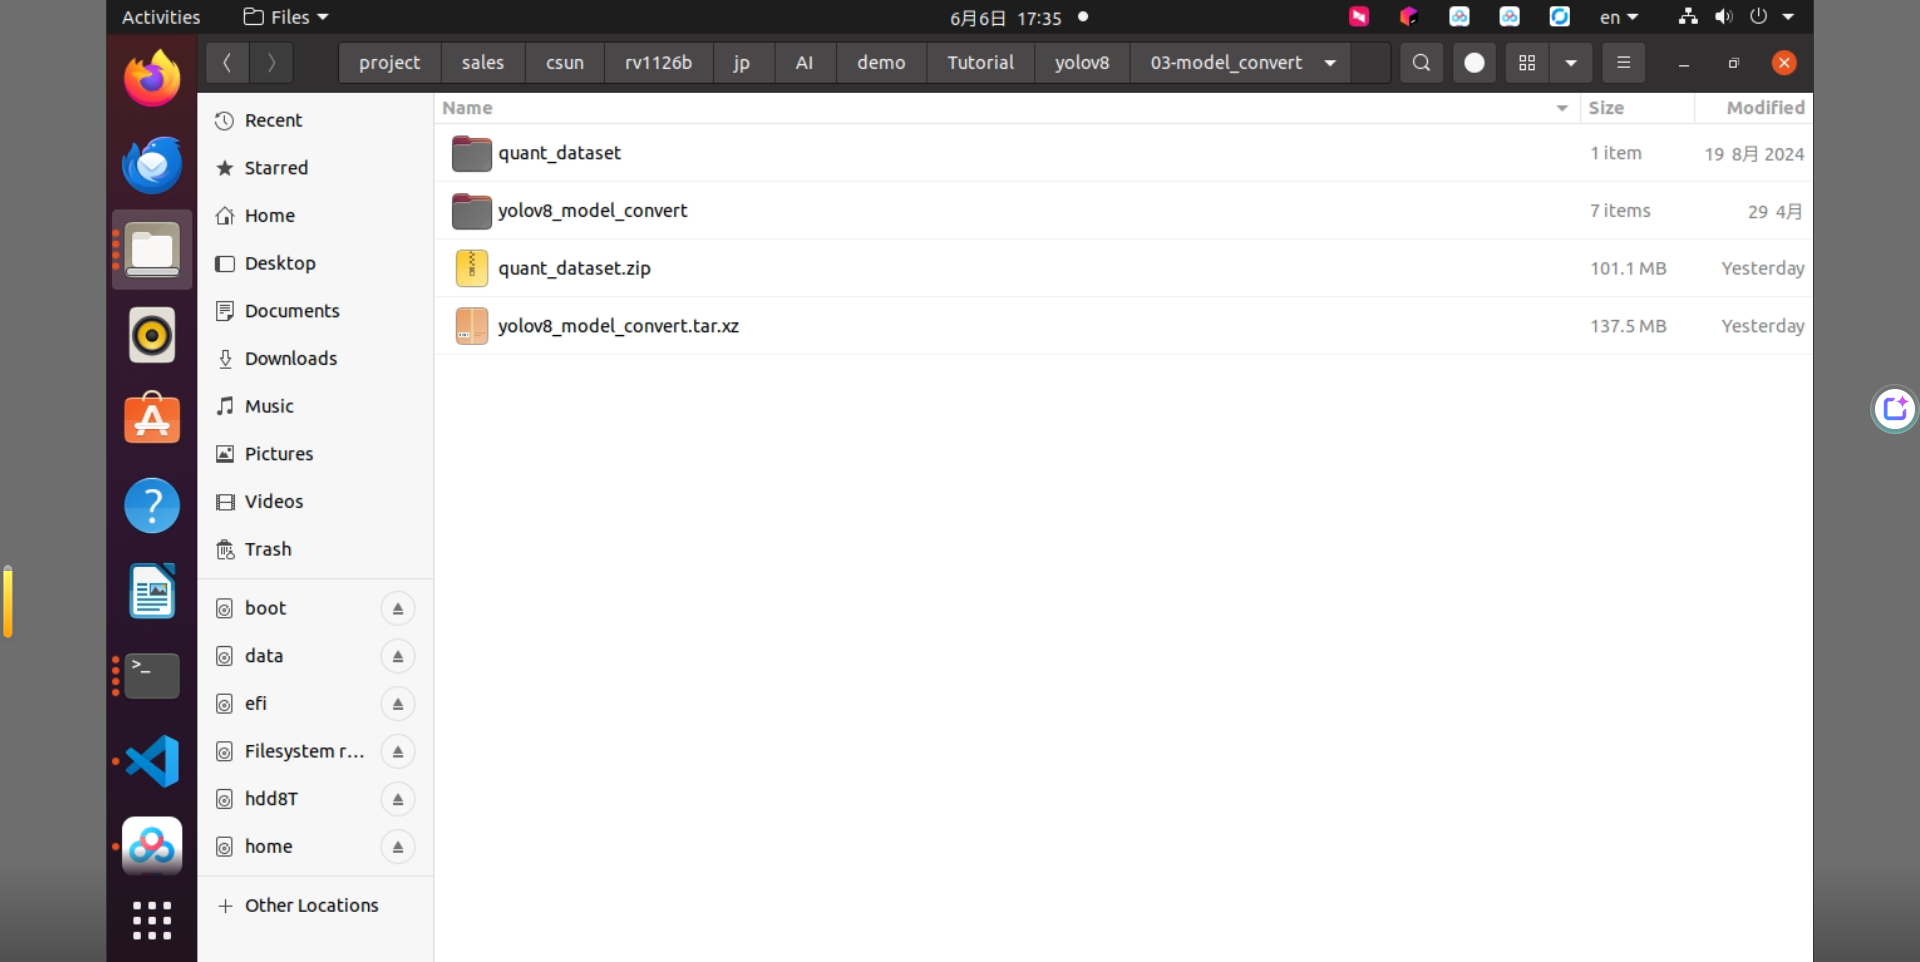
Figure 4-1 Extraction result of the YOLOv8 model conversion demo
4.2.2 Enter the Model Conversion Docker Environment
Use the following command to mount the working directory into the Docker image. /data/project/sales/csun/rv1126b/jp/AI/demo/Tutorial is used as the working directory and mapped to /test inside the container. The USB device path is also mounted with /dev/bus/usb:/dev/bus/usb.
docker run -t -i --privileged \ -v /dev/bus/usb:/dev/bus/usb \ -v /data/project/sales/csun/rv1126b/jp/AI/demo/Tutorial:/test \ rknn-toolkit2:2.3.2-cp38 /bin/bash
Figure 4-2 RKNN-Toolkit2 Docker environment startup result
4.2.3 Generate the Quantization Image List
In the Docker environment, enter the model conversion working directory.
cd /test/yolov8/03-model_convert/yolov8_model_convertRun gen_list.py to generate the quantization image list.
python gen_list.py
Figure 4-3 Execution result of generating the quantization image list
The generated quantization image list is saved as pic_path.txt.
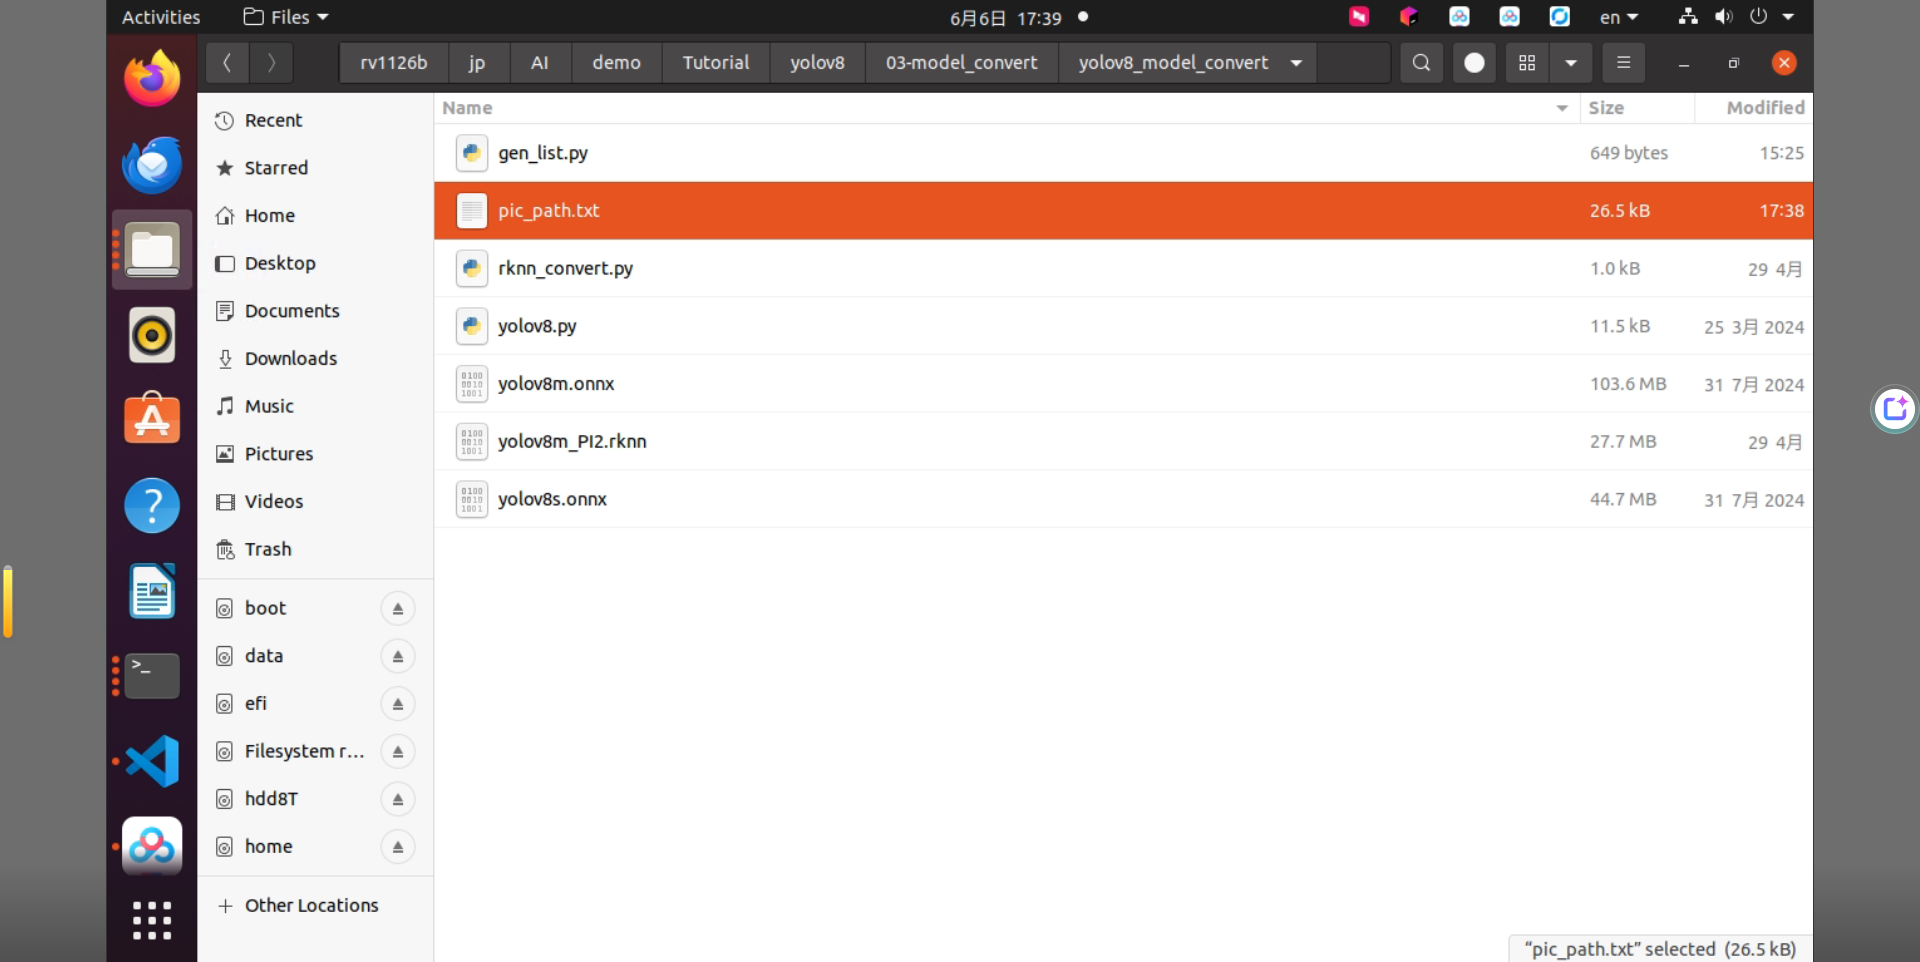
Figure 4-4 Generated pic_path.txt file
4.2.4 Convert the ONNX Model to an RKNN Model
rknn_convert.py performs INT8 quantization by default. The main script content is as follows.
import sysfrom rknn.api import RKNN
ONNX_MODEL = 'yolov8m.onnx'DATASET = './pic_path.txt'RKNN_MODEL = './yolov8m_rv1126b.rknn'QUANTIZE_ON = True
if __name__ == '__main__':    rknn = RKNN(verbose=False)
    print('--> Config model')    rknn.config(        mean_values=[[0, 0, 0]],        std_values=[[255, 255, 255]],        target_platform='rv1126b'    )    print('done')
    print('--> Loading model')    ret = rknn.load_onnx(model=ONNX_MODEL)    if ret != 0:        print('Load model failed!')        exit(ret)    print('done')
    print('--> Building model')    ret = rknn.build(do_quantization=QUANTIZE_ON, dataset=DATASET)    if ret != 0:        print('Build model failed!')        exit(ret)    print('done')
    print('--> Export rknn model')    ret = rknn.export_rknn(RKNN_MODEL)    if ret != 0:        print('Export rknn model failed!')        exit(ret)    print('done')
    rknn.release()
Place the trained yolov8m.onnx file in the yolov8_model_convert directory, and run the following command to convert the model.
python rknn_convert.py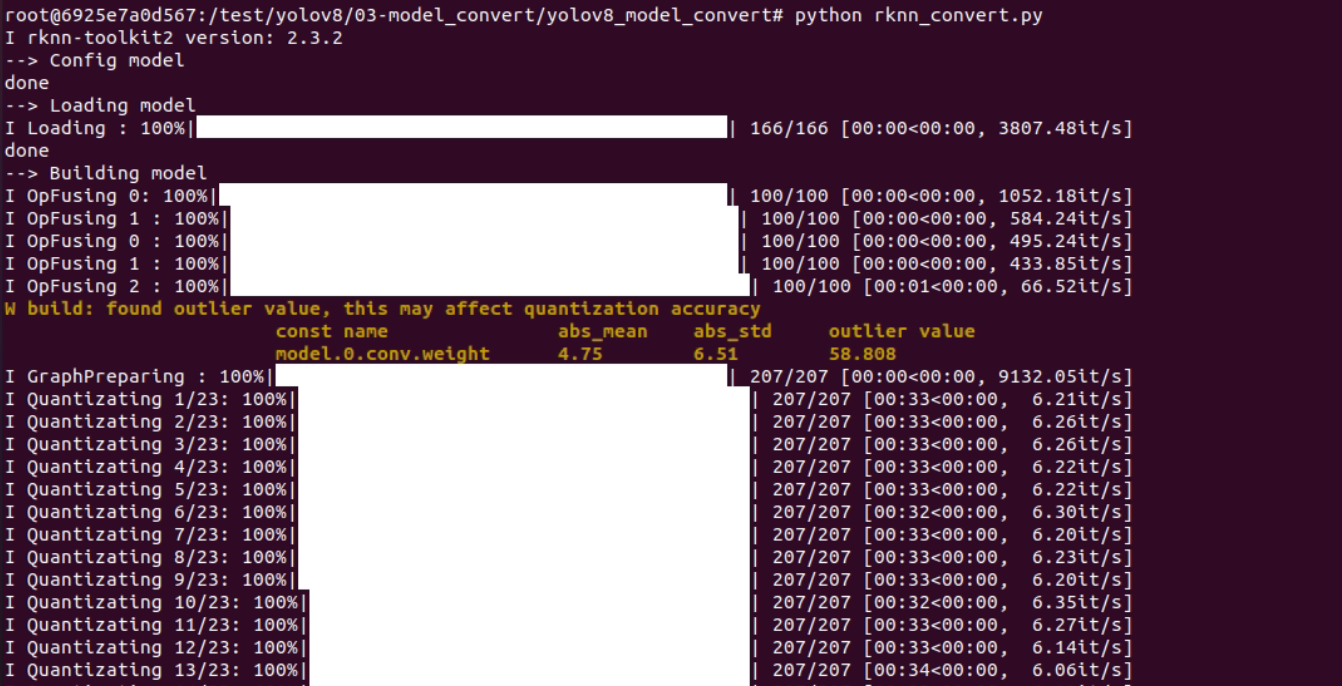
Figure 4-5 Terminal output of YOLOv8m RKNN model conversion
After the conversion succeeds, an RKNN model that can run on the CSUN RV1126B board is generated.
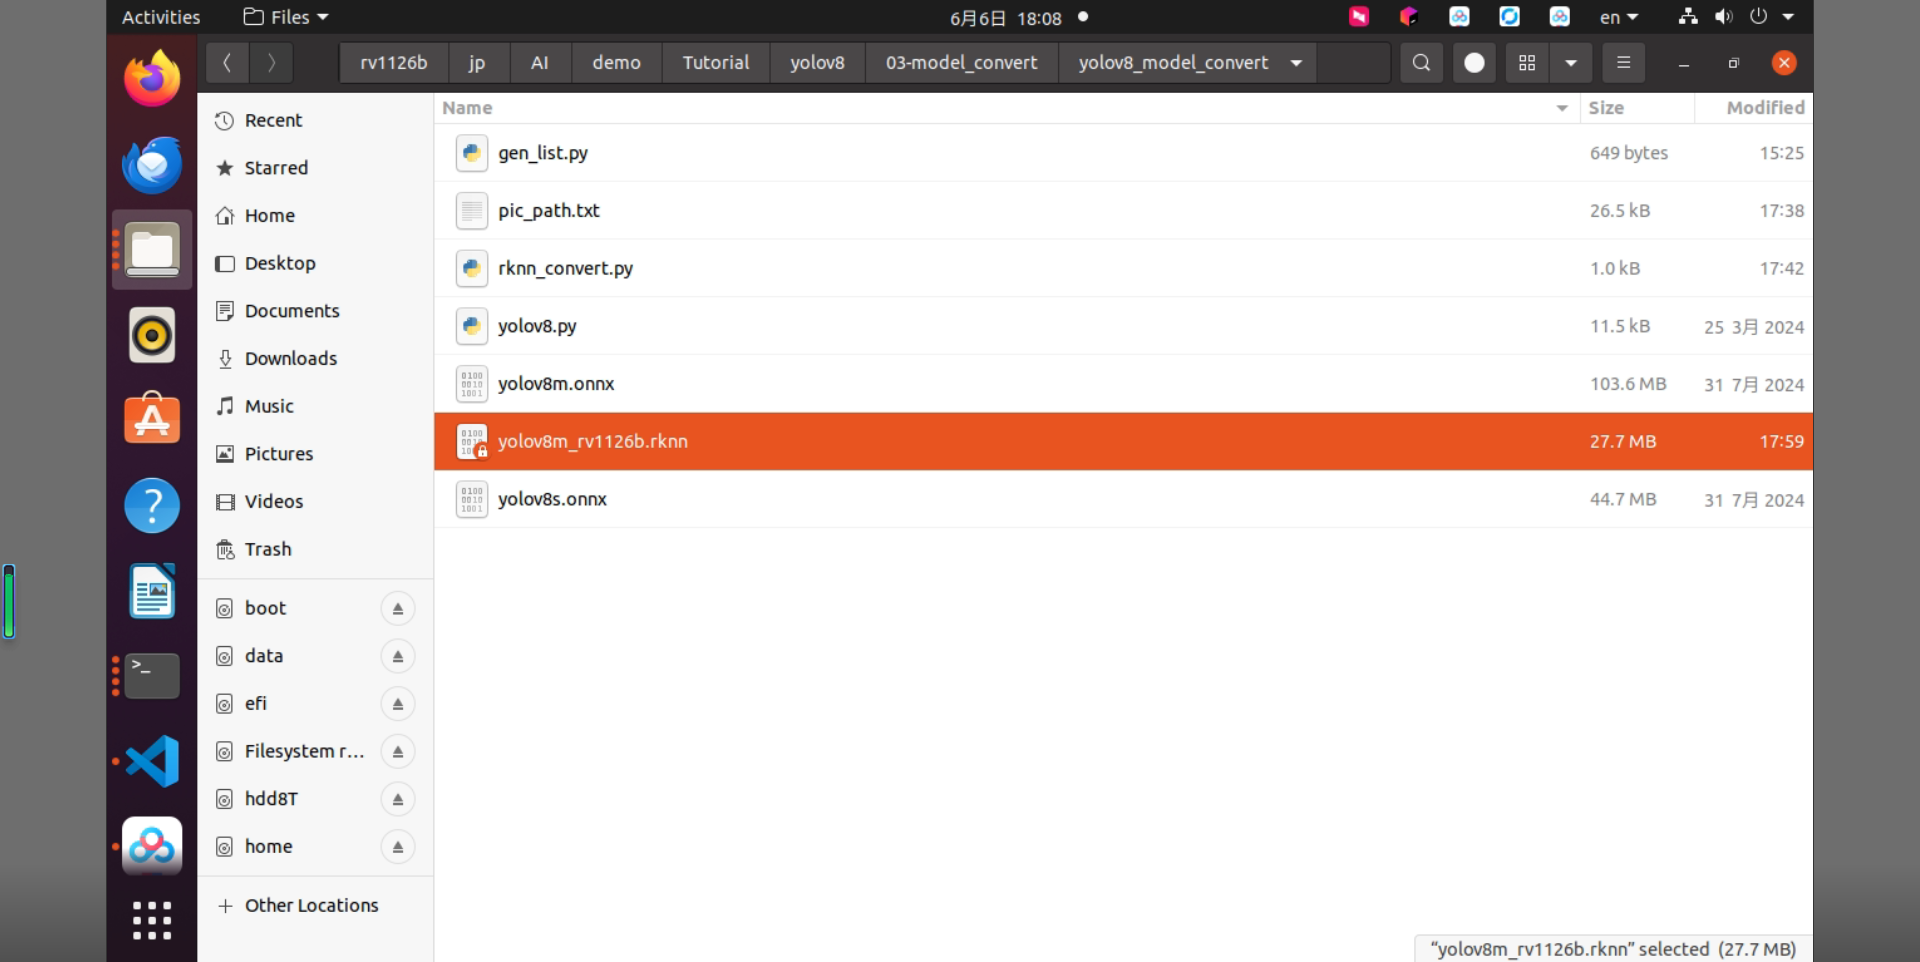
Figure 4-6 Generated YOLOv8m RKNN model file
5. YOLOv8 Model Deployment
5.1 Deployment Example Description
This section describes how to deploy the YOLOv8 model to the RV1126B board. The model used in this tutorial is a sample model trained only for operation verification, so its accuracy in real applications is not guaranteed.
5.2 Preparations
5.2.1 Hardware Preparation
Prepare the RV1126B board, a Type-C data cable, and a LAN cable. Use MobaXterm or a similar tool to log in to the RV1126B board over SSH. For detailed connection steps, refer to the Getting Started Guide.
The following diagram shows an example LAN connection.
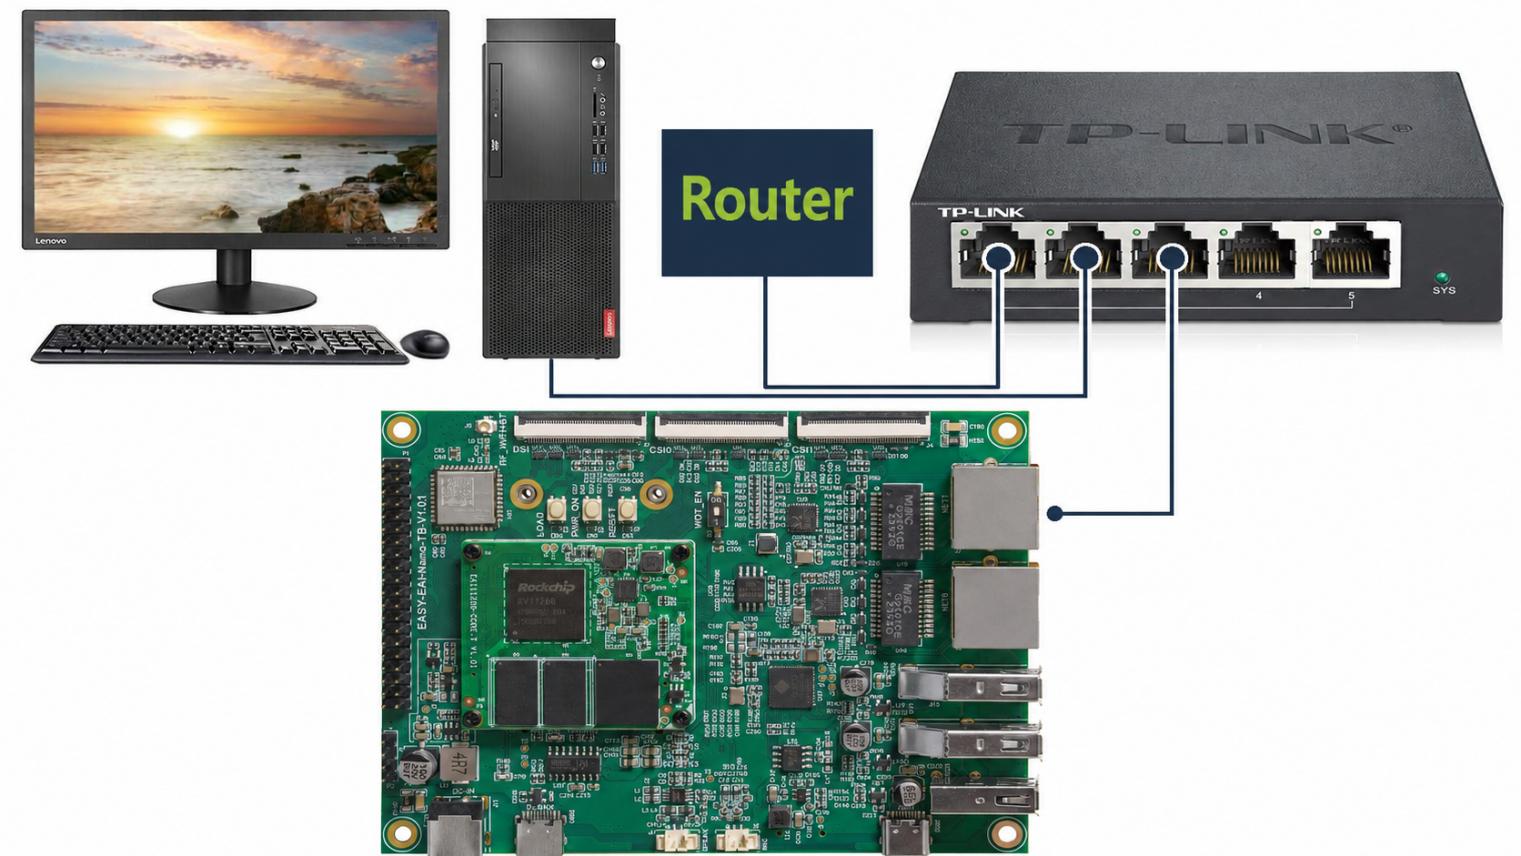
Figure 5-1 LAN connection topology for the RV1126B board
The following diagram shows an example Type-C serial connection.
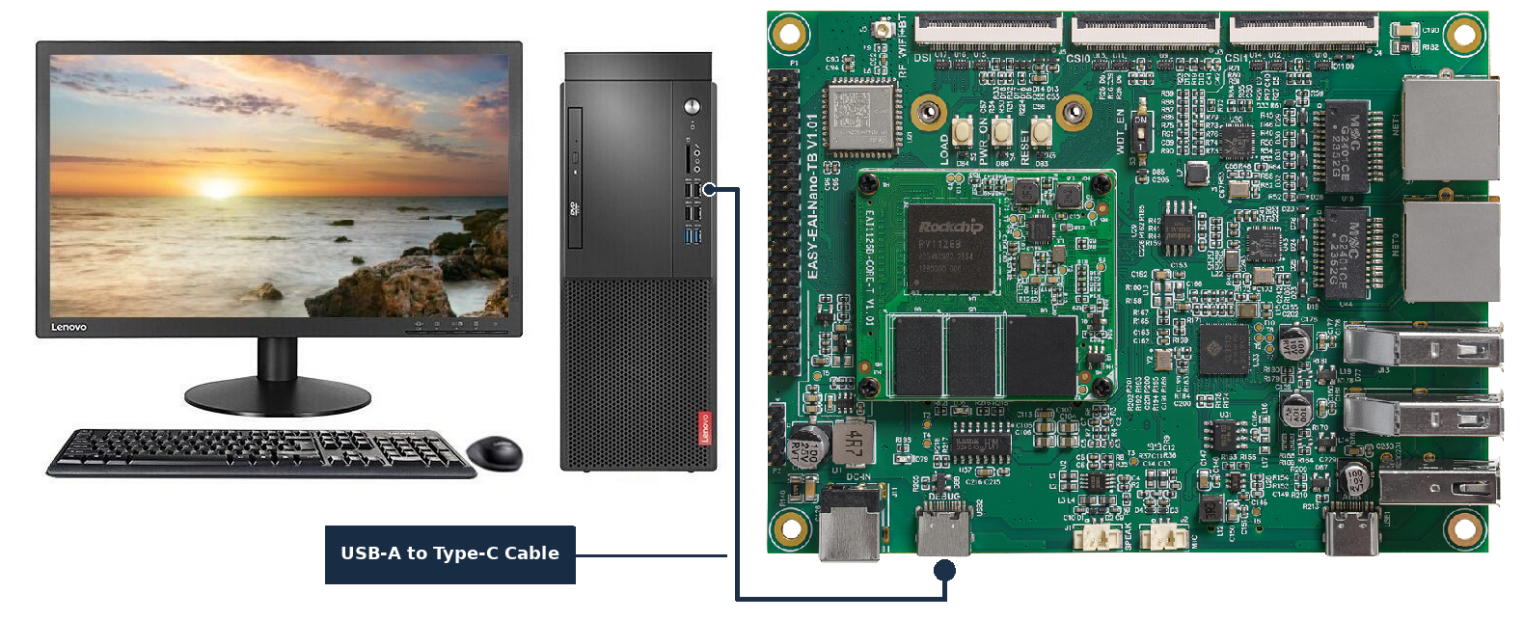
Figure 5-2 Type-C serial connection topology for the RV1126B board
5.2.2 Development Environment Preparation
If you are reading this manual for the first time, refer to the Getting Started Guide and build the compilation environment according to its instructions.
On the PC-side Ubuntu system, run run.sh to enter the RV1126B compilation environment. The procedure is as follows.
cd ~/develop_environment./run.sh 2204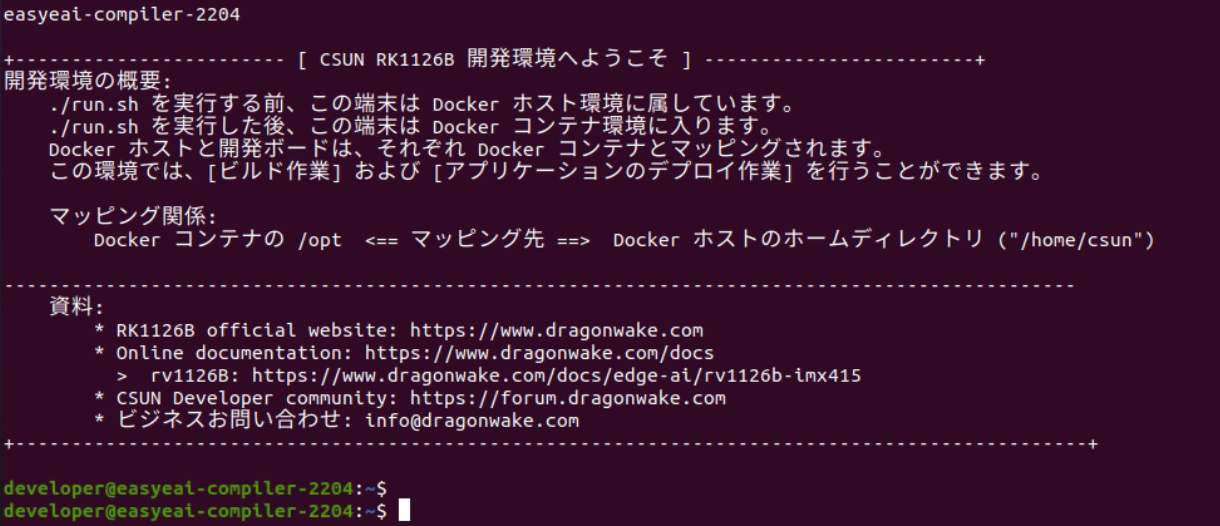
Figure 5-3 RV1126B Docker development environment startup result
5.3 Build the Sample Program
After moving the downloaded package into the RV1126B Docker development environment, run the following commands to extract it.
cd /opt/linuxshare/work/rv1126b/jp/AI/demo/Tutorial/yolov8/04-AI_deploytar -xJf yolov8_detect_C_demo.tar.xzAn example of the extracted directory is shown below.
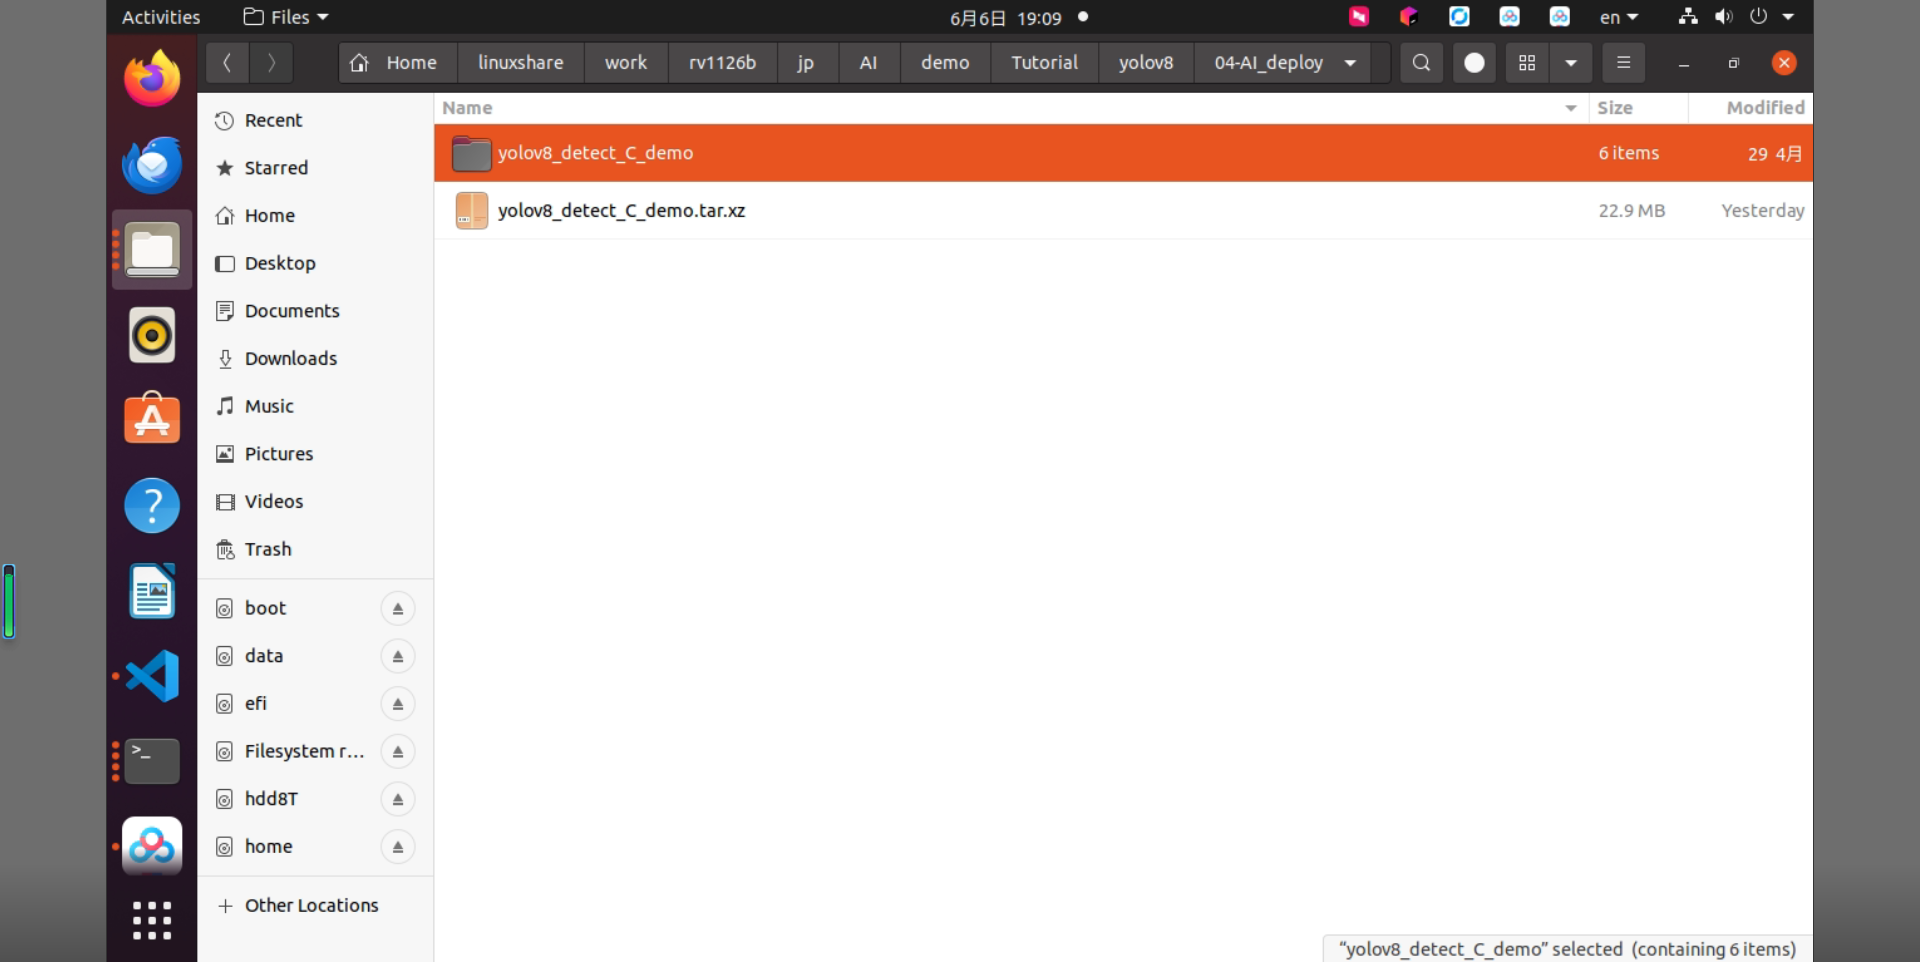
Figure 5-4 Directory after extracting the YOLOv8 C demo
In the RV1126B Docker development environment, enter the sample program directory and build the program. The commands are as follows.
sudo mount -t nfs -o vers=3,proto=tcp,mountproto=tcp,nolock,retrans=5,timeo=5 192.168.11.85:/ /mntcd /opt/linuxshare/work/rv1126b/jp/AI/demo/Tutorial/yolov8/04-AI_deploy/yolov8_detect_C_demo/./build.sh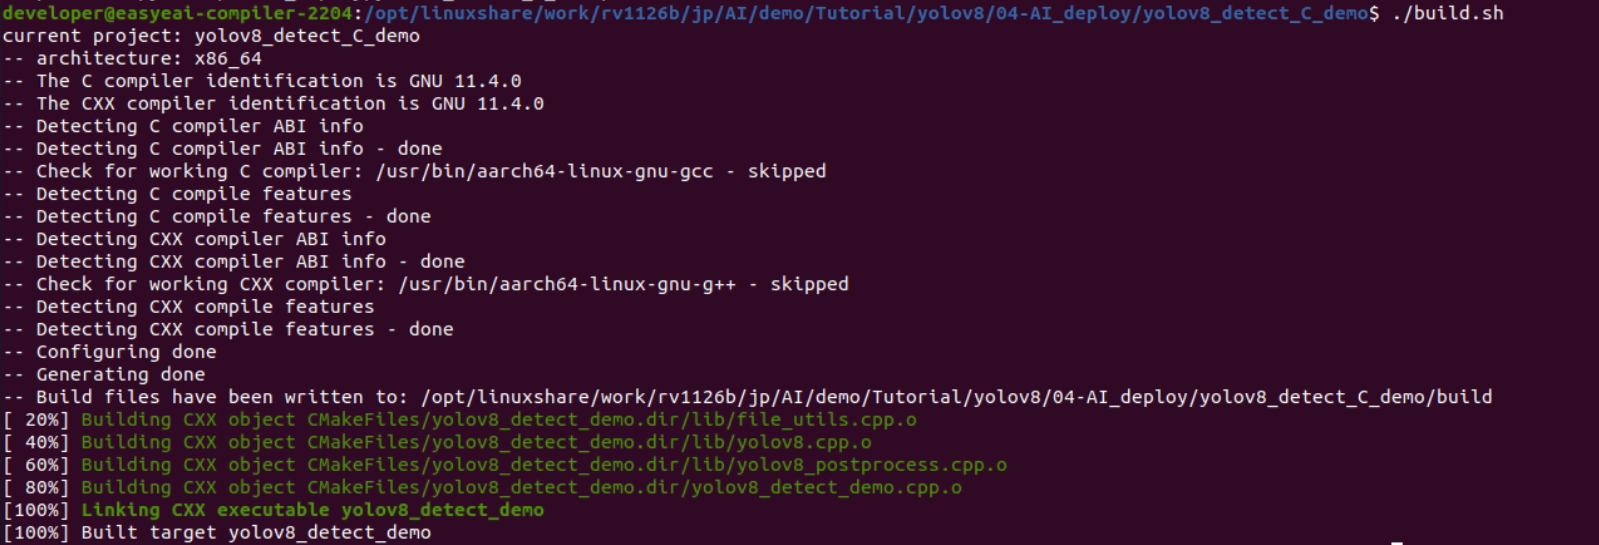
Figure 5-5 YOLOv8 C demo build result
After compilation succeeds, copy the executable directory yolov8_detect_demo_release/ to the /userdata directory on the RV1126B board.
cp yolov8_detect_demo_release/ /mnt/userdata/ -rf5.4 Run the YOLOv8 Model on the Development Board
Enter the board-side shell through serial debugging or SSH, and then enter the deployment directory of the sample program.
cd /userdata/yolov8_detect_demo_release
Figure 5-6 YOLOv8 demo execution directory on the board
Run the sample program with the following commands.
chmod 777 yolov8_detect_demo./yolov8_detect_demo yolov8m_rv1126b.rknn test.jpgAn example execution result is shown below. The algorithm execution time is about 106 ms.
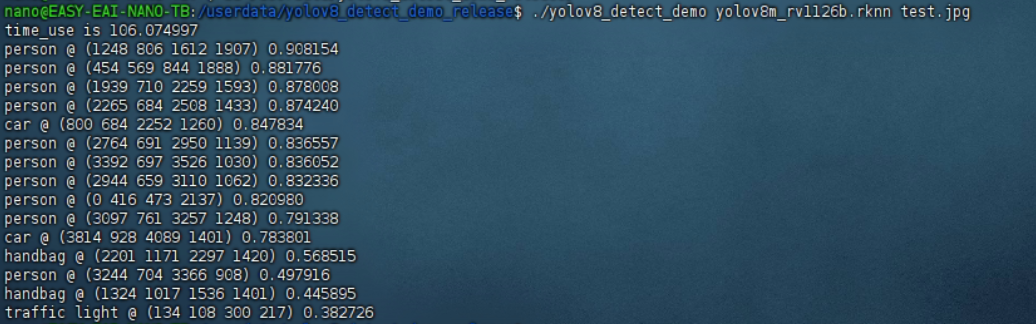
Figure 5-7 YOLOv8 demo execution result on RV1126B
The inference result image can be copied from the RV1126B compilation environment with the following command.
cp /mnt/userdata/yolov8_detect_demo_release/result.jpg .
Figure 5-8 Command for copying the YOLOv8 inference result image
An example detection result image is shown below.
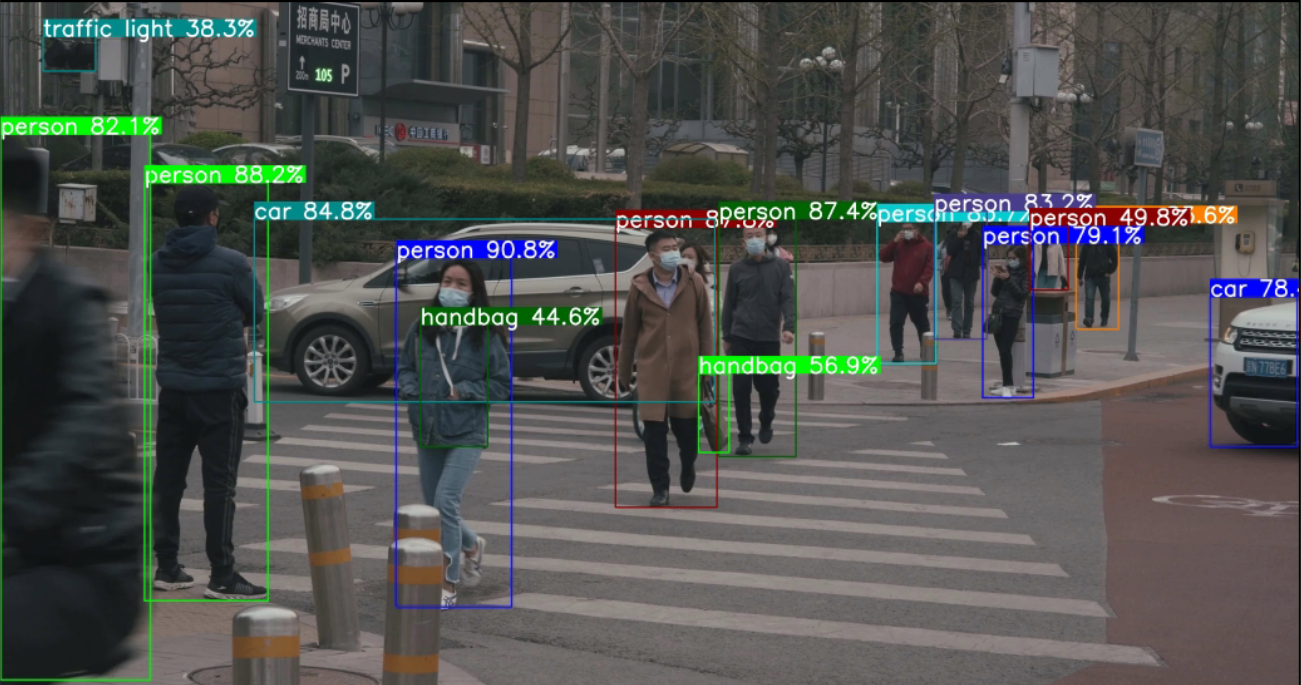
Figure 5-9 YOLOv8 object detection result image
The YOLOv8 object detection sample has now run successfully on the CSUN RV1126B board.