
EASY-EAI Compile Environment Deployment and Update
1.1 EASY-EAI Compile Environment Deployment
1.1.1 Overview of the EASY-EAI Compile Environment
The EASY-EAI compile environment is a self-developed online compile environment (development board online). It establishes a real-time synchronized mapping relationship between the PC and the board, so that when cross-compiling on the PC, the dependency libraries on the development board can be linked in real time. It has the following advantages:
(1) It solves various development problems caused by mismatched dependency libraries between the PC and the board in traditional cross-compilers.
(2) It eliminates the need for users to set or modify environment variables for traditional cross-compilers.
(3) Through real-time mapping between the PC and the board, file transfer speed is greatly improved, meeting the needs of real-time transfer of large files.
(4) It also supports local development on the development board, improving the flexibility of development methods.
**💡 Special Note **: If your company’s internal network separates the intranet from the Internet (the developer’s workstation cannot access the external Internet), please refer to “Offline Installation of the EASY-EAI Compile Environment” in the developer community. You do not need to read the rest of this document.
1.1.2 Preparing the Ubuntu System Environment on the PC Side
Because the EASY-EAI compile environment uses Ubuntu Docker container technology, the host machine on the PC side must support Docker-container-related software such as Docker commands and Docker images.
In the Ubuntu system on the PC side, use the following commands to install the docker command. This downloads and installs the docker command from Ubuntu or an Ubuntu repo mirror site.
sudo apt-get remove -y docker-ce docker-ce-cli containerd.io docker-buildx-plugin docker-compose-pluginsudo rm -f /etc/apt/sources.list.d/docker.list*sudo apt-get update -y && sudo apt-get install -y docker.ioAdd the user to the docker group (this allows Docker to be managed with non-root user privileges). The commands are as follows:
sudo groupadd dockersudo usermod -aG docker $USERTo make the changes take effect, restart the Ubuntu system on the PC side. After this, you can omit “sudo” when using docker commands in Ubuntu on the PC side. Reference: https://docs.docker.com/engine/install/linux-postinstall/
1.1.3 Obtaining the EASY-EAI Compile Environment
https://dl.dragonwake.com/download/rv1126b/embedded/images/develop_environment_20260310.tar.gz
Download the EASY-EAI compile environment toolkit “develop_environment_20250802.tar.gz” (usually the latest version is recommended). Then, as shown in the figure below, copy it to the home directory of the Ubuntu system on the PC.
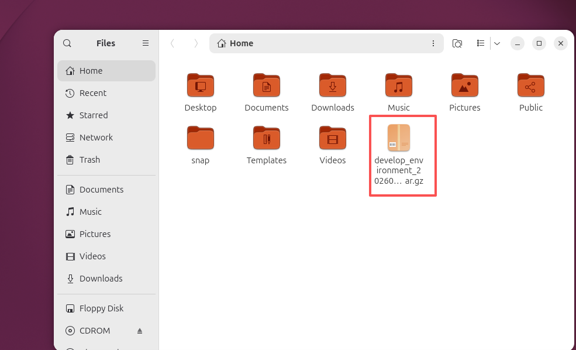
Obtaining the EASY-EAI Compile Environment
1.1.4 Installing the EASY-EAI Compile Environment
Extract the EASY-EAI compile environment toolkit and run the run.sh script. This installs and deploys the EASY-EAI compile environment.
tar -xvf develop_environment_20250802.tar.gzcd develop_environment/./run.sh 2204The result is as follows:
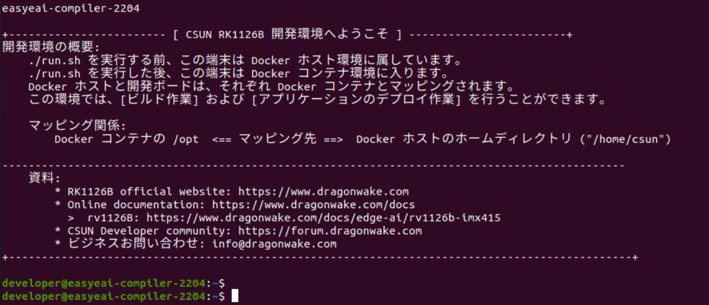
**💡 Note **: When running ./run.sh 2204 for the first time, the virtual machine on the PC side must be able to access the Internet. After the EASY-EAI compile environment is successfully installed, you can repeatedly enter the EASY-EAI compile environment by running ./run.sh 2204, even without an Internet connection.
1.1.5 Using the EASY-EAI Compile Environment: File Synchronization
In the EASY-EAI compile environment, check /opt. It is the home directory of the virtual-machine Ubuntu system. Users can place, edit, and compile source code here.
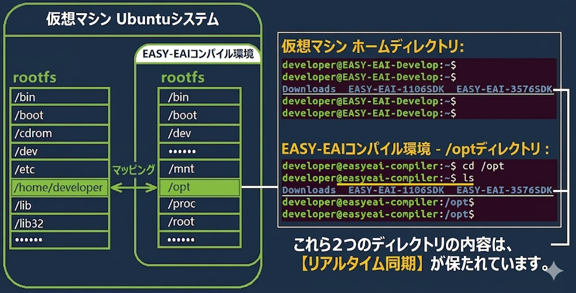
Using the EASY-EAI Compile Environment: File Synchronization
Dependency library synchronization: Since the cross-compilation toolchain and dependency libraries are separated, the development board (dependency libraries) must be mounted separately to /mnt in the EASY-EAI compile environment. The operation is as follows:
Through serial communication debugging, check the IP address of the development board (for example: 192.168.3.121). After confirming that the EASY-EAI compile environment can ping it, use the mount command to mount the development board to /mnt:
sudo mount -t nfs -o nolock 192.168.3.121:/ /mnt
Using the EASY-EAI Compile Environment: File Synchronization
Therefore, editing files under /mnt in the EASY-EAI compile environment automatically synchronizes them to the rootfs root directory of the development board.
If manually entering the mount command feels inconvenient, you can also use the preconfigured mount script load_rootfs:
load_rootfs 192.168.3.119
Using the EASY-EAI Compile Environment: File Synchronization
In addition, if you need to compile a third-party library and the third-party vendor has not purchased our development board, you can load the exported rootfs.img to /mnt to compile that third-party library.

Using the EASY-EAI Compile Environment: File Synchronization
To exit the EASY-EAI compile environment, run the exit command.
exitTo enter the EASY-EAI compile environment again, run the ./run.sh script again on the host machine.
./run.sh 2204For other usage tips for the EASY-EAI compile environment, please read the article “easyeai-compiler Usage Tips”. This article explains usage techniques such as [Handling Common Exceptions], [Compiling Third-Party Closed Libraries], and [Multi-person Simultaneous Debugging].
1.2 Updating the Development Environment
1.2.1 Updating the EASY-EAI Compile Environment
To update the EASY-EAI compile environment, download the latest develop_environment_xxx.tar.gz and extract it again. First run clear.sh 2204 in it, then run ./run.sh 2204.
1.2.2 Updating Toolchain Dependency Libraries
Because the dependency libraries of the compile toolchain are deployed on the hardware board, you only need to update the board system firmware according to the procedure in “Firmware Writing and Update” to complete the update of the development toolchain.
2 ADB, Serial, and SSH Debugging
2.1 ADB Debugging
ADB debugging uses the USB-ADB interface. (If Windows does not have the USB-ADB driver, you need to install the driver.)
Use a USB Type-C cable to connect the PC and EASY EAI Nano-TB. The related hardware interface is shown in the figure below.
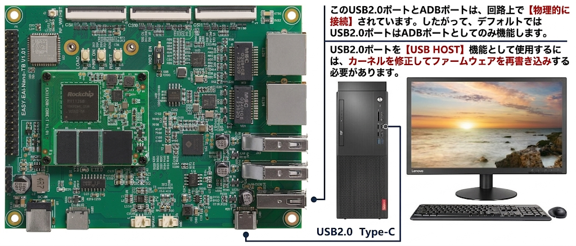
ADB Debugging
**💡 Note **: If it has already been switched to [USB3.0 Mode], the ADB function is disabled. In this case, the ADB interface only provides the [firmware writing (flashing) function].
2.1.1 Assigning (Mounting) the ADB Device
First enter the Ubuntu system. There are two ways to assign the ADB device to Ubuntu: “automatic assignment” and “manual assignment”.
Automatic assignment (passive): The virtual machine is running, and the ADB cable is not connected (or the board is powered off). When the cable is connected (or the board is powered on), a pop-up window like the one shown below will automatically appear.
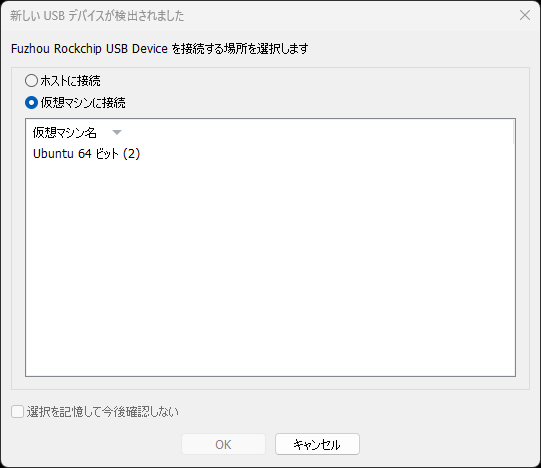
Assigning (Mounting) the ADB Device
Manual assignment (active): When the virtual machine has not started and ADB is already controlled by Windows. In this case, you need to manually mount the ADB device to the virtual machine side according to the figure below (with this method, it takes about 20 seconds until the ADB environment is ready).
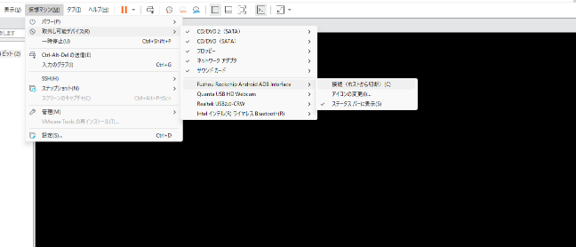
Assigning (Mounting) the ADB Device
Finally, confirm that the ADB device is correctly recognized (mounted) by the virtual machine as shown below.
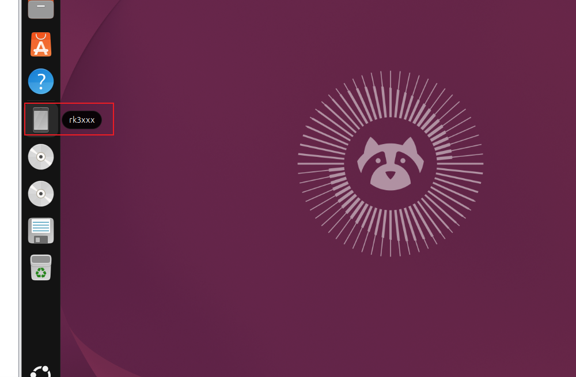
Assigning (Mounting) the ADB Device
2.1.2 Entering the Board Console via ADB
Open a terminal with the shortcut key [Ctrl + Alt + T], and enter “adb shell” in the terminal. If a screen like the one below is displayed, you have successfully logged in to the development board console environment as the root user.
adb shell
Entering the Board Console via ADB
2.1.3 Exiting the ADB Environment
Run the exit command to leave the board environment and return to the local Ubuntu environment.
exit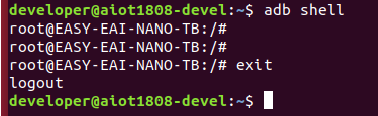
Exiting the ADB Environment
2.2 Serial Port Debugging
2.2.1 About Connection (Wiring)
EASY EAI Nano-TB supports debugging through serial communication. The related hardware interfaces are shown in the following figure.
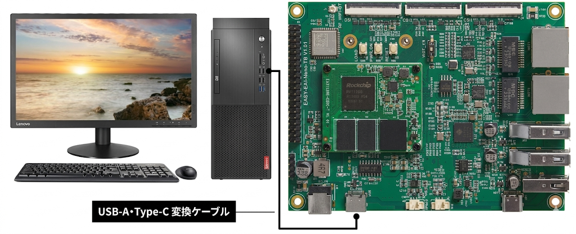
About Connection (Wiring)
When the serial port is correctly recognized by Windows, you can check the specific COM port number (for example, COM7) in Device Manager. Refer to the figure below.

About Connection (Wiring)
2.2.2 MobaXterm Usage Procedure
The following explains how to use MobaXterm to open the debug serial port (COM7). Select “Session” from the upper-left menu. Select “Serial” as the connection type, select COM7 as the serial port, and set the speed to 1.5 Mbps.
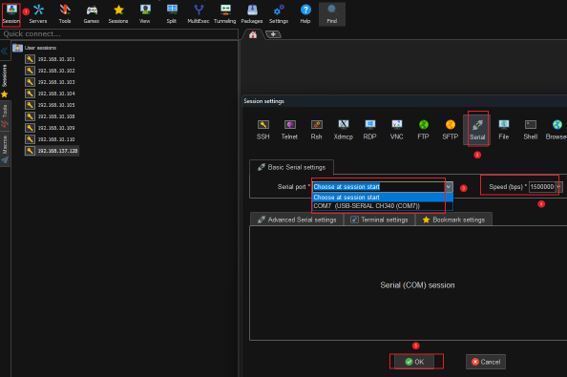
MobaXterm Usage Procedure
Click “OK” to open the serial port. Refer to the figure below.
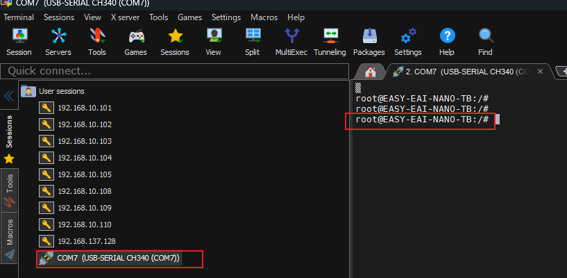
MobaXterm Usage Procedure
After opening it, all log information from the time EASY EAI Nano-TB is powered on will be displayed. Refer to the figure below.
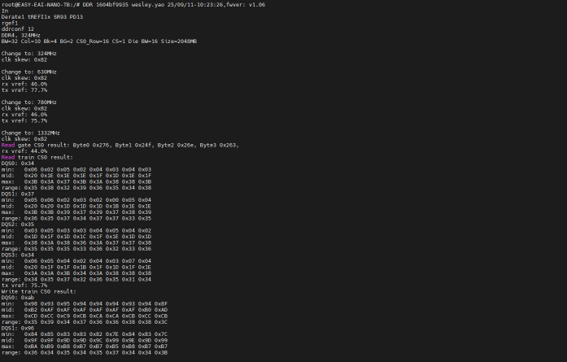
MobaXterm Usage Procedure
After the system has completely started, you can enter shell commands for debugging. It is as follows.
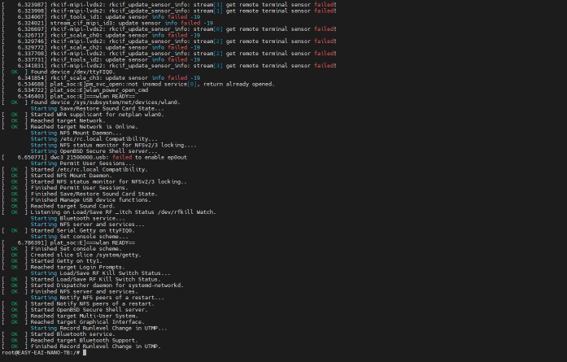
MobaXterm Usage Procedure
2.2.3 User Name and Password
EASY EAI Nano-TB user name: nano
EASY EAI Nano-TB password: 123456
2.3 SSH Debugging
2.3.1 About Connection (Wiring)
EASY EAI Nano-TB can be debugged using SSH remote desktop login tools such as MobaXterm. First, use a LAN cable to connect the gigabit Ethernet port of EASY EAI Nano-TB to a switch connected to the router LAN port, or directly to the router LAN port. Refer to the figure below.
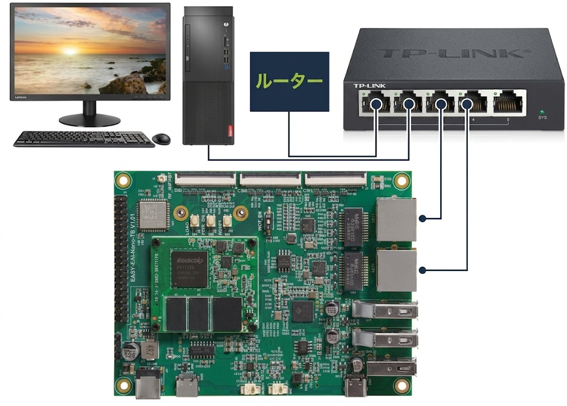
About Connection (Wiring)
Also connect the serial port.
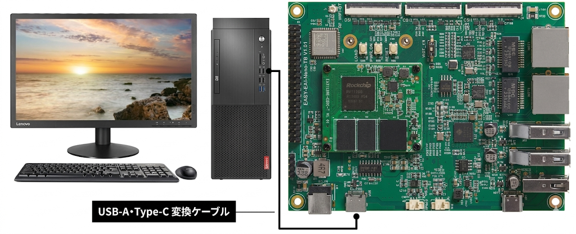
About Connection (Wiring)
Log in to EASY EAI Nano-TB through serial communication, run the ip addr command, and check the IP addresses dynamically assigned by the router to eth0 (wired LAN) and wlan0 (wireless LAN).
ip addrAs a result of the check, the assigned IP addresses are as follows.
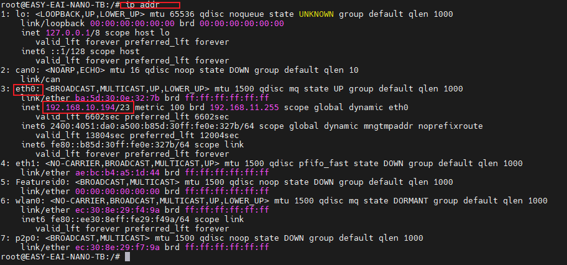
About Connection (Wiring)
[eth0] — IP address: 192.168.3.86, subnet mask (24): 255.255.255.0
[eth1] — No IP information because no LAN cable is connected
[wlan0] — No IP information because it is not connected
Use these IP addresses to ping between the PC and the board. SSH login becomes possible only after ping succeeds (communication can be confirmed).
2.3.2 MobaXterm Usage Procedure
The following explains how to use MobaXterm to establish an SSH connection.
Select “Session” from the left-side menu, and select “SSH” as the connection type. Enter the IP address of one of the board’s network interfaces (eth0 is used here as an example), and finally click “OK”. Refer to the figure below.
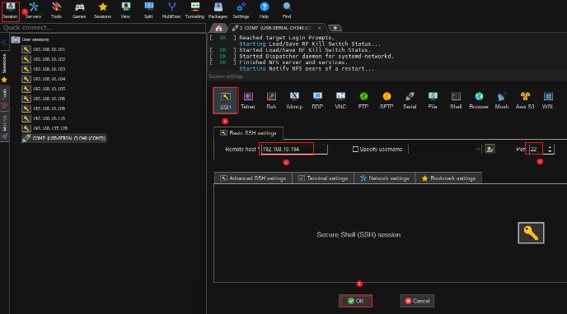
MobaXterm Usage Procedure
When connecting for the first time, the SSH client (PuTTY) generates an SSH key (host key) based on information such as the IP address of the SSH host, and stores the mapping between the SSH host and the corresponding IP address. If the IP address of the SSH host changes, or another SSH host uses a previously recorded IP address, the SSH host and IP address may no longer match and the connection may fail. In that case, you need to manually clear the saved SSH host/IP address mapping information on the client (PuTTY) side. For the specific clearing method, please look it up according to the SSH client you use.
Click “Accept” and you will be prompted to enter login information. Refer to the figure below.
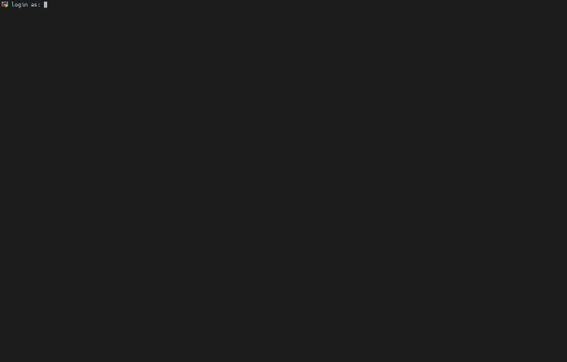
MobaXterm Usage Procedure
2.3.3 User Name and Password
EASY EAI Nano-TB user name: nano
EASY EAI Nano-TB password: 123456
3 Cross Compilation, Local Compilation, and Autostart
3.1 Cross Compilation
3.1.1 Advantages and Disadvantages
Advantages:
Because an x86-architecture CPU is used for compilation, the compilation speed is fast.
Source-code editing is easy, and various IDEs such as VS Code and Qt Creator are supported as the development environment.
Disadvantages:
The compile environment must be installed and built (deployed).
Program debugging and execution operations are slightly less intuitive than local compilation (one extra step is required).
3.1.2 Overview of the EASY-EAI Compile Environment
The EASY-EAI compile environment is a self-developed online compile environment (development board online). It establishes a mapping relationship that synchronizes in real time between the PC side and the board side, ensuring that when cross-compiling on the PC side, it can link with the dependency libraries on the development board in real time.
3.1.2.1 Installation and Deployment Method
Compared with traditional cross-compilation environments that require extracting the toolchain and setting system environment variables, the EASY-EAI compile environment is easier to deploy and can avoid various compatibility issues.
3.1.2.2 Mounting the Embedded Device (Development Board)
First, run the run.sh script to enter the EASY-EAI compile environment.
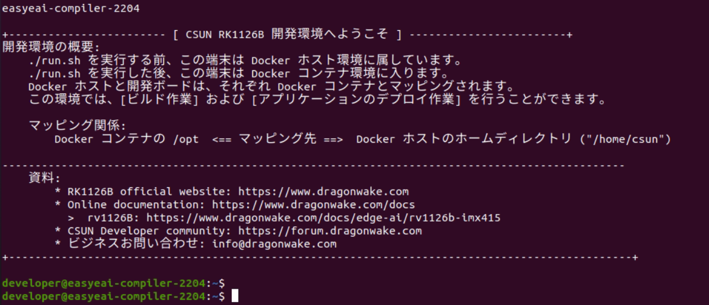
Next, use serial debugging to check the device IP address.
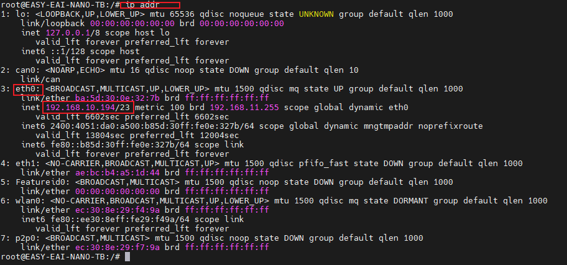
Return to the EASY-EAI compile environment and ping the development board to confirm communication. After ping succeeds, use the mount command with the IP address to mount the rootfs (root directory) of the development board to /mnt in the EASY-EAI compile environment. The command is as follows:
sudo mount -t nfs -o nolock 192.168.10.194:/ /mnt
Mounting the Embedded Device (Development Board)
If you compile an executable program inside the EASY-EAI compile environment and copy it into /mnt, it will automatically be synchronized to the rootfs (root directory) of the development board.
3.1.3 Samples of Common Compilation Methods
Link:
There are samples of four common compilation methods here.

Samples of Common Compilation Methods
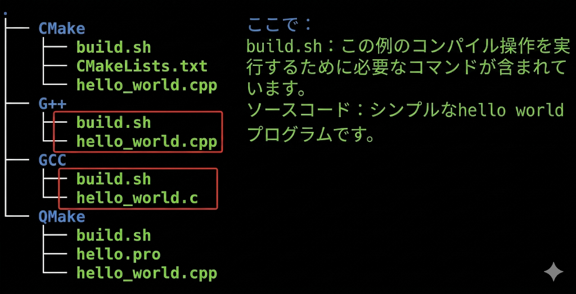
Each sample contains a build.sh script and source-code files as shown below.
Samples of Common Compilation Methods
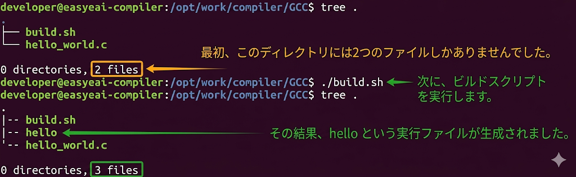
Enter any sample directory and run ./build.sh in it. A hello file will be generated.
Samples of Common Compilation Methods
Then, in the EASY-EAI compile environment, simply copy the generated file to any subdirectory under /mnt.

Samples of Common Compilation Methods
Log in to the board through serial debugging and move to the directory where you copied the hello file earlier. It is as follows:
cd /userdata/Run the ls command to check the directory, and you can see that the hello file has already been synchronized.
ls
Samples of Common Compilation Methods
Run the hello file directly to check the execution result.
./hello
Samples of Common Compilation Methods
3.1.4 Description of Common Compilation Methods
As can be seen from the mapping relationship, the /mnt directory in the EASY-EAI compile environment is the root directory of the development board itself. Because all dependency libraries of the cross-compilation tool are on the development board, you only need to specify /mnt as sysroot for the compiler.
GCC / G++:
aarch64-linux-gnu-gcc --sysroot=/mnt hello_world.c -o helloaarch64-linux-gnu-g++ --sysroot=/mnt hello_world.cpp -o helloCMAKE: You only need to add the following include statement to the CMakeList.txt file.
include ($ENV{HOME}/configs/cross.cmake)QMAKE: Because the qmake tool is installed directly on the development board, you can run qmake directly from the EASY-EAI compile environment. Example commands are as follows.
/mnt/usr/bin/qmake xxxxxx.promake3.2 Local Compilation
3.2.1 Advantages and Disadvantages
Advantages:
The development board can be used directly as a single-board computer (ultra-small PC), eliminating complicated application deployment work.
Disadvantages:
Because the rv1126B CPU is used for compilation, performance is relatively low and compilation speed is slow.
Source-code editing is difficult. Only the native vi editor can be used, and various IDEs cannot be used.
3.2.2 Usage Method
Log in to the console (background) of the development board using methods such as serial debugging or SSH, and use the development board directly as a PC with an Ubuntu system installed.
3.3 Autostart Settings
3.3.1 Overview
Four script files are involved in autostart. Specifically, they are rc.local, S99_userapp, start_app.sh, and stop_app.sh.
3.3.1.1 Script Description:
/etc/rc.local: This script is the first program called after the Linux file system starts. It sequentially calls all scripts under /etc/init.d/ in name order. (Example: A41 is called before S41, and S41 is called before S99.)
/etc/init.d/S99_userapp: This is a dedicated script for managing the startup/stop of user applications.
/userdata/start_app.sh: The startup logic of user applications is usually written here. The content can be freely modified.
/userdata/stop_app.sh: The exit logic of user applications is usually written here. The content can be freely modified.
3.3.1.2 Call Order and Relationship:

Call Order and Relationship:
3.3.2 Detailed Description:
3.3.2.1 /etc/init.d/S99_userapp
This is a startup script built into the system. You can modify it yourself as needed.
#!/bin/sh
if [ -e /userdata/apps/run.sh ];then cd /userdata/apps && ./run.shfi
3.3.2.2 /userdata/stop_app.sh
#!/bin/sh# Kill your app when shutdown system. For example:# killall facialGate3.3.3 Operation Guide:
3.3.3.1 Notes:
Usually, user programs do not exit once started, so you need to add ”&” at the end of the program execution command to run it in the background. This prevents execution of other startup scripts from being blocked (stopped).
/qSolu-facialGate &If your own dynamic libraries (shared libraries) are in user space, you can also add environment variables in the startup script.
source /etc/profileexport LD_LIBRARY_PATH=$LD_LIBRARY_PATH:/userdata/mylib/If the program to be started automatically is a Qt program and custom settings are required for Qt environment variables, you can also set additional Qt environment variables.
export QT_QPA_FB_DRM=1export QT_QPA_PLATFORM=linuxfb:rotation=0#export QT_QPA_EVDEV_TOUCHSCREEN_PARAMETERS=/dev/input/event5:rotate=180