
人体关键点识别
修订履历
| NO | 版本 | 修订内容 | 修订日期 |
|---|---|---|---|
| 1 | Ver1.0 | 新建 | 2026/06/29 |
本文档中的信息可能会因文档改进而在不事先通知的情况下变更。最新版请参阅本公司网站。
未经株式会社日昇科技书面许可,严禁以任何形式复制本文档。
1. 人体关键点识别概要
人体关键点识别是一种基于深度学习进行人体位置检测和姿态估计的模型。该模型广泛应用于体育分析、动物行为监测、机器人等领域,用于帮助机器实时理解物理动作。本算法执行效率高,实时性良好。
本算法在数据集上的性能如下:
| 人体关键点识别算法 | mAP pose@0.5 |
| Person Pose-S | 86.3 |
| Person Pose-M | 89.3 |
在 CSUN RV1126B 基板上的运行效率如下:
| 算法类型 | 运行效率 |
| Person Pose-S | 59ms |
| Person Pose-M | 108ms |
17 个人体关键点索引定义:
| 索引 | 定义 |
| 0 | 鼻子 |
| 1 | 左眼 |
| 2 | 右眼 |
| 3 | 左耳 |
| 4 | 右耳 |
| 5 | 左肩 |
| 6 | 右肩 |
| 7 | 左肘 |
| 8 | 右肘 |
| 9 | 左手腕 |
| 10 | 右手腕 |
| 11 | 左髋关节 |
| 12 | 右髋关节 |
| 13 | 左膝 |
| 14 | 右膝 |
| 15 | 左脚踝 |
| 16 | 右脚踝 |
2. 快速开始
2.1 开发环境准备
如果您是首次阅读本文档,请参考《入门指南/开发编译环境的准备与更新》,并按照相关步骤部署编译环境。
在 PC 端 Ubuntu 系统中执行 run 脚本,进入 Docker 开发环境。步骤如下:
cd ~/linuxshare/work/rv1126b/jp/embedded/images/develop_environment./run.sh 2204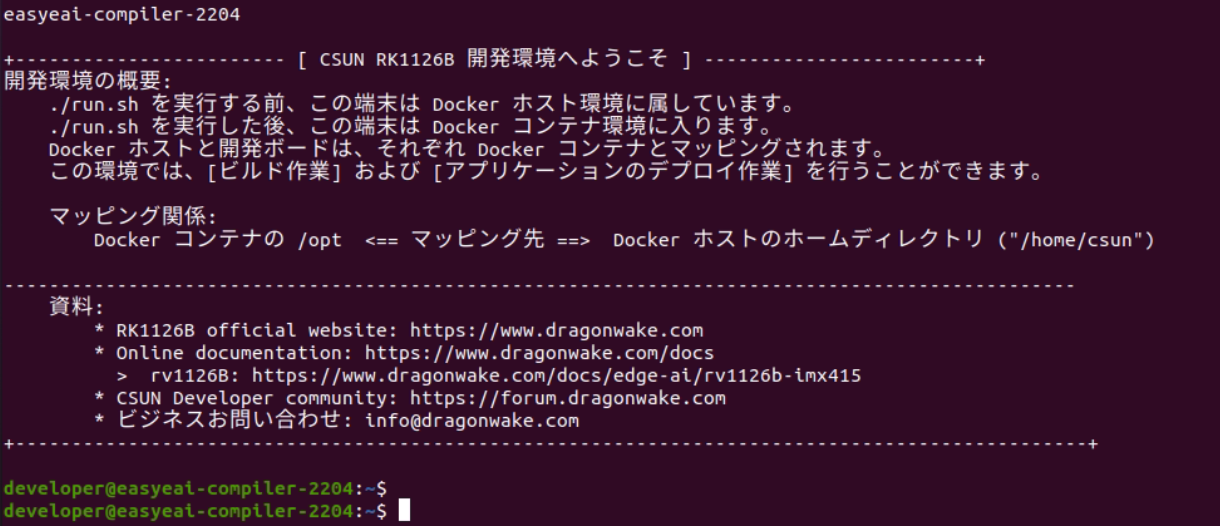
图2-1 Docker 开发环境启动
2.2 源代码下载
在 Docker 开发环境中,创建用于保存源代码仓库的管理目录。
cd /opt/linuxshare/work/rv1126b/jp/AI/demo/ai-algorithm使用 git 工具,在管理目录中克隆远程仓库。
git clone https://github.com/csunltd/rv1126b-ai-toolkit.git※ 即使从 GitHub 网页下载,也请下载整个仓库。请不要只单独下载与本示例对应的目录。
※ 如果已经下载完成,可以跳过此步骤。
2.3 模型部署
要运行算法 Demo,首先需要下载人体关键点识别算法模型。
下载链接:
https://dl.dragonwake.com/download/rv1126b/AI/demo/10_person_pose.zip
之后,请将下载的人体关键点识别算法模型复制到 Release/ 目录。
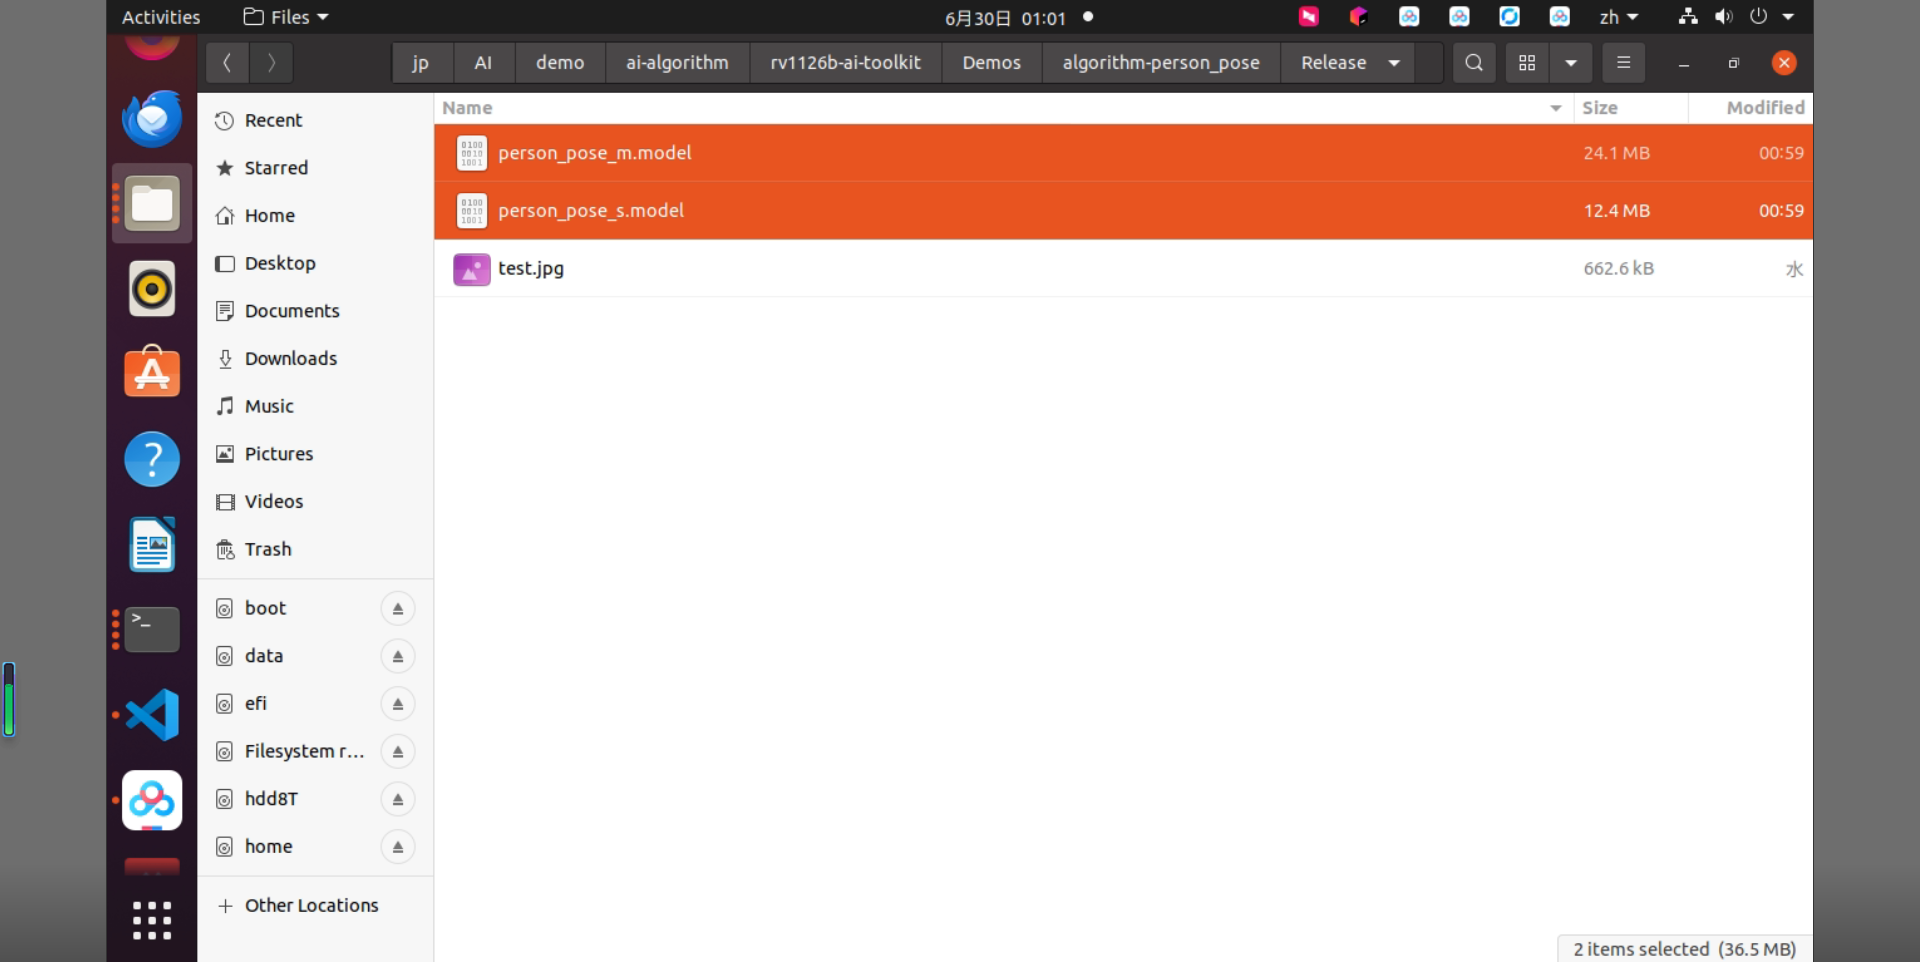
图2-2 Release 目录内的文件配置
2.4 示例构建
进入示例所在目录并执行构建。具体命令如下:
cd rv1126b-ai-toolkit/Demos/algorithm-person_pose/./build.sh cpres* 依赖库已配置在开发板上,因此交叉编译过程中需要保持 /mnt 挂载。
sudo mount -t nfs -o vers=3,proto=tcp,mountproto=tcp,nolock,retrans=5,timeo=5 192.168.10.85:/ /mnt* 为 build.sh 脚本指定 cpres 参数后,Release/ 目录内的所有资源都会被复制到开发板。
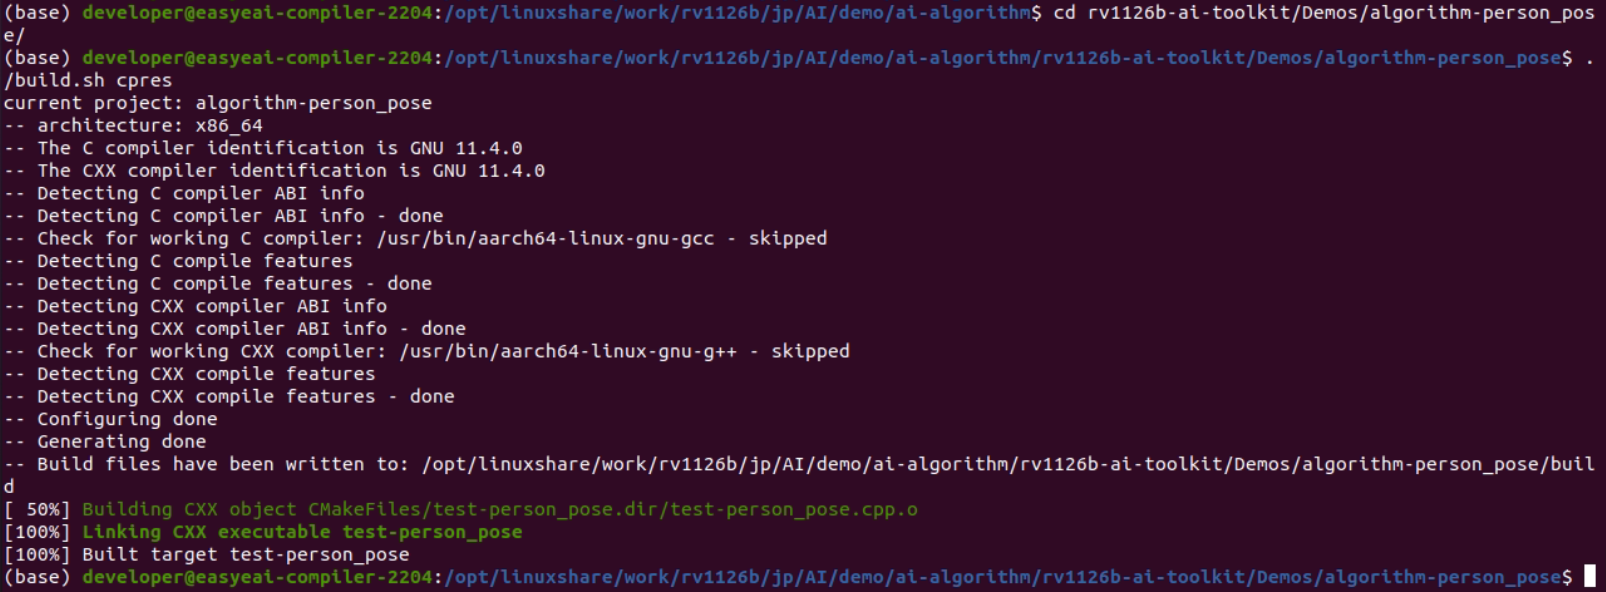
图2-3 示例构建结果
2.5 示例运行及结果
将已编译的文件复制到基板。
cp Release/\* /mnt/userdata/Demo/algorithm-person_pose/※ 如果使用 ./build.sh cpres 编译,会自动复制。
通过串口调试或 SSH 调试进入开发板后台,并按如下方式移动到示例部署目录。
cd /userdata/Demo/algorithm-person_pose/执行示例的命令如下:
./test-person_pose person_pose_m.model test.jpg
图2-4 示例运行结果
在 Docker 开发环境中,将测试结果图片从基板复制出来。
cp /mnt/userdata/Demo/algorithm-person_pose/result.jpg .
图2-5 结果图像复制命令
识别结果如下图所示。
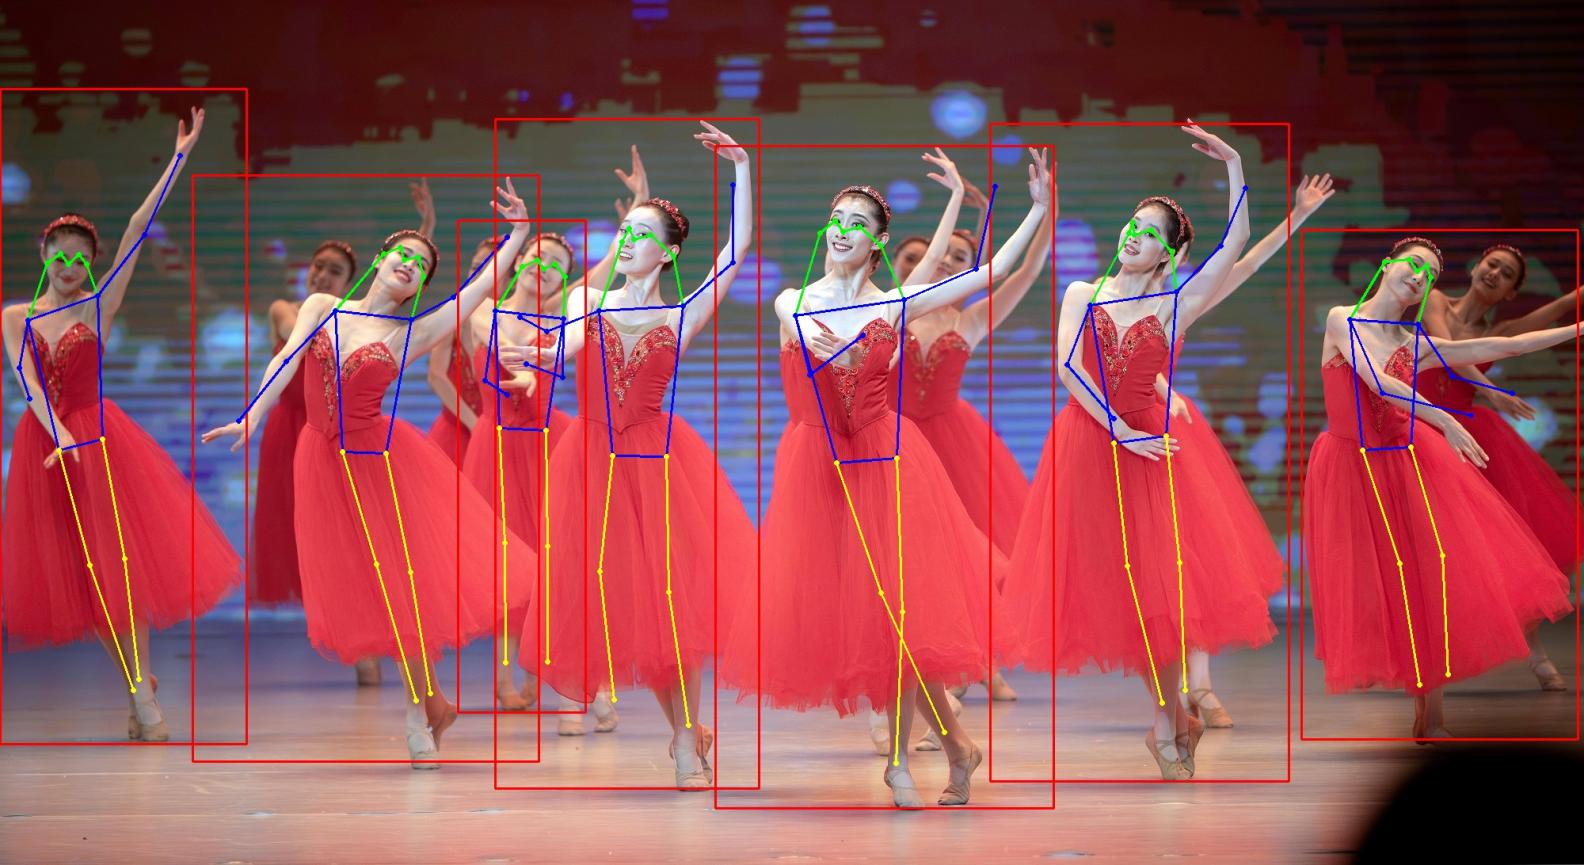
图2-6 人体关键点识别结果图像
关于 API 的详细说明以及 API 调用方式(本示例的源代码),请参见以下内容。
3. 人体关键点识别API 说明
3.1 引用方法
为了使客户能够从本地项目中直接调用 EASY EAI API 库,本项目需要链接的库、头文件等如下所示。用户可以直接添加。
| 项目 | 说明 |
| 头文件目录 | easyeai-api/algorithm/person_pose |
| 库文件目录 | easyeai-api/algorithm/person_pose |
| 库链接参数 | -lperson_pose |
3.2 人体关键点识别初始化函数
人体关键点识别初始化函数原型如下。
int person_pose_init(const char \*c, person_pose_context_t \*p_person_pose, int cls_num)详细说明如下。
| 函数名: person_pose_init() | |
| 头文件 | person_pose.h |
| 输入参数 | p_model_path:算法模型路径 |
| 输入参数 | p_person_pose:算法句柄 |
| 输入参数 | cls_num:类别数 |
| 返回值 | 成功时返回值:0 |
| 失败时返回值:-1 | |
| 注意事项 | 无 |
3.3 人体关键点识别执行函数
人体关键点识别执行函数 person_pose_run 原型如下。
std::vector\<person_pose_result_t\> person_pose_run(cv::Mat image, person_pose_context_t \*p_person_pose, float nms_threshold, float conf_threshold);详细说明如下。
| 函数名:person_pose_run() | |
| 头文件 | person_pose.h |
| 输入参数 | image:图像数据输入(cv::Mat 为 OpenCV 类型) |
| 输入参数 | p_person_pose:算法句柄 |
| 输入参数 | nms_threshold:NMS阈值 |
| 输入参数 | conf_threshold:信頼度阈值 |
| 返回值 | std::vector<person_pose_result_t>:person pose检测结果 |
| 注意事项 | 无 |
3.4 人体关键点识别释放函数
人体关键点识别释放函数原型如下。
int person_pose_release(person_pose_context_t\* p_person_pose)详细说明如下。
| 函数名:person_pose_release() | |
| 头文件 | person_pose.h |
| 输入参数 | p_person_pose:算法句柄 |
| 返回值 | 成功时返回值:0 |
| 失败时返回值:-1 | |
| 注意事项 | 无 |
4. 人体关键点识别示例
示例目录为 Demos/algorithm-person_pose/test-person_pose.cpp,操作流程如下。
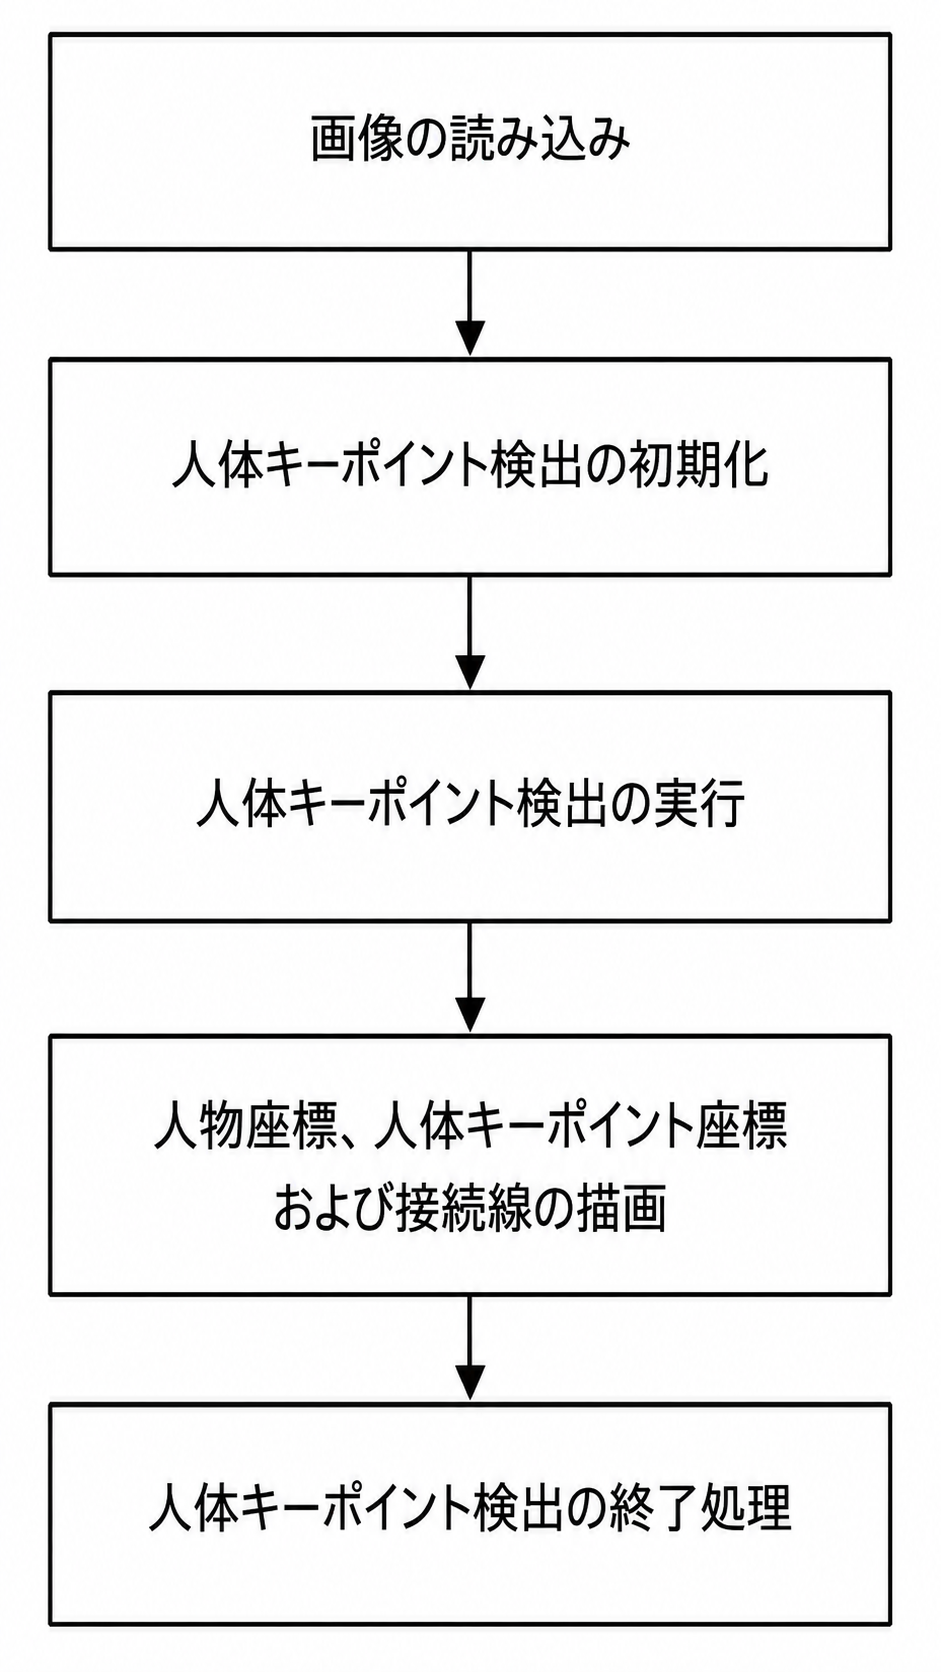
图4-1 人体关键点识别算法处理流程
参考示例如下。
#include <stdint.h>#include <stdio.h>#include <stdlib.h>#include <string.h>
#include "person_pose.h"#include <opencv2/opencv.hpp>

// 線を描画しますcv::Mat draw_line(cv::Mat image, float *key1, float *key2, cv::Scalar color){  if (key1[2] > 0.1 && key2[2] > 0.1) {    cv::Point pt1(key1[0], key1[1]);    cv::Point pt2(key2[0], key2[1]);    cv::circle(image, pt1, 2, color, 2);    cv::circle(image, pt2, 2, color, 2);    cv::line(image, pt1, pt2, color, 2);  }
  return image;}

// 結果を描画します:// 0 鼻、1 左目、2 右目、3 左耳、4 右耳、5 左肩、6 右肩、7 左肘、8 右肘、9 左手首、10 右手首、11 左股関節、12 右股関節、13 左膝、14 右膝、15 左足首、16 右足首cv::Mat draw_image(cv::Mat image, std::vector<person_pose_result_t> results){  long unsigned int i =0;  for (i = 0; i < results.size(); i++) {    // 顔部分を描画します    image = draw_line(image, results[i].keypoints[0], results[i].keypoints[1], CV_RGB(0, 255, 0));    image = draw_line(image, results[i].keypoints[0], results[i].keypoints[2], CV_RGB(0, 255, 0));    image = draw_line(image, results[i].keypoints[1], results[i].keypoints[3], CV_RGB(0, 255, 0));    image = draw_line(image, results[i].keypoints[2], results[i].keypoints[4], CV_RGB(0, 255, 0));    image = draw_line(image, results[i].keypoints[3], results[i].keypoints[5], CV_RGB(0, 255, 0));    image = draw_line(image, results[i].keypoints[4], results[i].keypoints[6], CV_RGB(0, 255, 0));
    // 上半身を描画します    image = draw_line(image, results[i].keypoints[5], results[i].keypoints[6], CV_RGB(0, 0, 255));    image = draw_line(image, results[i].keypoints[5], results[i].keypoints[7], CV_RGB(0, 0, 255));    image = draw_line(image, results[i].keypoints[7], results[i].keypoints[9], CV_RGB(0, 0, 255));    image = draw_line(image, results[i].keypoints[6], results[i].keypoints[8], CV_RGB(0, 0, 255));    image = draw_line(image, results[i].keypoints[8], results[i].keypoints[10], CV_RGB(0, 0, 255));    image = draw_line(image, results[i].keypoints[5], results[i].keypoints[11], CV_RGB(0, 0, 255));    image = draw_line(image, results[i].keypoints[6], results[i].keypoints[12], CV_RGB(0, 0, 255));    image = draw_line(image, results[i].keypoints[11], results[i].keypoints[12], CV_RGB(0, 0, 255));
    // 下半身を描画します    image = draw_line(image, results[i].keypoints[11], results[i].keypoints[13], CV_RGB(255, 255, 0));    image = draw_line(image, results[i].keypoints[13], results[i].keypoints[15], CV_RGB(255, 255, 0));    image = draw_line(image, results[i].keypoints[12], results[i].keypoints[14], CV_RGB(255, 255, 0));    image = draw_line(image, results[i].keypoints[14], results[i].keypoints[16], CV_RGB(255, 255, 0));
    cv::Rect rect(results[i].left, results[i].top, (results[i].right - results[i].left), (results[i].bottom - results[i].top));    cv::rectangle(image, rect, CV_RGB(255, 0, 0), 2);  }
  return image;}
/// メイン関数int main(int argc, char **argv){    if (argc != 3) {        printf("%s <model_path> <image_path>\n", argv[0]);        return -1;    }

    const char *p_model_path = argv[1];    const char *p_img_path = argv[2];  printf("Model path = %s, image path = %s\n\n", p_model_path, p_img_path);  cv::Mat image = cv::imread(p_img_path);
  printf("Image size = (%d, %d)\n", image.rows, image.cols);    int ret;  person_pose_context_t yolo11_pose;    memset(&yolo11_pose, 0, sizeof(yolo11_pose));
  person_pose_init(p_model_path, &yolo11_pose, 1);

  double start_time = static_cast<double>(cv::getTickCount());  std::vector<person_pose_result_t> results = person_pose_run(image, &yolo11_pose, 0.35, 0.35);
  double end_time = static_cast<double>(cv::getTickCount());  double time_elapsed = (end_time - start_time) / cv::getTickFrequency() * 1000;  std::cout << "person pose run time: " << time_elapsed << " ms" << std::endl;
  // 結果を描画します  image = draw_image(image, results);
  cv::imwrite("result.jpg", image);  printf("Detect size = %ld\n", results.size());
    ret = person_pose_release(&yolo11_pose);
    return ret;}